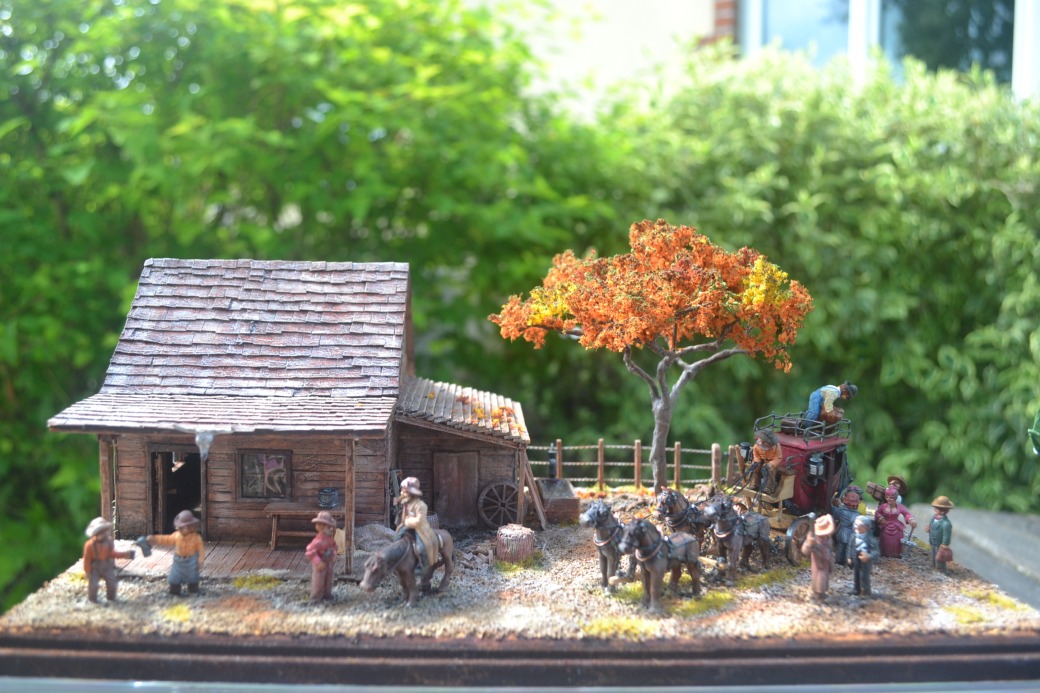
Few images of the Old West more classical than a Wells Fargo Overland Stagecoach and Dixon Miniatures produce a fantastic kit. Having constructed one of these kits for my brother’s birthday some while ago I always had it in mind to build another for myself, it was always just a matter of time.
I decided the stagecoach would feature in a diorama and chose to depict a Way Station where passengers leave and join the stage and where drivers and horses rest up a while. Space as ever was a constraint but I wanted this to be a diorama of firsts, reflecting if you will my growing confidence at scratch building.
I had never built a wire tree before, made a wire fence, constructed my own internal furniture or completely constructed my own building with a removable roof but that was about to change!
Following a video guide I found on YouTube the first thing I built was the wire tree. I wont go into further detail on this because I covered the process in two recent blog posts. YouTube was also the provider for how to make a wire fence. The fence posts themselves were match sticks each drilled with three holes. The wire was real wire 0.5mm thick. A length of about 12 inches/30cm was folded back on itself and then the two separate ends were clamped together tightly (a vice is good for this). I used a nail placed at the looped end to pull the wire tight and then twisted and twisted and twisted … you get the idea … and twisted until the wire became taught. Simple but very effective. The wire was then threaded through the holes on the fence posts.
Anyone who has followed my earlier posts may recognise that the building looks pretty similar to those produced by Sarissa Precision which I have used in the past. There is a reason for this. When you by one of their kits they come in a couple of MDF sheets (more for bigger buildings) of about A4 size. Each sheet has the various parts which make up the building which once pressed out leaves the complete outline of that part which can then be used as a perfect template for creating your own scratch building. In my opinion Sarrisa Precision make quality products at reasonable prices, their range has grown and grown too. If you think you might use one of their designs more than once, or there is a design that you could easily modify, then buying one and keeping the empty sheets for future builds is a cheap option.
So back to the building. Using the template of a previously purchased building I set about constructing the various parts using my now tried and tested method of foam board, coffee stirrers, cardboard, match sticks (extra long matches for the veranda posts) and PVA glue. The lean-to on the side of the building was my own design addition.
For this building I planned for the roof to be removed in order to look inside. With this in mind it was necessary to clad the inside of the building with coffee stirrers too and to make frames to cover the “glazed” windows and add wooden shutters as well. The window shutters and the door were given “Z” frames for appearance and practical build reasons. The door handle was made by drilling a whole in the door and inserting a small piece of a cocktail stick.
All of the furniture was scratch built. The bed was made using a combination of match sticks and coffee stirrers (as was the wooden log box) and a dried out wet wipe dipped in diluted PVA was used to make and mould into shape the bed pillow and blanket. The table, chair and dresser were all made of various combinations of match sticks, coffee stirrers, cocktail sticks and other bits I found lying around.
The wood stove was my favourite build. It was made using a piece of round wooden dowel with a round metal washer as the base. Two metal washers, one larger than the other, were stuck together to make the top of the stove along with a small piece of rounded card to close the washer whole. Another small piece of card was used to create some relief on the dowel to make a door and a pin head was used to make the door handle. A wooden BBQ skewer was used to create the stove-pipe and a piece of tubular plastic taken from one of the protective covers which comes with good brushes was used to create the joint. It was then all undercoated before being painted black and weathered.
The coat hooks were made using the ends of cocktail sticks, the hat was taken from an unwanted figure and the rope was made from some thin string. The broom was made from a thinned match stick and the hair of an old brush.
Outside, the barrels were some spares I had in my “bit box” and the log pile was simply made from various left overs made smaller with a modelling knife. If like my brother you are wondering why there aren’t any tools lying about then I will give you the answer I gave him, “they’re all neatly inside the lean-to!”. The water trough was made of coffee stirrers, filled with Woodland Scenics Realistic Water and the pump was made from wooden skewers with a paper clip handle.
The figures are all once again from Dixon Miniatures with no alterations made. The stagecoach does not come with chains and harnessing so this was all made from scratch. The chain was purchased from Hobby Craft and cut to length. At each end a pin shortened in length was attached and a hole drilled in each horse to accommodate it when stuck together.
Assembly required a lot of thought. With so many pieces it would have been easy to box myself in and have very little room, if any, to access and paint as required. fortunately I got there in the end!
Images of the completed diorama appear below.
TIM


Wow man. Love all the details. The tree looks great. Really fantastic work here man. Well done.
LikeLiked by 1 person
Glad you like it and as always appreciate the feedback.
LikeLike
This is awesome. I want to see dozens of other pictures of close ups on every little detail. Everything looks great. Really like all of the furnishings in the building. Clever way to make the stove.
For the building is that foam board with wood planks over top?
LikeLiked by 1 person
Glad you like it and appreciate the feedback. For the main building I used thin mdf clad front and back. The lean to was made of foam board clad on the outside only. If you want more details on how I made other bits let me know and I will happily try to explain in gteater detail.
LikeLike
That is absolutely amazing! I love how the roof of the cabin comes off to reveal the whole world with. Incredible!
LikeLike
Appreciate the feedback Luke and glad you like it.
LikeLiked by 1 person
I was struck by how realistic the wood was on the outside of the building and then we got to see you did the interior as well! I was wondering if I might use a picture from this post for my next painting challenge?
LikeLiked by 1 person
Help yourself to any pictures Ann. I am of course now intreagued to learn whatever you have up your sleeve for a challenge! 😊
LikeLiked by 1 person
Thank you very much. I’m proofing the next challenge post now so I can put it up before hubby and I go for our Socially Distant Hike ™. 🙂
Then tomorrow I’m going to start working on the round-up for April. From all of the pingback’s I saw it is going to be a huge post, lol.
LikeLiked by 1 person
Enjoy your hike. At least the round-up will keep you busy! I think I can safely say everyone appreciates the challenges and the work you put in, I certainly do. 😊
LikeLiked by 1 person
Thank you very much, I certainly appreciate you included the lovely art you produce, that’s for sure. So far the challenges are proving to be a lot of fun. 🙂
LikeLiked by 1 person
Well I didn’t have to wait long to learn what you had in mind. Sounds fun, just need to sort something out now! 😊
LikeLiked by 1 person
Hehe, yup, I wanted to get the next challenge out as soon as I could.
Great, looking forward to seeing what kind of project you come up with.
LikeLiked by 1 person