

An early entry for the April challenge under the banner of “build or assemble something”. This was not my planned entry, details of which will follow later in the month, this one was an accident. Let me explain.
For quite a while now I have wanted to attempt a plastic kit. I reckon it must have been the best part of 45 years ago when I last did one. Why? Because I loved the look of some them all those years ago, as indeed I do to-day, but I simply don’t enjoy making them. My willingness to have another go was fuelled by my desire to try to encourage my model club who are well into such kits to base them, even simply as is the case with this one. The passage of time also helped, it couldn’t have been that bad all those years ago could it? Alas it was and readers of earlier posts will be aware that this little project was in danger of going tits up and being abandoned altogether. Then the April challenge got me refocused on getting it done. I figured if I was going to do it then I might as well kill two birds with one stone.
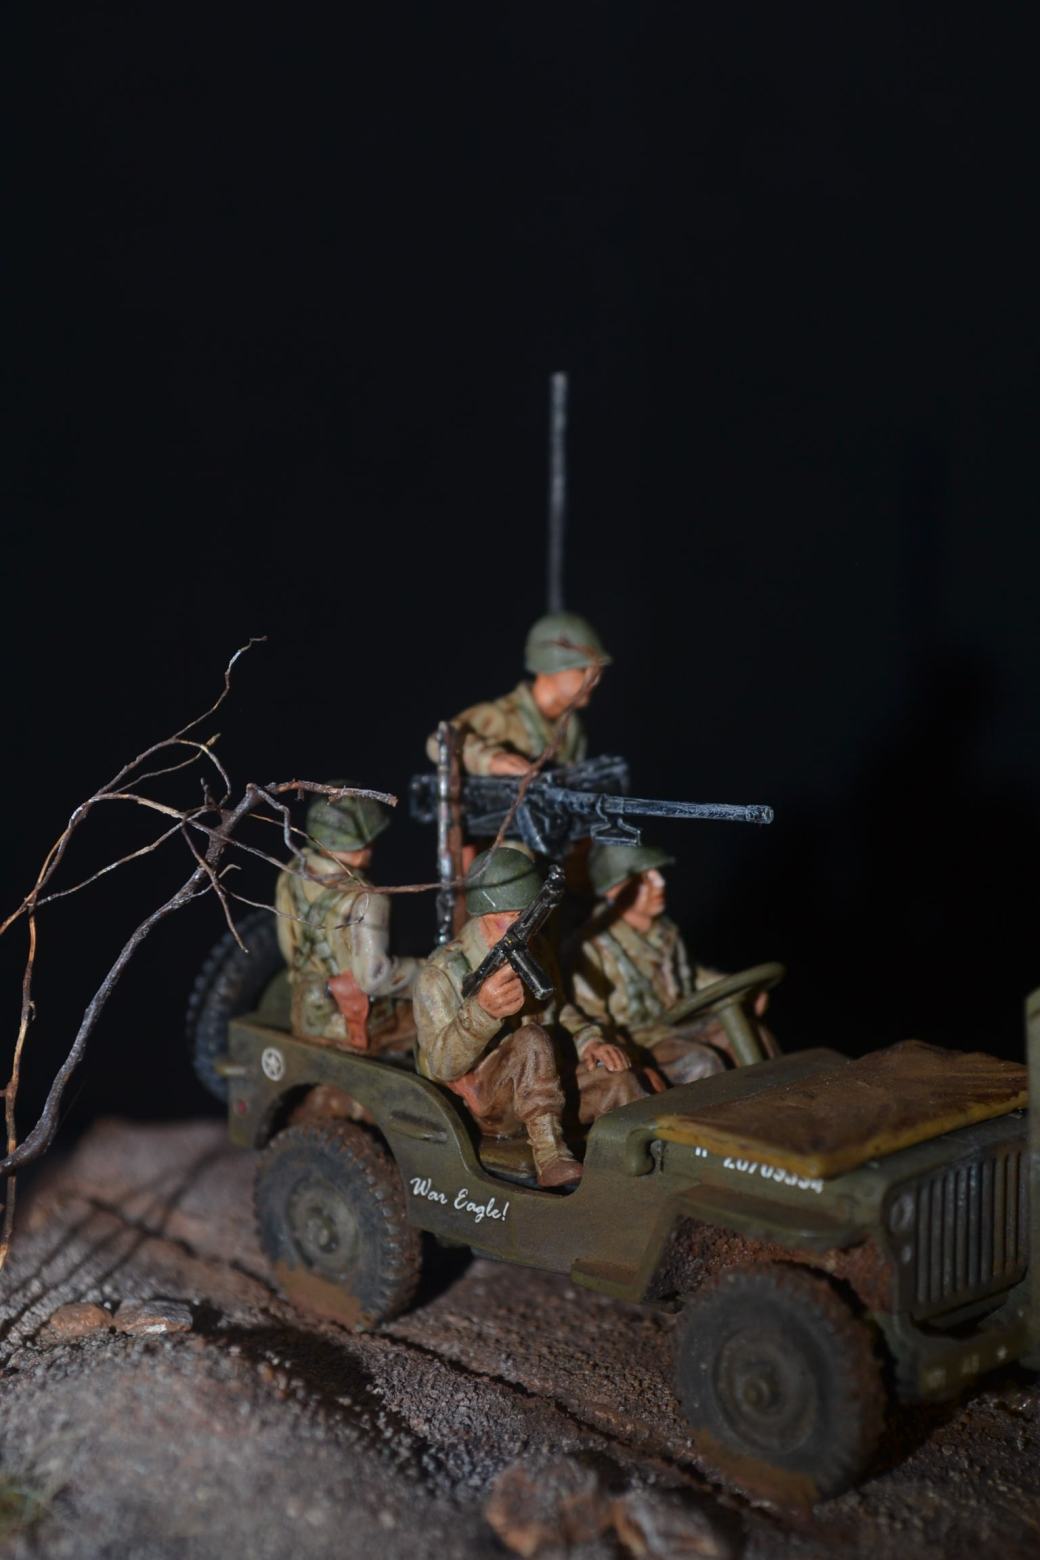
Pictures of the completed piece appear below and the eagle-eyed amongst you might notice that there are no “in progress images”. There is a reason for this.
As I have mentioned previously I am not a vehicle kit person chiefly because me and glue simply do not see eye to eye. I was dreading the build rather than looking forward to the challenge that lay ahead. Nevertheless I was determined to complete the exercise come hell or high water but had no desire to record this momentous step by taking progress photos of deformed plastic covered in blobs of glue.
So how did it go? Better than I thought but not great. Were my worst fears justified? Not the worst ones but the ones just below the worst ones.
The first issue I had was shortly after I opened the box and started to assemble the kit. It turns out this Rubicon kit can be assembled into one of four configurations. Being a man I don’t tend to read instructions so this point initially passed me by. However, I got lucky. I wanted to build the US version and without realising it this is the one I had started on when I discovered all the additional parts that I couldn’t work out what to do with. Score – 1.
After eventually reading the instructions, assembly to be fair was pretty straight forward and the fit of parts were good, not that I have much previous experience on which to judge this. I even managed to think to paint areas before assembly and to add things like mud to the wheel arches before fixing the wheels themselves in place. Score + 1.
Unfortunately some things hadn’t changed, I’m still heavy-handed with glue. As light a touch as I might have with a brush the complete opposite is true with glue. Alas trying to apply super glue with a modelling brush which would be the ideal solution for me is simply a way of ruining a brush. So, crucially glue everywhere, Score – 10!
I had hoped the figures would be my saving grace and although they were OK the faces left a lot to be desired. I’ve been lucky of late in that a lot of the miniatures I have been working on have been superbly sculpted and the expressions on the faces have been simply awesome. As a consequence I have been able to get away with my painting skills. Unfortunately the faces of these figures were plain, very flat and featureless and although I felt I made the most of them the end result still left a lot to be desired. Score + 1.
Final assembly of the kit including the figures went together better than I had hoped but for one error. I’m not sure if the error is with the kit or with my assembly. Having googled some images of completed kits done by others I think I can be certain the error is mine but quite where I went wrong I’m not sure. The error in question is with the rear sitting down soldier and the way he is holding his rifle. He’s holding it far to low down and although I was aware of this at the time I simply couldn’t get it higher and get the figure sitting in the back of the jeep. Still that’s why I’m The Imperfect Modeller! Score – 1.
On to something positive, the base work. Now there is nothing much to the base, it’s all pretty basic and that was the intention, to keep it simple as a demonstration piece for presentation at the club. However, if there is one thing I have learnt, albeit with room for improvement, it is how when creating dioramas and vignette bases to cover up errors! With a considerable effort I pretty much managed to conceal excess glue thanks to some weathering, decals, ground work and opting to lay the windscreen flat to the point where the overall model just about looks OK. Score 10 – not entirely merited but brings the overall score to 0 which feels just about right.
In summary, did I enjoy the experience? No. Will I venture into a kit build again in the future? Only if the wife is present to tell me to read the bloody instructions or if I can learn how to better apply glue!
Conclusion? Never say never but if I did embark on another kit then I would only do so if I was drunk!
TIM


Congrats on completing your challenge so early! That jeep looks great. It’s a 28mm plastic kit?? I don’t know that I’ve seen one of those in person. Nice job all around!
LikeLiked by 1 person
Yes it’s a plastic kit by Rubicon, not a company I know much about. Based on my very limited knowledge and some feedback that I read I would say it was a nice little kit. I was attracted to it more for the guy standing up but in reality I thought the figures, particularly the faces were very poor. With hindsight I wish I’d bought the metal kit by Empress which has fantastic looking figures. Never know, maybe I will at some point.
As for finishing early I got lucky. Started this before knowing the subject of the April challenge and just got fortunate that the two went together. My other little project that I am working on is the “real” one for April but I’m not there with it yet.
LikeLiked by 2 people
It’s a shame you didn’t really enjoy making it – because it looks fantastic 🙂
LikeLiked by 1 person
Thanks Luke. Now that it’s done it doesn’t feel like it was quite that bad but at times I could have walked away from it. Perhaps I should have done but if I did I don’t think I would have come back to finish it!
LikeLike
It looks great to me. I can’t see any obvious flaws. But here’s the thing – unless you’re on a forum or some such where people love to pick holes in each others’ stuff, we’re often our own worst or harshest critics. Not to make this about me – but go read this post and tell me if the thing that bothers me bothers you as well.
https://azazelx.com/2015/03/16/axemen-of-lossarnach/
I’d also like to encourage (recommend? Instruct? DEMAND?) you to do another plastic kit – indeed – the sooner the better. Specifically, something that’s less fiddly with the building and much more about the painting. Find a tank kit from Warlord, and dio it up with a couple of external tankers or some infantry milling about. You got me thinking about my own Warlord tanks just now, so I’ve just stopped writing thsi comment, found the post, repaired it and reblogged it. Those tanks are easy as pie to build, even for someone like me who is not what I’d call a modeller. Get one of those happening in a diorama and break (the spine of) that anti-plastic vehicle kit mentality (over your knee, like Bane to Batman!).
😀
LikeLiked by 2 people
OK, OK, OK – I’ll consider doing another one at some point. Lot in the queue at the moment (plus I’ve now had a couple of nice ideas too) and I’ll need to see what’s out there. Will need to be small enough for a brush job like this was, I don’t do airbrushing.
Checked your post and yes it would bother me as the painter but unless you are an anal viewer then chances are it wouldn’t be noticed. That’s not the point though, it’s about the standards you set yourself and yours are high. Did you go back and change it?
LikeLiked by 1 person
In the end, I didn’t. The line is smaller than it seems in photos, and as such the difference is much smaller in real life. It’s also a 3rd-rank model, so it’ll rarely if ever be seen. More importantly, I’d have to repaint and reshade the white of the cloth, which is much harder than repainting red. It’s an imperfection (see what I did there?), but overall it isn’t going to be noticed in a meaningful way – and as such, I decided that my time was better invested elsewhere over fixing up a minute detail like that. Because that’s what it all comes down to in the end – how much time something is worth against another thing.
LikeLiked by 1 person
Can’t say I blame you. A stand alone figure is one thing but nobody is going to see it in the third rank are they. In any event I can’t imagine anyone spotting things like that if you don’t point it out in the first place. I think it’s the pursuit of perfection thing. For all the models I’ve done and the nice comments I sometimes receive the truth is I’ve never done anything I’ve been truly 100% happy with and I doubt I ever will. Won’t stop me trying though!
LikeLiked by 1 person
Exactly. We notice our own flaws. The only reason I brought up my Axemen was to compare it to your comments about the rifleman in the Jeep. What they say about canvas painting is just as true for the stuff that you and I do. A piece of art is never truly “finished”. It’s just knowing when to stop working on it.
Thus perfection is impossible, even for perfectionists. 😉
LikeLiked by 1 person
Here I was thinking you were25. Looks great mate. I’m not a huge fan of putting big kits together but I always like the finished result. You should be well chuffed with your finished result. Bravo
LikeLiked by 1 person
Haha 25! I wish, mentally perhaps. I’m an old dad which keeps me young. Glad I’m not alone on the kit front.
LikeLike
Heh ! this is are a really great job cobber ,I tried a couple of kits late 2017 and as yourself just ended up gluing myself to the kit ,and as for painting you don’t won’t to know ,as yourself glue hates me especially super glue ,it always works really well one my fingers but never on the figure’s . My father purchased a army surplus We Willy jeep so he could use it on the farm we lived on in NSW and my young friend the mud in the guards is so realistic , another pat on the back mate . Azael has pinged it the above comment in regards to critics . Good news ! Tech adviser has seen me in the shed pumping out lots off trees ,so impressed was she with the style and result mate , that she is going to go the extra mile and maybe get some photos up of the many trees I have experimented with for you to see . ( fingers crossed ) .
LikeLiked by 2 people
Nice to know I’m not the only one who has trouble with glue! A real Willy jeep, that must have been fun. Such an iconic vehicle. I think I’m warming to Tech Adviser! Looking forward to seeing those trees, I just know there is going to be some learning tips in there for me. Love this community. You bounce something out there and it comes back at you, brilliant!
LikeLike
That looks great- if you hadn’t have said I’d have never guessed that you had trouble or didn’t enjoy making it.
Cheers,
Pete.
LikeLiked by 1 person
Cheers Pete. I guess we all have our preferences but kit making isn’t one of mine. To be fare I love the look of them and admire what others do but but overall I think I’ll stick with figures.
LikeLiked by 1 person
I think it looks great! Of course, if you had needed a Plan B, you’d tell us this is the work in progress shot and the next stage would be to put the snow on, so it complements your US troops in winter! I really like it – sometimes it can be difficult to give jeeps character, but this one has it!
LikeLiked by 1 person
If I had that as a plan B then I would have definitely made it my plan A. Great idea. If I ever do another kit I’m going down the winter route!
LikeLiked by 1 person
Excelent work!
LikeLiked by 1 person
Many thanks, glad you liked it.
LikeLike