

This week I started on another Reaper Chronoscope Steampunk figure, Rowena Von Graaf. You will have to wait until next week to see her painted as my time thus far has been spent working on the base. I have downloaded an online unpainted image of her so you can at least see what the figure looks like.

As I say this week has been spent working on the base. I decided I wanted to create a small wall, a pillar and some railings. I also wanted to add a lamp to the top of the pillar. First up was the need to make an “L” shape using a couple of pieces of plaster board. This stuff is so versatile and easy to cut and use.

Once dried the next step was to clad the “L” in bricks.
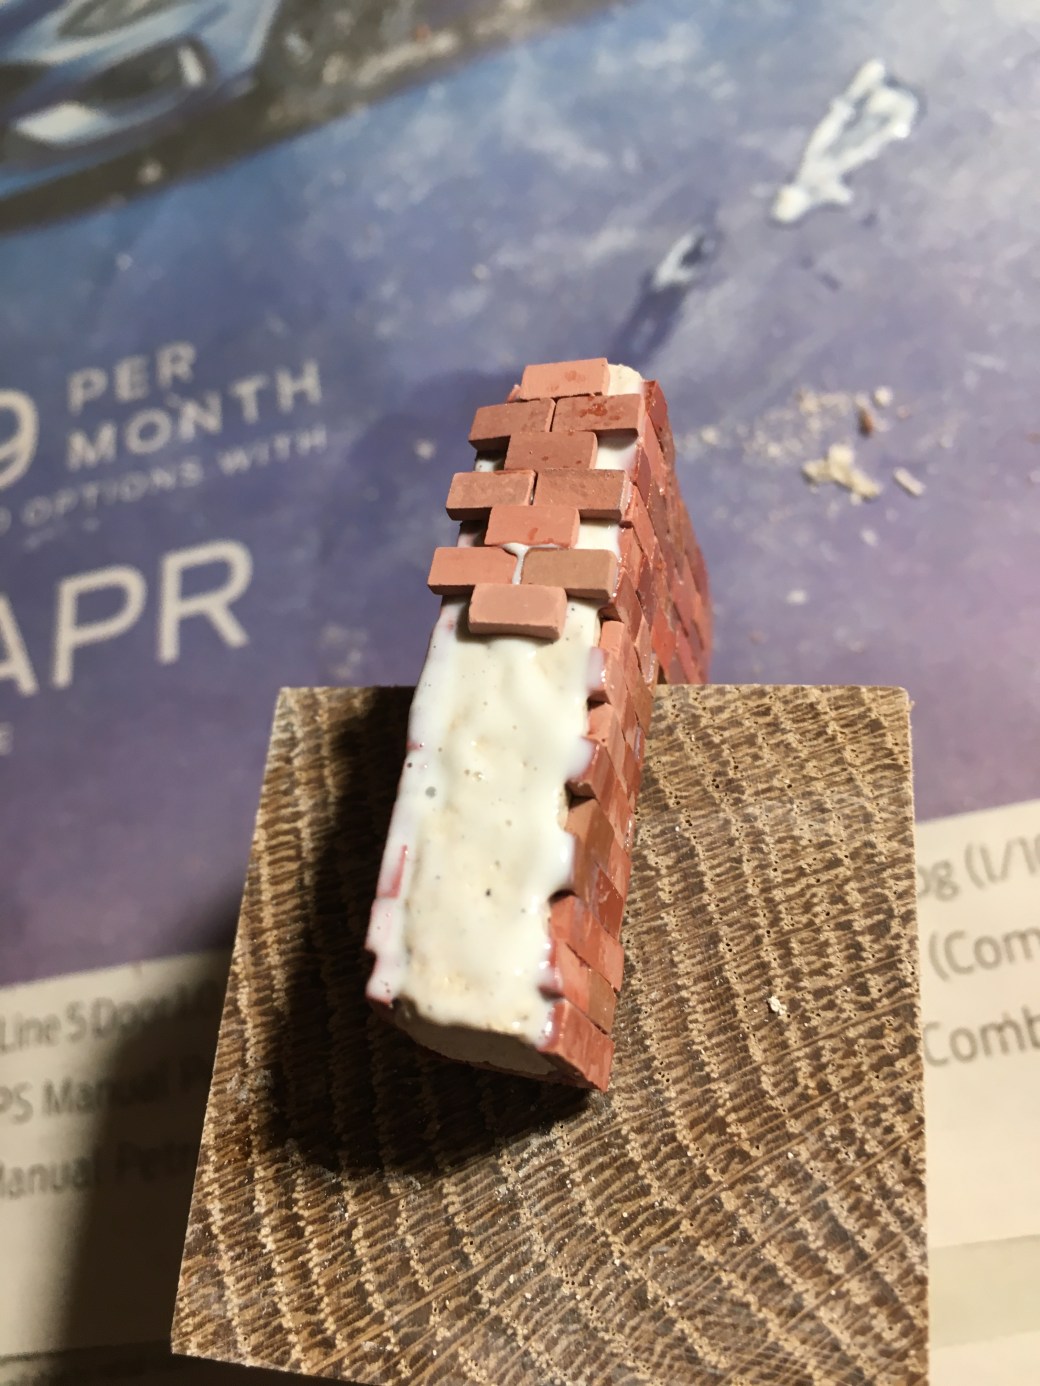
If you follow my blog you will know I bought some Victorian lamps off of Ebay which I used in a previous model a couple of weeks ago. I used another one here, or to be more precise the top of one. For the railings I used some galvanised metal mesh. I also used a couple of small tiles which I bought from the same place I purchased the bricks. These needed to be drilled to take the mesh. Some Milliput was used for the rest of the base and holes positioned to take Rowena once she is painted and ready for adding to the base.


Finally some grit was added and once the PVA had dried it was time to start the painting and whethering. As a final touch some flowers were added to provide a little more colour and interest.


All simple enough but time consuming, particulalry in terms of allowing tbings to dry. Time now to paint the lady herself.
TIM

Coming along well so far, Dave! Definitely got an “old” look to it! 🙂
LikeLiked by 2 people
Thanks John. I have to say it us quite satisfying taking a few bits and bobs and turning them into something.
LikeLiked by 2 people
Looking good so far, always really useful to see the process by which these pieces are constructed as well 🙂
LikeLiked by 3 people
Thank you. I’m not sure how much people gain from my WIP posts but over the years I have picked up a good many ideas from other people’s.
LikeLiked by 3 people
I know what you mean, whenever I post a WIP I think “Why will anyone be interested in this?” but those are often the most popular posts. I know I’m always a lot more interested in seeing other people’s WIPs than I am in my own – there’s a lot to be learned from a WIP!
LikeLiked by 2 people
Spot on. That very much sums up my thinking on the subject too.
LikeLiked by 2 people
Looks great Davey. The plaster board is a good idea. I often use cork tile for structures but I have a few large sheets of plaster board under the house that I might need to cut up. Looking forward to seeing the figure on the base.
LikeLiked by 3 people
If the plaster board is holding the house up I would be inclined to leave it where it is! 😉 Cork is good,
I know a few people who recommend it but need to give it a go myself.
LikeLiked by 3 people
Ahhhh thanks for the tip. Cork is good. Base coat and dry brush and you’ve got yourself a nice looking concrete wall.
LikeLiked by 2 people
just brilliant, and there was me betting myself it would have a snow base, never mind its fantastic to see it. May i ask as to what you do with your diorama’s when completed.
LikeLiked by 3 people
Thank you. Individual figures like those which feature in my musings posts I either add to my own collection or sell on Ebay. They are easy to post and the money I make completely makes my hobby self funding. The dioramas I generally keep as they are not easily posted. I have some on display, mainly the ones that have done well in competions, but many are just stored now. Space is a problem which is why I stepped down in scale to 28mm from 54mm.
LikeLiked by 2 people
I really like the base and look forward to seeing the lady in question finished.
LikeLiked by 3 people
Cheers Steve, hope you are feeling better.
LikeLiked by 1 person
That is some nice scratchbuilding. Impressive.
Cheers,
Pete.
LikeLiked by 2 people
Thanks Pete.
LikeLiked by 2 people
Nice subject and really good job about the diorama 😉
LikeLiked by 2 people
Thank you.
LikeLiked by 2 people
😉
LikeLiked by 1 person
I’m with a number of the others, I love seeing the ‘behind the scenes’ process of this kind of thing. I’m always amazed at the effort that goes into it. I know you say the processes themselves are simple but it’s still impressive.
LikeLiked by 2 people
Thank you. It strikes me from what I have seen of other people’s blogs, yours included, we all have a couple of things in common – modelling/painting skills and a good degree of patience. Hence I am not doing something which others cannot do if they want to. The problem is we don’t know what we don’t know which is why I like WIP posts by other people as you can usually pick up a good tip here and there along the way on how to do something. 😊
LikeLiked by 2 people
Fully agree and by doing these posts you also preempt the inevitable ‘how did you do that’ comments 😁
LikeLiked by 2 people
Always love the WIP stuff – and I know you do as well. Really impressive- I really like the weathering on the bricks – just dry brushed?
LikeLiked by 1 person
A couple of colours applied first then about a three colour variation dry brushed. Dry brushing is just so effective.
LikeLiked by 1 person
Definitely
LikeLiked by 1 person