TIM’s Memory Monday (No: 14)

A small ACW piece and one of my favourites.  Not so much for the figures but the composition, an idea I copied from Andre Miniatures.  Looking at it again I’m tempted to explore another scene along similar lines.  It’s been a long time since I last delved into this genre.

—000—

28mm ACW Conderate Cavalry Diorama – Part 1

Having completed my WW1 diorama I now find myself returning to the Old West, or to be more accurate the American Civil War.  The weather here in good “Old Blighty” is typical for the summer which is to say that it is once again raining in England. Ideal for modelling I hear you say, so thought I but alas it is the school holidays and the family have other ideas.  She Who Must Be Obeyed won over and thus progress on the new diorama is slower than anticipated.  I digress.

This diorama is inspired by figures sold separately or as a diorama by Andrea. Andrea Miniatures produce fantastic figures, mostly in 54mm scale, which are priced accordingly, which is to say they are pretty expensive.  Don’t get me wrong I am happy to spend money on my hobby and I do (no dearest, these were a bargain and cost very little for how good they are) but on this occasion I thought I would try to do my own version using 28mm Dixon Miniature ACW figures.  They have a good range of figures for this period and I was able to find what I was looking for with only minor adjustments being necessary.

Base work needed to be done first as positioning of the figures was key so I set about gathering the necessary materials – slate chippings from my drive, dirt dust from the road outside my house, static grass, dried grass from Dartmoor, PVA, water, Milliput and a few minor scenic bits from my modelling drawer and off course paint. Ordinarily I wouldn’t bother to list the items I use, not that it’s a secret but because I’m sure most people have a good idea of what they need.  No, the only reason for listing the items is it never ceases to amaze me that from such an odd array of crap items it is possible to produce something that looks like a reasonably natural landscape.

Enough chat, some work in progress photo’s.  Hopefully I’ll have the whole thing done before I go on holiday in two weeks time.

TIM

20170626_080016_resized20170626_142145_resized20170626_143424_resized20170708_174037_resized


TIM’s Memory Monday (No: 13)

At the time when I did this post back in July 2017 I didn’t think I would get quite so involved in WW1 themed figures and little dioramas.  I went on to produce my own timeline all of which will be revealed in future Memory Monday posts.  I also didn’t appreciate how much I would deviate from the Old West genre which had pretty much dominated my work up to that point.  How times change!

—000—

28mm WW1 Diorama (No: 1)

Although most of my models follow an “Old West” theme I do occasionally deviate from the genre.  Sometimes I do so because a model or figure comes along which simply takes my fancy but sometimes there are other reasons for doing so which is the case in this instance.  I shall explain.

Modelling for many of us who are interested in the hobby is often a solitary affair; a great thing to do on a wet and rainy day, of which there are far too many in England. Whilst I am happy to spend hours indulging in my pastime I am if I am being honest more extrovert than introvert and decided I need to engage more with the wider community.  To this end I made the decision to a) create a blog and b) find a nearby modelling club and join it.

The blog is doing OK despite my lack of computer know how and I am aware it takes a while to get these things up and running.  I’m also aware that this is a niche area so I’m not anticipating a life style change anytime soon!  I do now have a couple of followers, you know who you are and I am both flattered and grateful for your comments, thank you. So, objective number 1 is in hand.

So on to objective number 2 and its relevance to the diorama featured in this post. I managed to track down a club in Plymouth and a few months ago went along to my my first meeting.  They meet a couple of times a month with the second meeting being a club competition evening.  There are about 19 members, most of whom I have now met and they are a friendly bunch.  Modelling is a diverse subject made up of various genre’s many of which are represented by the club members.  That said few of the members are figure painters so my work has brought something new to the club.

At this point I should perhaps explain to those who do not know that Plymouth is a Naval and Royal Marine city and I think this has influenced many of the clubs modellers who specialise is WW1 and WW2 military planes, ships and vehicles (I on the other hand am a Londoner a who wanted to be a Cowboy!)  The club also holds its own annual Modelling Show in the City and for 2018 they aim to hold the event on the same day that the City holds its Armed Services Day.  As next year will be the hundredth anniversary of the last year of the Great War 1914 – 1918 the club thought it would be a nice idea if everyone produced a model with a WW1 theme.

The images of the diorama below represent my contribution to next years model show.  Military uniforms are not my speciality so apologise in advance for any inaccuracies.  The model was fun to do but I don’t think the era will dominate my future work. Although having said that the idea of doing more diverse subjects has captured my imagination.

A final few comments on the club I joined.  Firstly, I would encourage anyone who is not in a club to join one.  It’s great fun engaging with fellow enthusiasts even if you aren’t into the same genre.  Most, if not all, modelling skills and techniques are transferable and so much more can be learnt in this environment. Secondly, assuming this to be true of most clubs, there is a wider audience via the attendance and participation at other shows.

I went to my first show a few weeks ago and took along some of my own work to display.  To be honest I was a little afraid of what people might think of my work but having had a lot of positive feedback at club nights, and competition nights in particular, I went along with a positive out look.  It turned out to be a great day, met and spoke with a lot of new people, picked up some great tips and received a few accolades along the way.  One chap even took photo’s at the event and put them onto a YouTube video.  If anyone wants to check it out then search for “Helicopter Museum Model Show 2017” there is a part 1 (which features 7 images of my models which blew me away) and part 2.

Images of the diorama – in progress to completion – below, hope you like it.

TIM

20170726_114208_resized

20170728_233041_resized

20170728_232937_resized

20170729_180907_resized

20170729_144842-1_resized

20170729_144733_resized


TIM’s Memory Monday (No: 12)

This at the time, and probably still the case now, was my most complex diorama build.  Being my sixth building project I had learnt a great deal and tried to incorporate just about everything I had learned up to this point.  It remains a personal favorite, has won a couple of awards and often receives nice comments when taken to display at shows.  Looking at it again now makes me think that one day I may take on a similar project.

TIM

—000—

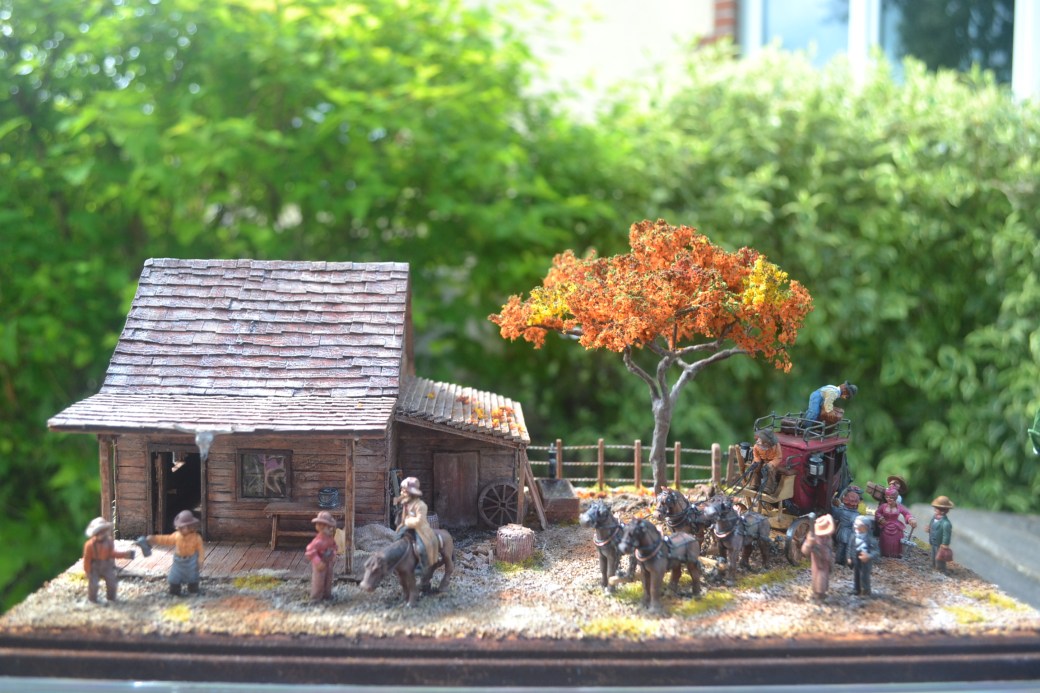
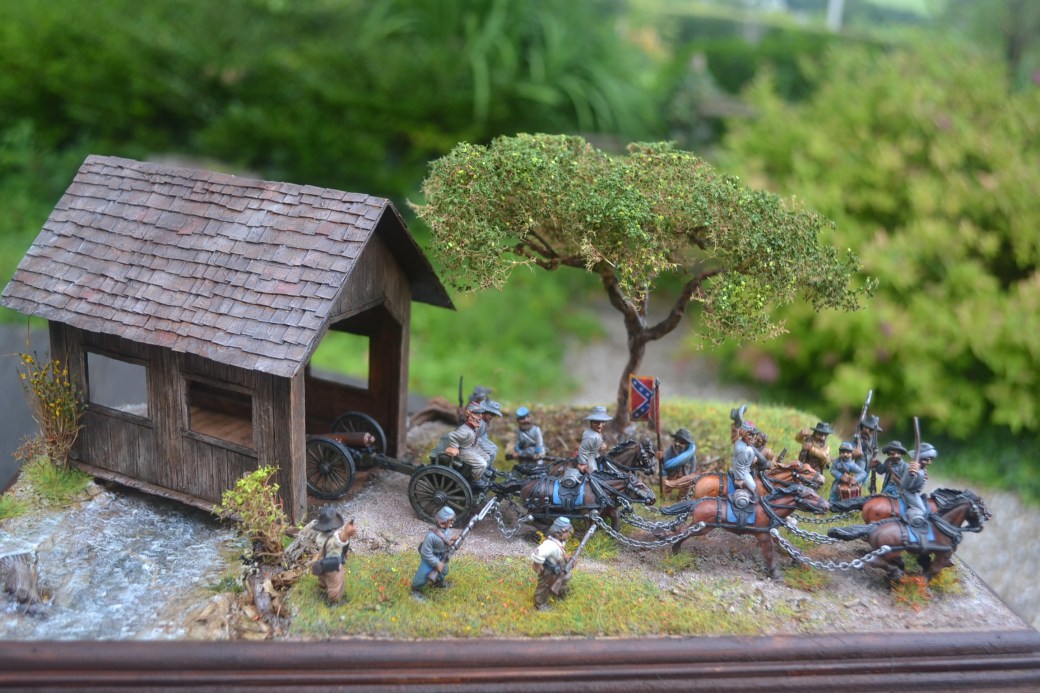
28mm Building Project No: 6 – Wells Fargo Way Station

Few images of the Old West more classical than a Wells Fargo Overland Stagecoach and Dixon Miniatures produce a fantastic kit.  Having constructed one of these kits for my brother’s birthday some while ago I always had it in mind to build another for myself, it was always just a matter of time.

I decided the stagecoach would feature in a diorama and chose to depict a Way Station where passengers leave and join the stage and where drivers and horses rest up a while. Space as ever was a constraint but I wanted this to be a diorama of firsts, reflecting if you will my growing confidence at scratch building.

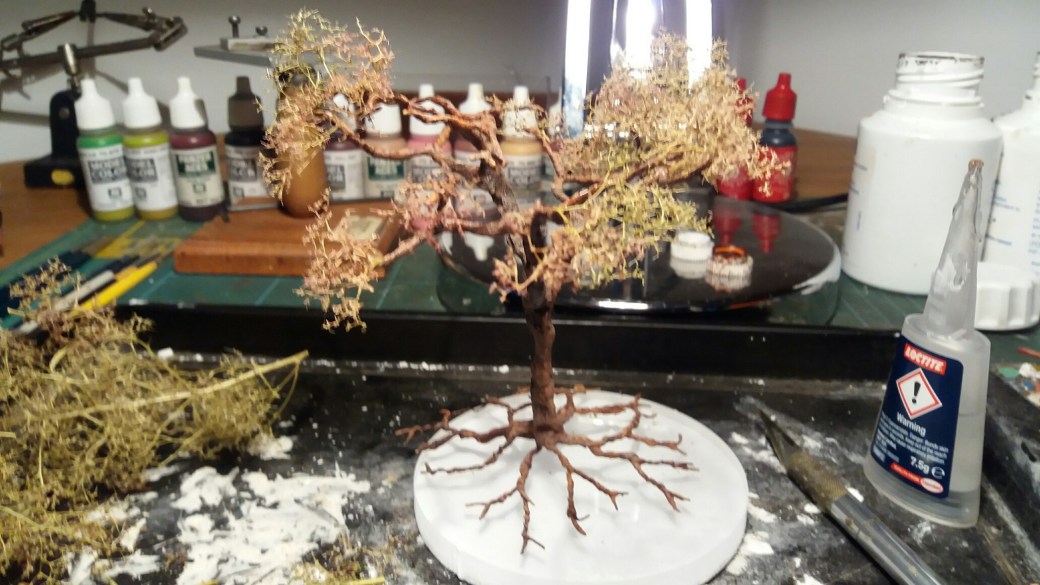
I had never built a wire tree before, made a wire fence, constructed my own internal furniture or completely constructed my own building with a removable roof but that was about to change!

Following a video guide I found on YouTube the first thing I built was the wire tree.  I wont go into further detail on this because I covered the process in two recent blog posts. YouTube was also the provider for how to make a wire fence.  The fence posts themselves were match sticks each drilled with three holes.  The wire was real wire 0.5mm thick.  A length of about 12 inches/30cm was folded back on itself  and then the two separate ends were clamped together tightly (a vice is good for this).  I used a nail placed at the looped end to pull the wire tight  and then twisted and twisted and twisted … you get the idea … and twisted until the wire became taught. Simple but very effective.  The wire was then threaded through the holes on the fence posts.

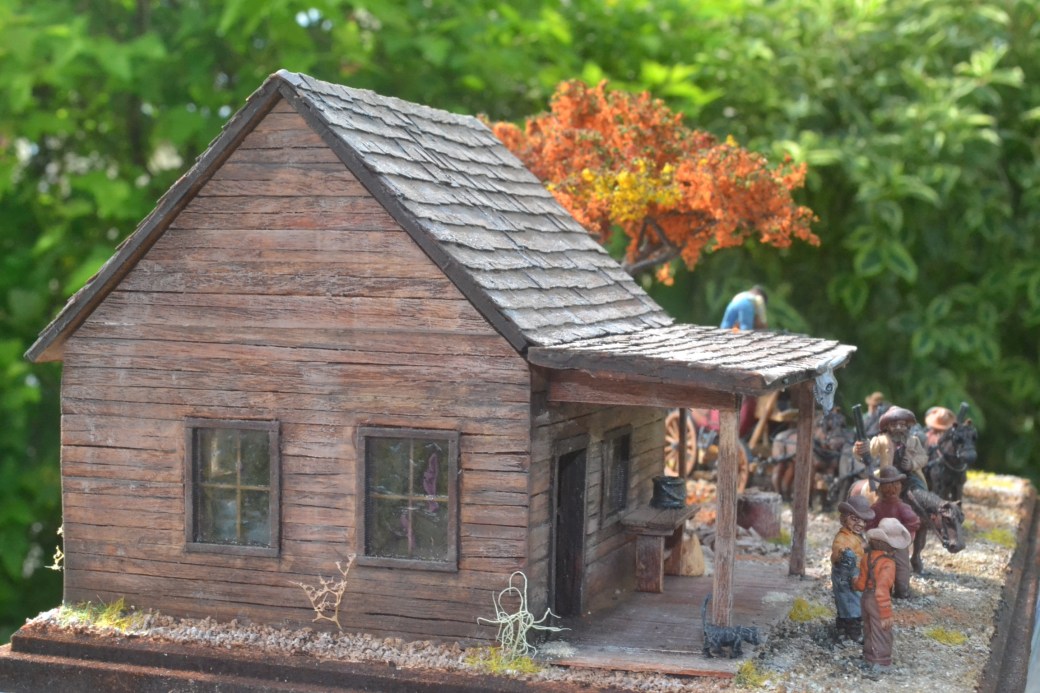
Anyone who has followed my earlier posts may recognize that the building looks pretty similar to those produced by Sarissa Precision which I have used in the past. There is a reason for this.  When you by one of their kits they come in a couple of MDF sheets (more for bigger buildings) of about A4 size.  Each sheet has the various parts which make up the building which once pressed out leaves the complete outline of that part which can then be used as a perfect template for creating your own scratch building.  In my opinion Sarrisa Precision make quality products at reasonable prices, their range has grown and grown too.  If you think you might use one of their designs more than once, or there is a design that you could easily modify, then buying one and keeping the empty sheets for future builds is a cheap option.

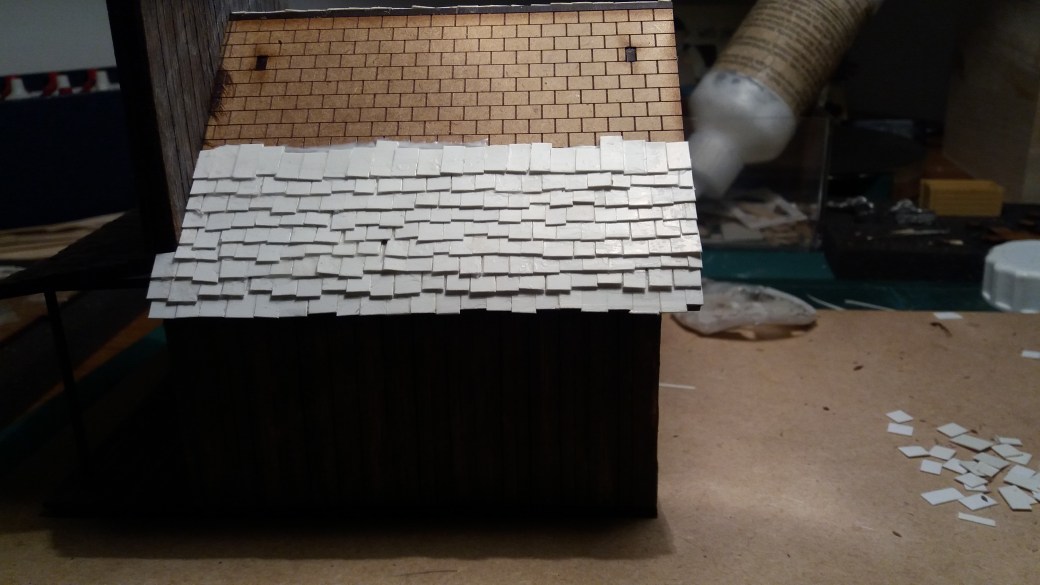
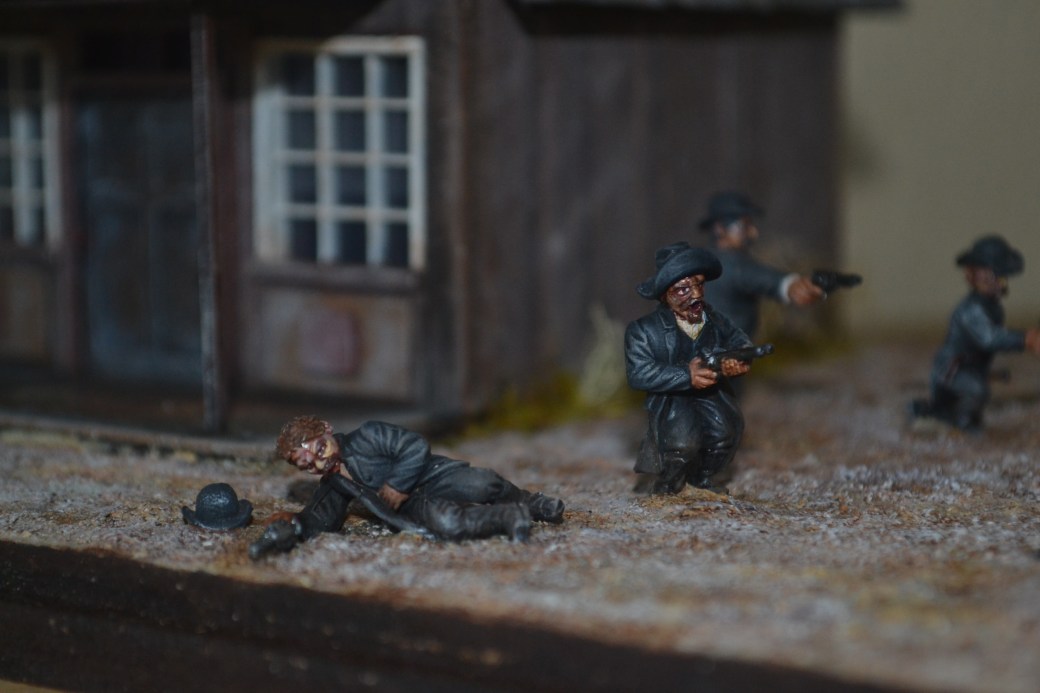
So back to the building.  Using the template of a previously purchased building I set about constructing the various parts using my now tried and tested method of foam board, coffee stirrers, cardboard, match sticks (extra long matches for the veranda posts) and PVA glue.  The lean-to on the side of the building was my own design addition.

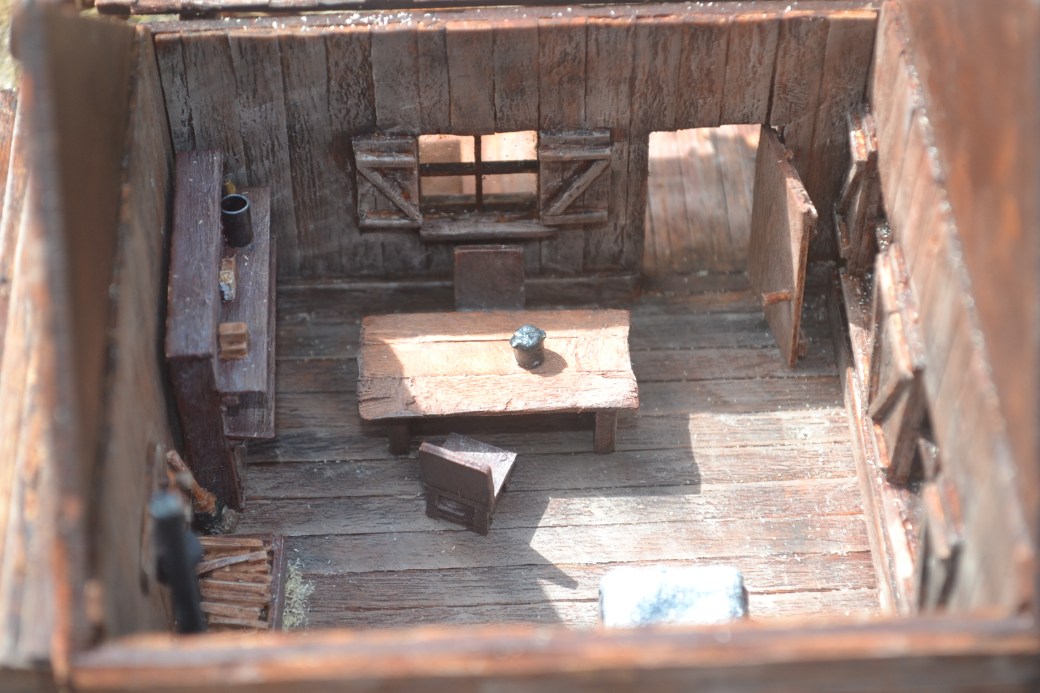
For this building I planned for the roof to be removed in order to look inside.  With this in mind it was necessary to clad the inside of the building with coffee stirrers too and to make frames to cover the “glazed” windows and add wooden shutters as well. The window shutters and the door were given “Z” frames for appearance and practical build reasons.  The door handle was made by drilling a whole in the door and inserting a small piece of a cocktail stick.

All of the furniture was scratch built.  The bed was made using a combination of match sticks and coffee stirrers (as was the wooden log box) and a dried out wet wipe dipped in diluted PVA was used to make and mold into shape the bed pillow and blanket.  The table, chair and dresser were all made of various combinations of match sticks, coffee stirrers, cocktail sticks and other bits I found lying around.

The wood stove was my favorite build.  It was made using a piece of round wooden dowel with a round metal washer as the base.  Two metal washers, one larger than the other, were stuck together to make the top of the stove along with a small piece of rounded card to close the washer whole.  Another small piece of card was used to create some relief on the dowel to make a door and a pin head was used to make the door handle.  A wooden BBQ skewer was used to create the stove-pipe and a piece of tubular plastic taken from one of the protective covers which comes with good brushes was used to create the joint.  It was then all undercoated before being painted black and weathered.

The coat hooks were made using the ends of cocktail sticks, the hat was taken from an unwanted figure and the rope was made from some thin string.  The broom was made from a thinned match stick and the hair of an old brush.

Outside, the barrels were some spares I had in my “bit box” and the log pile was simply made from various left overs made smaller with a modelling knife.  If like my brother you are wondering why there aren’t any tools lying about then I will give you the answer I gave him, “they’re all neatly inside the lean-to!”.  The water trough was made of coffee stirrers, filled with Woodland Scenics Realistic Water and the pump was made from wooden skewers with a paper clip handle.

The figures are all once again from Dixon Miniatures with no alterations made.  The stagecoach does not come with chains and harnessing so this was all made from scratch.  The chain was purchased from Hobby Craft and cut to length.  At each end a pin shortened in length was attached and a hole drilled in each horse to accommodate it when stuck together.

Assembly required a lot of thought.  With so many pieces it would have been easy to box myself in and have very little room, if any, to access and paint as required. fortunately I got there in the end!

Images of the completed diorama appear below.

TIM

DSC_0018DSC_0027DSC_0019DSC_0019DSC_0022DSC_0026DSC_0030DSC_0029

TIM’s Memory Monday (No: 11)

This model features the Tree, Flat Bed River and New England Bridge that all featured in previous posts.  All finally coming together in this completed diorama.  I still have this one out on display as it is one of my favourites.  I hope those of you seeing it for the first time like it too.

TIM

—000—

Off The Work Bench – American Civil War 28mm Diorama

Much of which I could say about this diorama has already been covered in earlier posts under the header “On The Work Bench” so I wont bore anyone by making further reference to making the tree, the covered bridge and the small section of river.  That said more than happy to answer any questions on the subject.

The diorama itself is meant to depict confederate infantry men making way for the limber coming through and hopefully that comes across.  The figures are once again all from Dixon Miniatures and apart from adding harnessing to the horses and limber are as purchased.

Assembly on this scale and with quite a few pieces proved a little tricky but I got there in the end! Various scenic details were added, most notably the grass which was applied using a static grass applicator.

TIM

DSC_1001DSC_1003DSC_1000DSC_1002DSC_1006DSC_0998DSC_1004


TIM’s Memory Monday (No: 10)

Although most of my blog activity centered around 28mm scale figures my modelling roots were very much in 54mm figures.  Even now it is nice to do a larger figure once in a while but on this occasion I was given a figure by a guy at the modelling club.  He said he would never get around to doing it and wanted to see what I would come up with.  This was the result.  Not my finest piece of work as I look at again now.  Rusty from doing smaller figures!

TIM

—000—

Off the Work Bench

I was recently given a Pegaso 54mm Comanchero by a guy who didn’t consider himself to be a figure painter. Although my American Civil War diorama is very near completion I thought I would have a break from 28mm figures and paint it. It has been a while since I have painted a 54mm figure and it surprised me how big it was!

An enjoyable project and a welcome distraction but back to finishing my diorama.

Is it just me or am I the only one who has more ideas on what to do next than I have years left to live to complete them?!

DSC_1013DSC_0001

TIM’s Memory Monday (No: 9)

This post goes back to July 2017.  It was a build completed before I really started with the blog so I had little in the way or progress images.  If I were doing a project like this now it would probably cover several WIP posts.  Nice for me to see this one again as it has been hidden away in a storage box for the last couple of years.

TIM

—000—

28mm Building Project No: 5 – The OK Coral

For my 5th Building Project I drew inspiration from one of the great legendary moments in Old West history, The Gunfight at the OK Coral.  As much as possible I wanted to be true to the actual events and location but to create a model which worked for me and my limited base space it was necessary to invoke an element of poetic license.

20161204_18441520161229_12074520170101_15481620161229_12075720161202_205347

Diorama in development

Without turning this into a history lesson, the fight (some might say murder) took place in a vacant lot between two buildings.  Fly’s photographic Gallery was actually at the back of the lot but is usually depicted at the front, presumably because the building was of greater interest and I have done the same.  The righthand building was actually an old wooden house but as I did not have the space and wanted to create the feel of a vacant lot I chose instead to make it a small barn/out building.

The small out building was built from scratch using the same method as Building Project No: 4 – foam board sides clad with coffee stirrers and roof made of cardboard with cardboard shingles.  It was then painted using a variety of oil paint washes (for details refer earlier posts).

Fly’s Photography Gallery started life as a Sarissa Precision kit.  The kit was assembled and then completely clad on the sides with coffee stirrers and on the roof with card board shingles.  The doors were also remodeled.  After drying it was painted with oil paint washes.  Clear plastic was used to glaze the windows and blinds were added, the aim of which was to restrict the view looking into the building as on this occasion I did not plan to fit out the inside.

Signage was made using a downloaded Western font and then printed in black and white using Word.  It was then given a thin wash and a bit of weathering.

The figures used were once again all from Dixon Miniatures.  Virgil Earp (kneeling) was given a walking cane (a pin) and Morgan Earp (lying down shot) was given a new hand holding a gun.

Images of the final diorama appear below.

DSC_1011DSC_1007DSC_1012DSC_1009DSC_1009


TIM’s Memory Monday (No: 8)

As the initial post on the “New England Bridge” was rather short I thought I would include the follow up post on the “Flat Bed River” too!  Yes I know I am spoiling you, two for the price of one!

TIM

—000—

On the Work Bench – New England Style Wooden Bridge

Work continues on my American Civil War  diorama, a feature of which is a New England Style wooden Bridge.  The bridge is based on an image I found online albeit that the “real” bridge and river were wider. Nature has few space constraints but alas my diorama base does so it was necessary to construct a shorter bridge!

The bridge itself was constructed using wooden coffee stirrers to make the base and sides, match sticks to make the front and back trim and cardboard to make the wooden shingle roof.  The finished bridge was then painted using a variety of oil based washes. For further details and information on construction and painting methods please refer to my “Building Projects” section.

Below are a few images of the bridge during construction. My next step is to work on the river, more of which in my next post.

—000—

On The Work Bench – Flat Bed River

My American Civil War diorama, when complete, aims to show a six-horse Confederate limber and cannon having crossed a river via a covered bridge.  A group of infantry men are standing either side of the road making way for the limber team to ride on through.

I have completed a tree for the diorma, the bridge and most of the figures and horses.  It was time to work on the base, specifically the small section of river which needed to be created.

My base was slightly modified by adding some wooden quadrant to all four sides.  This was done to raise the edges of the base and to give depth for the river and its banks to be made.  Filler, scraps of wood and whatever else was lying around was used to bring the base, with the exception of the river, to the level of the newly added quadrant.

The area which would become the river bed was then painted black.  This was done purely as a precaution just in case anything showed through at a later stage when it would have been too late to do anything about it.  Using a variety of materials – small bits of stone and gravel, cat litter and anything else rock like – I created the banks of the river.  Some pieces of fallen tree were added too to add a little more interest.

The river bed and bank were then painted using oil paints diluted slightly with white spirit.  Black was used to depict the bottom and therefore the deepest part of the river and then I used burnt umber, burnt sienna and raw sienna as as I worked my way from the bottom of the river bed and up the sides of the bank.  The oil paints blend well and dry a little quicker when used with white spirit.

Once dried the various “rocks” on the river bed and along the river bank, together with the pieces of fallen tree, were dry brushed to bring out detail and shading.  The next step was to add the “water”.  For this I use a Woodland Scenics product called Realistic Water, a silicone product which dries clear. Pending the depth of your river it is best to build up in layers allowing each one to dry before adding more “Realistic Water”. It does take quite a while to dry and is often best left to do so over night.

Having added the “Realistic Water” to the desired depth my next step was to add movement to the river.  If you only want to create the effect of a mill pond then movement is less critical but for a flowing river it’s a must.  Woodland Scenics do have products which you can buy to help achieve this but these can be pretty expensive to buy in the UK and besides there are other ways of doing it.  My preferred method is to simply take an old paint brush (you can use other things instead) and rough up the silicone a bit before it has gone off completly hard.  This does of course mean keeping an eye on it but as it does take a long time to dry so you only need to check after several hours and not every few minutes.  The aim of this process is to create ridges in the silcone to simulate water movement.  You do not need to go deep into the silicone but you do need to go with the flow of your river and not across. Once done leave to dry completely.

When completly dry I used to white oil paint to dry brush the ridges of the silicone. It’s best to go sparingly and add more as you think you need it.  If all goes well your river now looks like it’s flowing as the highlighted ridges look like white water.

Below are a few pictures of the various stages referred to above.  Images of the completed diorama will be posted soon.

TIM’s Memory Monday (No: 7)

This post first appeared in June 2017.  Outside of my blog it has never been seen so this January just gone I decided to enter it into my modelling clubs annual in-house competition under the dirorama category because I hadn’t done anything else I could enter since going to Telford in November.  Despite some strong competition it won in its class and to my surprise it also scored more points than any other model on show and so I won and award for that too.  So here it is again for those who have seen it before and here it is for the first time for those who haven’t!

TIM

—000—

28mm Building Project No: 4 – Railway Freight Depot

I’ve always admired model railways but never had the space to truly consider building one so when I discovered that http://www.sarissa-precision.com had produced an old western steam locomotive I decided that this would have to be my next diorama. The train even in 28mm scale is a reasonable size and it took me a while to determine how best I could present the model whilst finding room on the base for a building and a few suitable figures.

originally I had wanted to build a railway station but even at 28mm this was to big for the base I wanted to use.  I finally decided I would construct a small-scale Freight Depot building but struggled to find suitable figures and so for a while the idea remained on the back burner until eventually I discovered some western railroad figures produced by http://www.northstarfigures.com.

I was now in a position to get my latest project off the ground.

As mentioned in Building Project No: 3 I had already determined that my next building would have a “wooden” shingle roof.  I had also decided that for this model I would try using foam board as the backing to the wooden stirrers instead of cardboard.  As with my previous build my first step was to establish the dimensions of the building and overall layout of the diorama.

In addition to the train Sarissa also produce track and other wagons.  I couldn’t accommodate additional wagons on this occasion but did acquire some track for mounting the train.

Having drawn up rough plans for the building (an end shed, an office in the middle and an open canopy at the other end) I set about cutting the foam board to shape and cutting away for doors and windows.  As with my previous builds I then cut the coffee stirrers to shape and glued them using PVA to the foam board.  Once the front, back and sides were complete the wood was weathered using a wire brush and a modelling knife for later painting.  Window and door frames were made using match sticks and clear plastic was used for window glazing.

I followed the same oil paint wash method for painting the outside walls as previously published.  Although I did not intend for the roof of the building to be removable I did take account of the fact that you could see inside the building through the open door and the window.  With this in mind I clad some of the interior and added a couple of wall posters and a couple of bits of furniture.

The next step was to have a go at my first shingle roof.  The basic structure was a simple piece of cardboard cut to the right length and then folded in half.  Before then gluing it to the main structure of the roof I drew lines at regular intervals on it. These lines would serve to line up the shingles.

20160908_101505

The central part of the building before adding the “wooden shingle roof

The shingles themselves were made from cardboard strips that were then cut into much small rectangular pieces.  A tedious job but not one that takes that long.  A line of PVA was then added to the lowest part of the roof and the individual shingles attached.  Using a cocktail stick dipped into a small amount of PVA makes it easier to pick up the small shingles.  The process is then repeated line by line.  It doesn’t take long to get into a rhythm and the process becomes quicker that you might expect.  I tend to put on a You Tube play list and before you know it the roof is complete.

When dried the next step is to paint the roof.  I chose Burnt Umber oil paint thinned with a little white spirit as my base coat followed by a black wash and then by a grey wash.  Once dried I used white as a dry brush applied going against the grain of the roof tiles.  This I felt highlighted the shingle edges.

20160914_214823

The central part of the building with the “wooden” shingle roof added along with the left hand side shed and the right hand side open canopy
Some further images of the buildings before final completion.  Note the inside detail.

With the buildings complete a few additions were added in the way of posters, weeds, grasses, dust and ladders etc for added realism.  The next step was to work on the train and the figures.

The train itself went together quite well and painted up OK too I felt.  I added wood to the Tender and a few pipes and levers to the cab.  The figures themselves were then painted using oil paint and placed on the diorama.  I also allowed for the Tender to be removable if required.

The finished train.

Images of the completed model appear below.

TIM’s Memory Monday (No: 6)

On The Work Bench – Scratch Built Wire Tree (part 2)

Having allowed the All Purpose Filler mixed with PVA to dry the next step using a sharp tool (I use my modelling knife) is to scratch some lines into the trunk of the tree in order to create a better bark effect when painted.  Once done it’s time to paint the tree starting with the underside first.

The paints I use are Winton and Newton oils – Burnt Umber, Ivory Black, Burnt Sienna and Titanium White.  The first application applied was Burnt Umber, diluted with white spirit to create a wash which nicely soakes into the filler.  This was followed by a wash of black, mostly applied to the shadow areas, then followed by a wash of Burnt Sienna with emphasis on the upper outside branches.  Titanium White was dry brushed to provide highlights.

20170606_204432_resized

Almost there with the painting

With the paining complete the next step is to add the smaller branches which will take the leaves in due course.  For these smaller branches I use small pieces of “Seafoam Trees” available from Gaugemaster.  Bit by bit these are added to complete a full canopy.

20170606_212324_resized20170606_221022_resized

Small “Seafoam” branches added to complete canopy

The final step is to add the leaves.  For this I use “Leaf Foliage” by “Noch” which comes in a variety of colours allowing for a nice mix of trees if you are aiming to have several in a display or reflect other times of the year such as Autumn.  The tree canopy is sprayed with a strong hold Hairspray and the leaves sprinkled on. Typically I find this process needs to be done several times in order for the leaves to create clumps and create a finish that I am happy with.

20170607_194526_resized

The Final Tree

Essentially the tree is finished but as I intend to use this one on a diorama the roots will need to be worked on once again along with the appropriate ground work being added too.   It will be a while until the diorama is complete but when it is I will post some images of the tree in its final state.


TIM’s Memory Monday (No: 5)

It is hard to believe that this post originally went out on the 4th June 2017 and that it is ober two and half years ago now that I made my first scratch built tree.  I’ve made a few more trees since then but the method for doing so remains unchanged.  Part 2 next week.

—000—

On The Work Bench – Scratch Built Wire Tree (part 1)

Figures for my 28mm American Civil War diorama are coming along OK but I am now starting to think about base construction.  Decided I definitely want a tree and thought I would have another go at scratch building one.  I have only ever done one tree before and much to my surprise found it easier than I thought it would be.  It might have been beginners luck though so we will have to see how this one finally turns out.

To start with I wrapped some 0.5mm wire around an A5 pad about 20 times which gave me a loop of wire approximately 9 inches (23cm) long.  Once removed from the A5 pad the loop was twisted several times starting just below the half way point.  This produced a figure 8 shape.  The bottom loop was then cut so that the wire strands all became separated.

The separated wire strands were then grouped into four individual bunches.  Each bunch was then twisted a few times and then separated once again into either two or three further bunches which were also twisted a few times and then separated again until eventually only one strand remained.  Where the remaining strand was to long it was cut off to a length I was happy with.

Once I had done this to each of the initial bunches of wire I was left with the tree’s root system.

Having completed the root system the next step was to repeat the exercise by cutting through the upper loop and creating the branches.

20170604_190341_resized

Once this was complete it was then a case of spending a few moments positioning and bending the roots and branches into a shape I was happy with.  I then mixed up some All Purpose filler together with some PVA glue to an almost liquid consistency and using an old brush applied it to the underneath of the branches first and then to their upper side, the trunk and the roots.  It was then placed to one side to dry.

It might be necessary to add more filler and to scratch away any excess dried filler but that pretty much completes the process for the basic tree.  The next step will be to paint and “dress it”, more of which in a future post.