28mm Building Project No: 4 – Railway Freight Depot

I’ve always admired model railways but never had the space to truly consider building one so when I discovered that http://www.sarissa-precision.com had produced an old western steam locomotive I decided that this would have to be my next diorama. The train even in 28mm scale is a reasonable size and it took me a while to determine how best I could present the model whilst finding room on the base for a building and a few suitable figures.

originally I had wanted to build a railway station but even at 28mm this was to big for the base I wanted to use.  I finally decided I would construct a small-scale Freight Depot building but struggled to find suitable figures and so for a while the idea remained on the back burner until eventually I discovered some western railroad figures produced by http://www.northstarfigures.com.

I was now in a position to get my latest project off the ground.

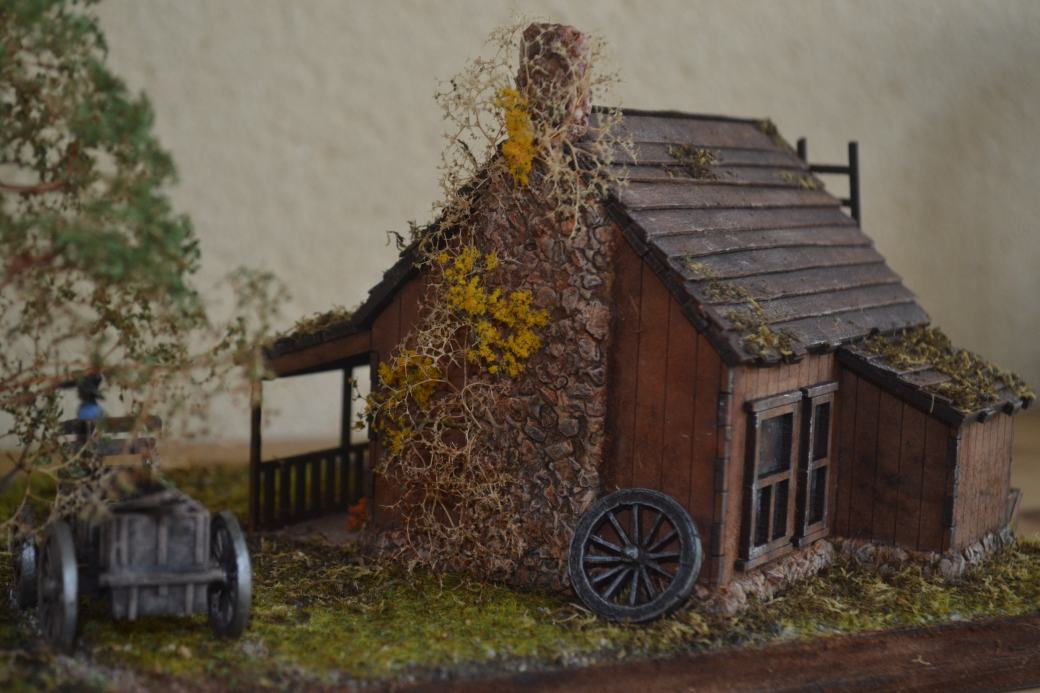
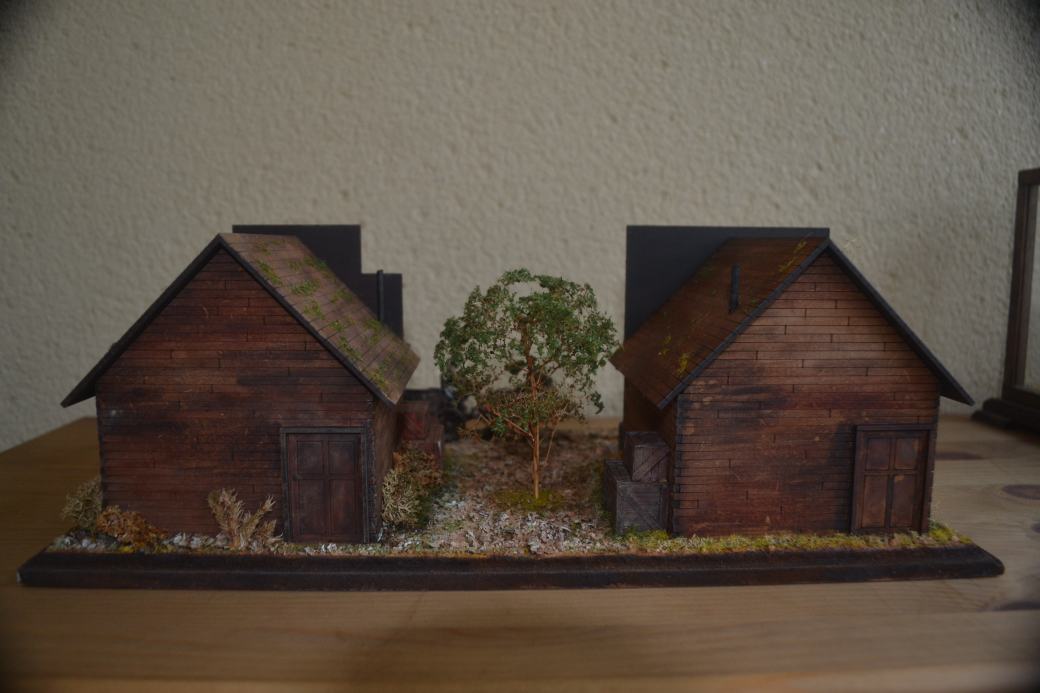
As mentioned in Building Project No: 3 I had already determined that my next building would have a “wooden” shingle roof.  I had also decided that for this model I would try using foam board as the backing to the wooden stirrers instead of cardboard.  As with my previous build my first step was to establish the dimensions of the building and overall layout of the diorama.

In addition to the train Sarissa also produce track and other wagons.  I couldn’t accommodate additional wagons on this occasion but did acquire some track for mounting the train.

Having drawn up rough plans for the building (an end shed, an office in the middle and an open canopy at the other end) I set about cutting the foam board to shape and cutting away for doors and windows.  As with my previous builds I then cut the coffee stirrers to shape and glued them using PVA to the foam board.  Once the front, back and sides were complete the wood was weathered using a wire brush and a modelling knife for later painting.  Window and door frames were made using match sticks and clear plastic was used for window glazing.

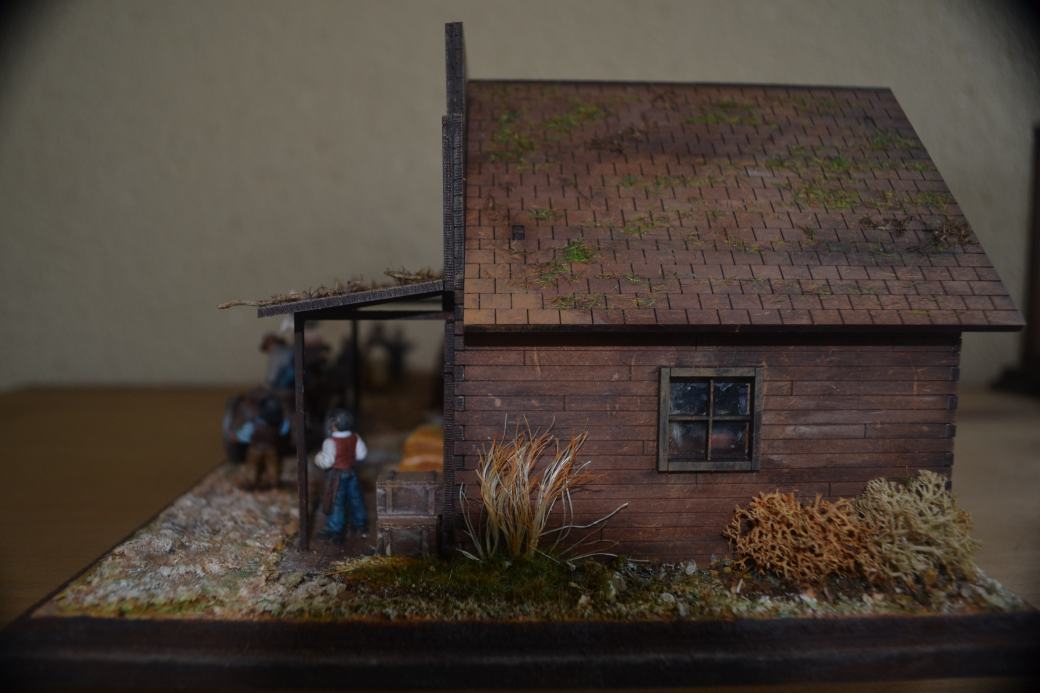
I followed the same oil paint wash method for painting the outside walls as previously published.  Although I did not intend for the roof of the building to be removable I did take account of the fact that you could see inside the building through the open door and the window.  With this in mind I clad some of the interior and added a couple of wall posters and a couple of bits of furniture.

The next step was to have a go at my first shingle roof.  The basic structure was a simple piece of cardboard cut to the right length and then folded in half.  Before then gluing it to the main structure of the roof I drew lines at regular intervals on it. These lines would serve to line up the shingles.

20160908_101505

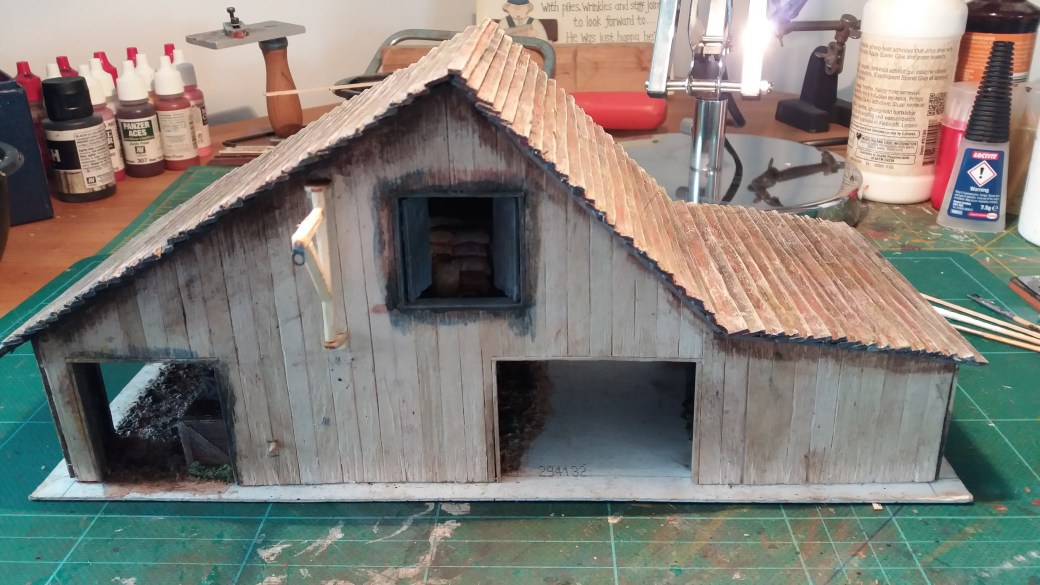
The central part of the building before adding the “wooden shingle roof

The shingles themselves were made from cardboard strips that were then cut into much small rectangular pieces.  A tedious job but not one that takes that long.  A line of PVA was then added to the lowest part of the roof and the individual shingles attached.  Using a cocktail stick dipped into a small amount of PVA makes it easier to pick up the small shingles.  The process is then repeated line by line.  It doesn’t take long to get into a rhythm and the process becomes quicker that you might expect.  I tend to put on a You Tube play list and before you know it the roof is complete.

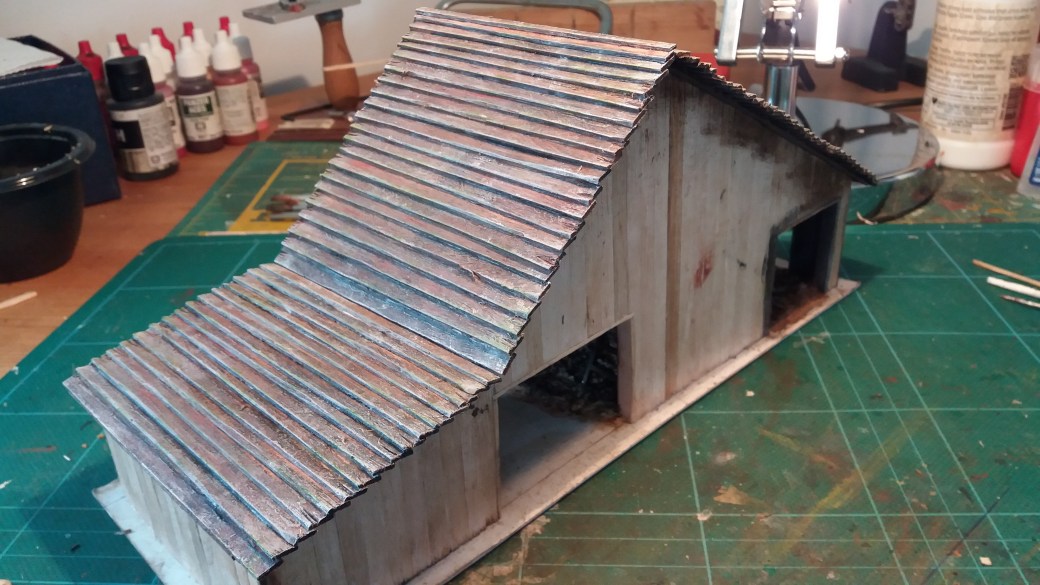
When dried the next step is to paint the roof.  I chose Burnt Umber oil paint thinned with a little white spirit as my base coat followed by a black wash and then by a grey wash.  Once dried I used white as a dry brush applied going against the grain of the roof tiles.  This I felt highlighted the shingle edges.

20160914_214823

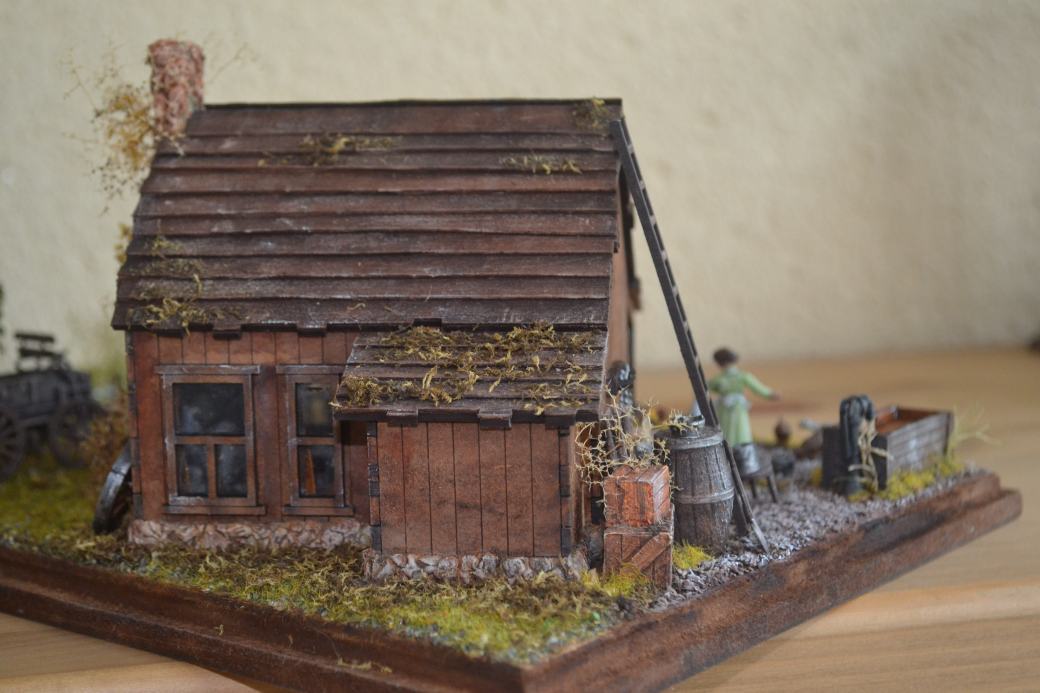
The central part of the building with the “wooden” shingle roof added along with the left hand side shed and the right hand side open canopy
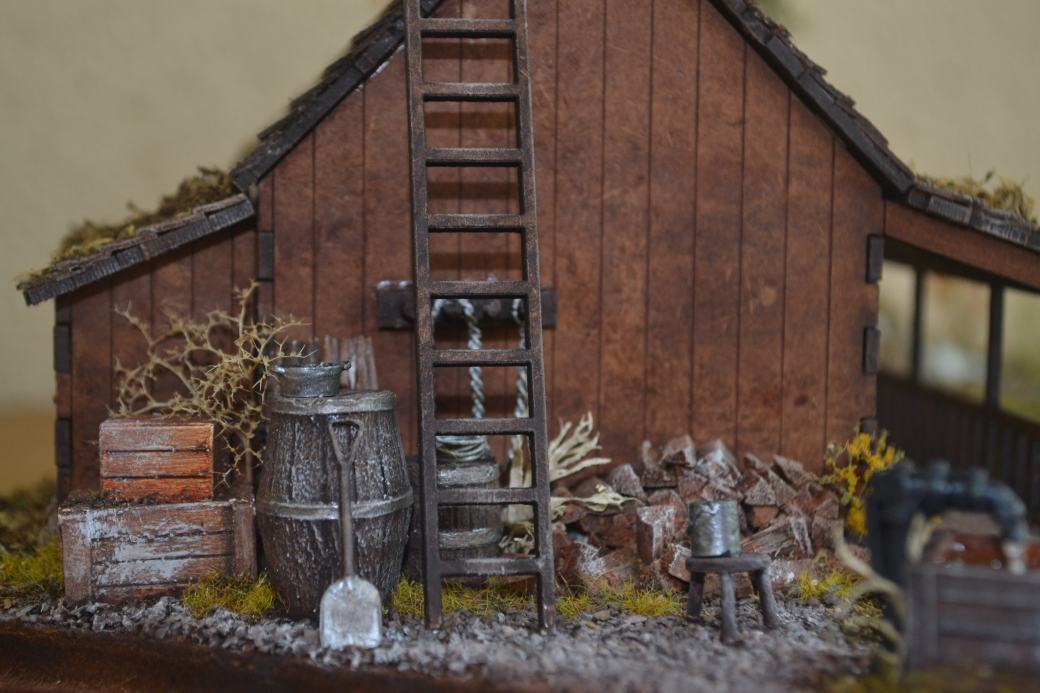
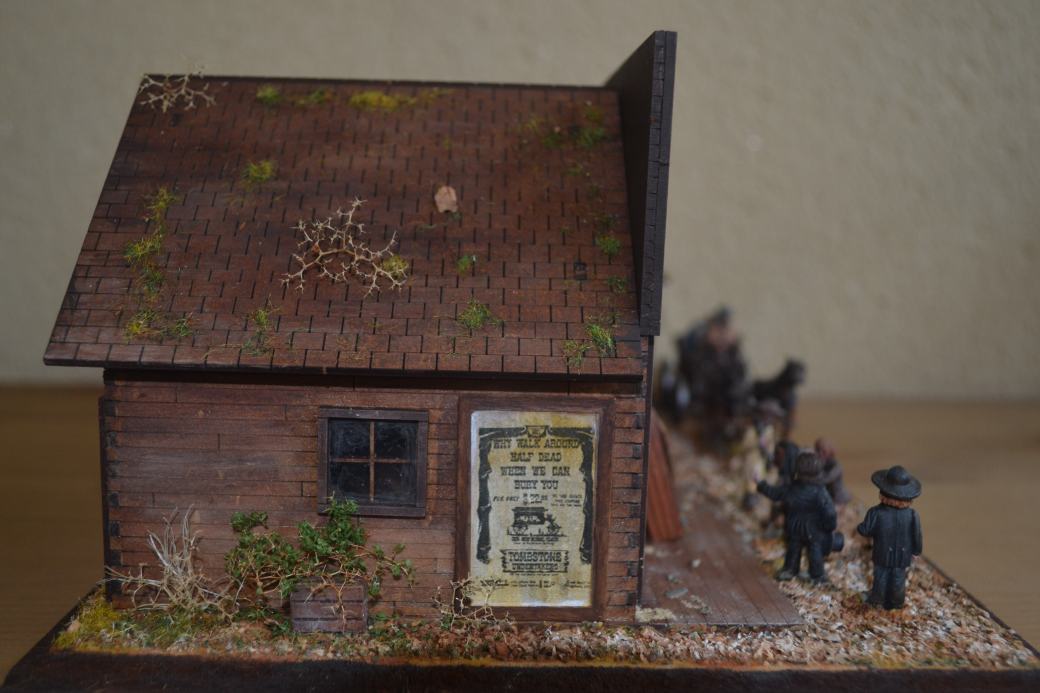
Some further images of the buildings before final completion.  Note the inside detail.

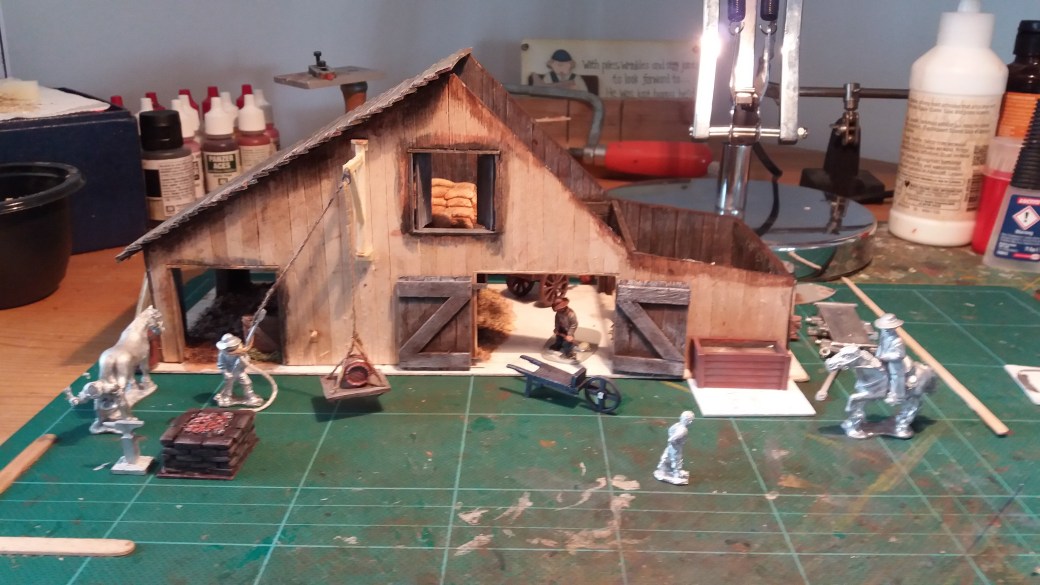
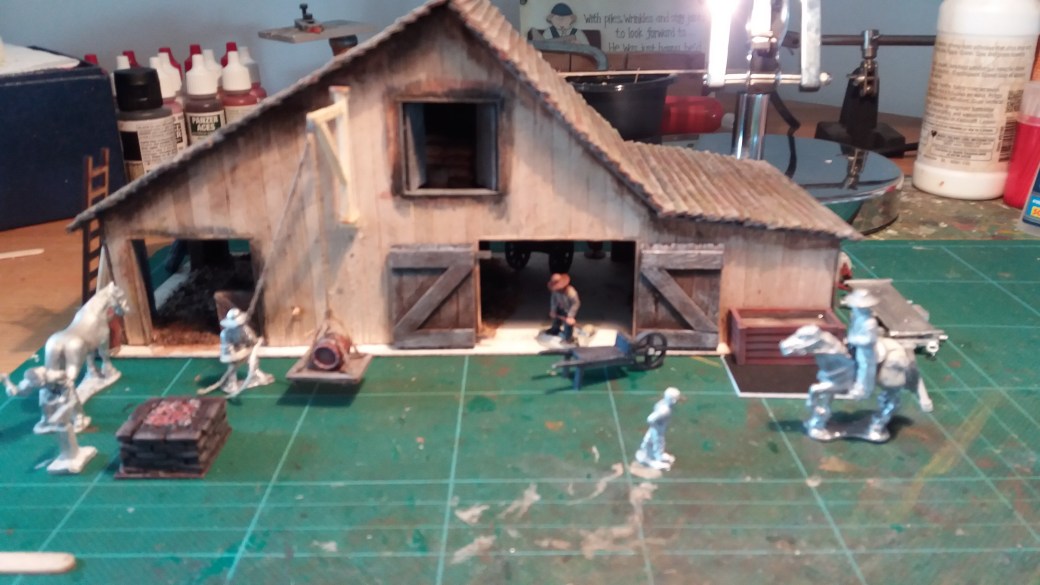
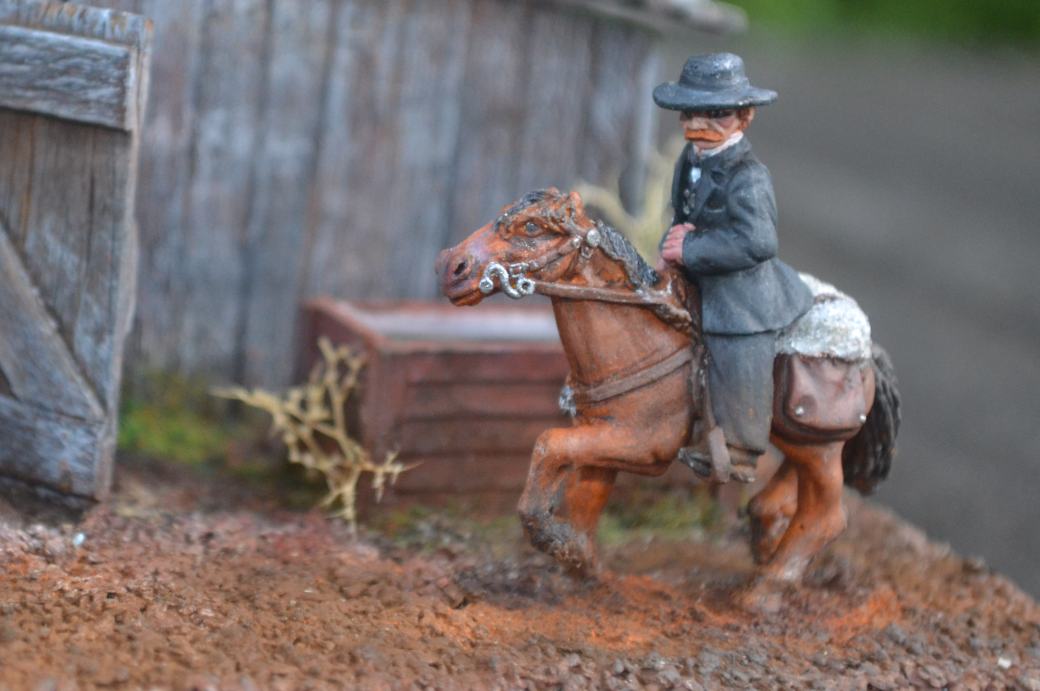
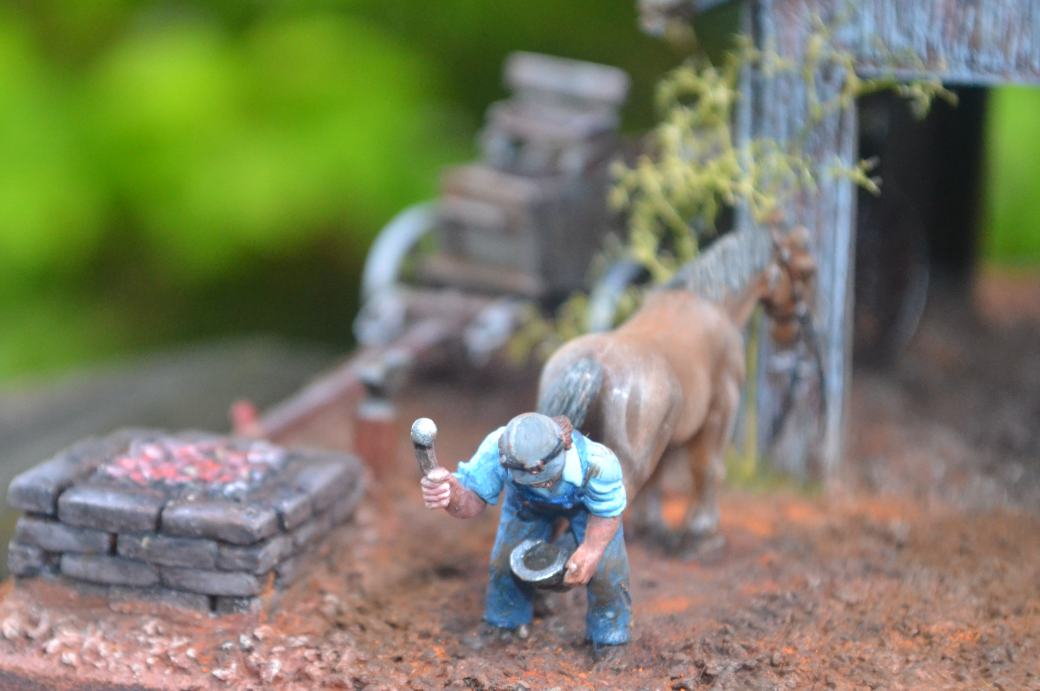
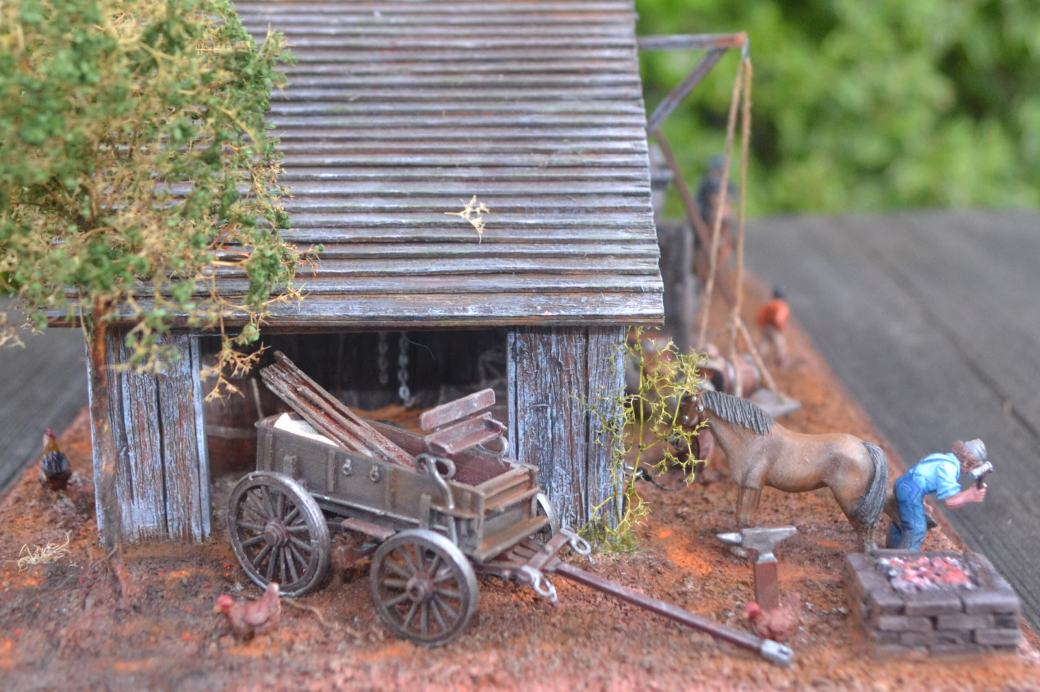
With the buildings complete a few additions were added in the way of posters, weeds, grasses, dust and ladders etc for added realism.  The next step was to work on the train and the figures.

The train itself went together quite well and painted up OK too I felt.  I added wood to the Tender and a few pipes and levers to the cab.  The figures themselves were then painted using oil paint and placed on the diorama.  I also allowed for the Tender to be removable if required.

The finished train.

Images of the completed model appear below.

28mm Building Project No: 3 – Livery Stable

Having completed two building projects I was ready to have a go at scratch building one.  I already knew that I wanted to build a Livery Stable and had in mind a rough idea of how it would look when completed.  To be fair the idea was based upon an old Britain’s Livery Stable (see image below) which I used to play with as a kid.

download

My first step was to put my design down on paper.  Having taken account of the base size, and working to a scale of 28mm equals 6 feet (and therefore 5mm equals approximately 1 foot), I drew the outline on graph paper (front, back and sides). Coffee stirrers were then cut to shape and using pva glue were stuck to card.  I used thick card, the type they use for making picture frame mounts.

Outline graph paper drawings and coffee stirrers

As part of my design I intended to have a roof which could be removed in order to look inside, so coffee stirrers needed to be stuck to both sides of the cardboad. The one thing I had not accounted for was the contraction brought about by the pva drying.  As a consequence the dried walls curled up a little rather than lay flat. Had I weighted the sides down while drying things might have been better.  The problem wasn’t insurmountable but it became clear that I needed to redesign the inside slightly so that the sides could be braced and pulled together when assembled and glued.

Early internal images showing the upper flooring and stable posts which were used to brace the sides at assembly

You will notice from the images above that the inside was also painted at this stage as it was much easier to man handle the model and gain access to all internal areas. My next steps were to add the door frames, construct the winch system, build the doors and begin the roof.  Coffee stirrers were again used and cut to size.

20160414_12054820160413_19034120160414_12053920160414_12060620160416_13350520160416_151301

Various images of the outside and roof as the model began to come together and the figures started to be included

The right hand side of the roof as viewed in the above image was made to be removable while the left hand side was fixed.

The next stage was to paint the outside of the building but before doing so the wooden stirrers were roughed up using a wire brush and a modelling knife to add character which would become more obvious when the painting and dry brushing was done.  For painting I used a variety of different colour washes.  The washes were all created using various oil paints thinned out using white spirit.  I’m sure the purists would be horrified at the use of white spirit but I think the medium is great and use it all the time to thin and matt down oil paints.  The great thing about using real wooden coffee stirrers is the paint washes soak into the wood and in my opinion produce a nice finish.

With the building essentially complete attention was now directed to the figures and internal detailing.  The figures were mostly from http://www.dixon-minis.com – their Old West and American Civil War series.  Minor conversions were made to an artillery figure which was adjusted to pull the rope and the riden horse had saddle bags and a blanket added.

Ground work was essentially grit swept from the curb side and the greenery comprises of static grass, taller grass made from string and Seafoam Trees purchased from http://www.gaugemaster.com.  These trees are aimed at railway modellers but they are ideal for 28mm scale either as trees, bushes or climbing plants.  They are best painted with a diluted paint and then dressed with leaf materials applied using hair spray.

Images of the completed model appear below.

It was only after I had completed this model that I saw some images of roofs made of wooden shingles and thought they looked much better.  I decided that shingle roofs would be the next step towards improving my scratch built buildings.  More on this when I get round to publishing Building Project No: 4.

CSC_0899DSC_0886CSC_0896CSC_0894CSC_0895CSC_0893CSC_0892CSC_0891CSC_0890CSC_0889DSC_0887

28mm Building Project No: 2 – Pioneers Cabin

For this diorama I wanted to try to improve upon my first building project.  As a theme I decided to go with a pioneers cabin set in the middle of nowhere and where the early settlers would have had a non violent relationship with the local tribal indians.  The completed result appears below.

DSC_0863

The building itself is another kit from Sarrisa (North American series) which has had some modifications.  As mentioned in my earlier Building Project No: 1 post, I wanted to add some depth to my next building and decided to use coffee stirrer’s to help achieve this.  I wasn’t bold enough to clad the building walls but did alter the roof.  Overall I was pleased with the outcome and with hindsight wished I had done something with the walls after all!

The building also featured a stone chimney.  Being laser etched the chimney looked very flat and so along with doing alterations to the roof I decided to build a new chimney using cat litter and filler.  Picture below.

DSC_0870

Another first in this dioram was the introduction of “water”.  Woodland Scenics “Realistic Water” was used in the water trough and for creating the small waterfall and stream.  See below.

As with most things done for the first time there is a learning curve.  “Realistic Water” is like real water in that it runs everywhere and will escape all over the base unless it is properly contained.  If you want to add water to anything you do this stuff is great and there are some excellent tutorials on Youtube which can tell you how to use this stuff far better than I can.

The figures and wagon are all 28mm Dixon Miniatures.

A few more photo’s of this diorama are below.

DSC_0869DSC_0866DSC_0865DSC_0871DSC_0868DSC_0863

For my next building project I decided I would try my hand at constructing a building completely from scratch.  More on that to follow.  In the meaanwhile I need to work on my photography skills as these images aren’t that great!


28mm Building Project No: 1 – Undertakers & General Store

As mentioned in my previous post, I decided that scaling down to 28mm was my best option if I wanted to include buildings within my dioramas.  Having reached that decision a quick internet search for 28mm old west Buildings led to my discovery of Sarissa Precission’s website (http://www.sarissa-precision.com).  Sarissa have a whole host of buildings covering various periods including the Old West and North America both of which were of interest to me.

Sarissa’s buildings are made of MDF with laser etched detail, fit together perfectly and look very good when made up.  They were just what I was looking for and so I purchased two of them for the model pictured below.  The building on the left is Old West model code SmallPLUS Building 1 and the building on the right is Old West model code SmallPLUS Building 4.  For both buildings I also purchased the optional apex roof (I’m no fan of the characterless flat roof that comes as standard).

20170324_141235

The aim of the diorama was to simply capture a moment in time on the street of a western town.  The buildings themselves were simply painted but, as can be seen from the additional photo’s below, I also chose to fit out the insides of both buildings. For reference all the figures in this diorama are from Dixon’s Miniatures (http://www.dixon-minis.comand the various internal accessories are mostly from Frontline Wargaming (http://www.frontlinewargaming.co.uk).

Inside the General Store

Inside the Undertakers

The only minor adjustments I made to both buildings was to add clear plastic glazing where appropriate to doors and windows, to make a hole in each roof for the chimney of the wood burning stoves and to add the main signage (this was done using Word together with a downloaded western font which was printed and given a light colour wash).  Overall I was pleased with the outcome of my first building but as is often the case we are often our own worst critic and so, on closer inspection I felt there were improvements which could be made next time around.

A better painter than me would have been able to add depth to the wood of the building and to the roof tiles.  That was beyond my skill set and so my overall impression was that the end result was rather flat and lacking in character and depth.  How I could improve upon this came to me in Burger King while I was stirring my coffee – use real wooden coffee stirrers for cladding!  Which leads nicely onto the subject of my next post, My Second Building.

DSC_0830DSC_0831DSC_0832DSC_0827

Buildings – Introduction

As a kid I can remember Britains toys adding to their swoppet range by introducing western buildings and I can recall having been given the Bank, Jail, Hotel, Ranch House and Livery Stable as christmas and birthday presents.  I mention this only because it was these memories which inspired me to want to go beyond just painting figures to adding buildings to my modelling.

One of the first things to consider is the scale you want to build in.  As a modeller I had for the most part painted 54mm figures up to this point and as a consequence my initial idea was to build in this scale.  I soon realised that this presented two problems. Firstly, the constructed building would be quite large.  Secondly, how would I store or display it and keep it free of dust?

Pathetic as this sounds it took me a while to reach the obvious answer – build in a smaller scale!  I had only ever really considered 28mm to be a war gaming scale and as such had never properly looked at available figures and accessories. Needless to say a quick internet search opened up an entire new world and I haven’t looked back since.

I am by no means an expert on constructing buildings, if I were then I would would not be The Imperfect Modeller.  However, in a short period of time I have managed to move on from simply constructing and painting bought buildings to constructing my own frrom scratch, a most rewarding experience.

In this series of posts I will go through the evolution of my buildings.  In the meanwhile a picture below of a Livery Stable I constructed completely from scratch. It’s not without it’s faults (which I will highlight going forward) but it was only my third building ever.

20160508_205449