Operation Overlord – A 28mm WW2 Diorama (Part 1 – Building No: 1)

Introduction

The Plymouth Model Club has chosen D-Day as the theme for next years show, an exhibition to mark the 75th anniversary of the invasion landings.  All the club members have plans to produce something and for my part I thought I would, in addition to a few other models that I will produce, make a sizeable diorama.  If I manage to pull it off then it will be the biggest diorama I will have done.  Not necessarily the most complicated but certainly the biggest.

It will also be time-consuming to produce so this will most likely be the first of a number of posts on this project.  I will post regular updates but for my sanity as well as yours I expect I will work on a few other things in parallel and vary my future posts accordingly.

So what do I have in mind to put together?

The concept is a simple one and one which may well evolve a little as I begin to make progress.  The plan is to have three, possibly four, buildings representing a small street scene with troops from the 101st US Paratroop making their way carefully along the road.  Dimensions and aesthetics will play a part in the final design.  Written down I can’t believe how shit this concept sounds but the image in my head is much better so at this stage you’re just going to have to trust me!  The devil will be in the detail as I hope you will come to see.

Key to the diorama will be the buildings.  Initially I thought I would do my own completely from scratch but windows in particular are a nightmare.  I then decided to buy a kit from Charlie Foxtrot, ironically a company I discovered at this year’s Plymouth show where Colin, the owner had a display.  If I like the end result then I will purchase the remaining buildings from him too.

So let’s get this series underway starting with the first building.

The Kit – Ruined House No: 2 by Charlie Foxtrot Models

Below is a picture of the actual kit as it appears on the website.  It’s probably easier to look at the pictures of how it is designed to look than for me to tell you, particularly as I have plans to make a number of changes.


The link below will take you to this kit on the website and to the online shop if it’s of interest to you.

28mm 1:56 "Ruined House 2"

Looking at the kit you may well be asking yourself why would I want to make changes to what is essentially a highly detailed kit?  There are two main reasons.  Firstly the kit is made of MDF which is a great material for accurate laser cutting and etching but the finish is flat and characterless.  Secondly, whilst the kit is probably ideal for war gaming in that it neatly comes apart it is not detailed enough when it comes to being a feature of a diorama (well not for me at least).  This will probably become clearer as the construction of this kit gets underway.

I mentioned earlier that my plan is to have at least three buildings.  This is the first of the them and I expect it will prove to be the most challenging, mainly because it will require internal changes and enhancements in addition to an external makeover.  I’ll explain why as the build progresses.

Time for a couple of photos.

20180926_14094520180926_14112720180926_141944

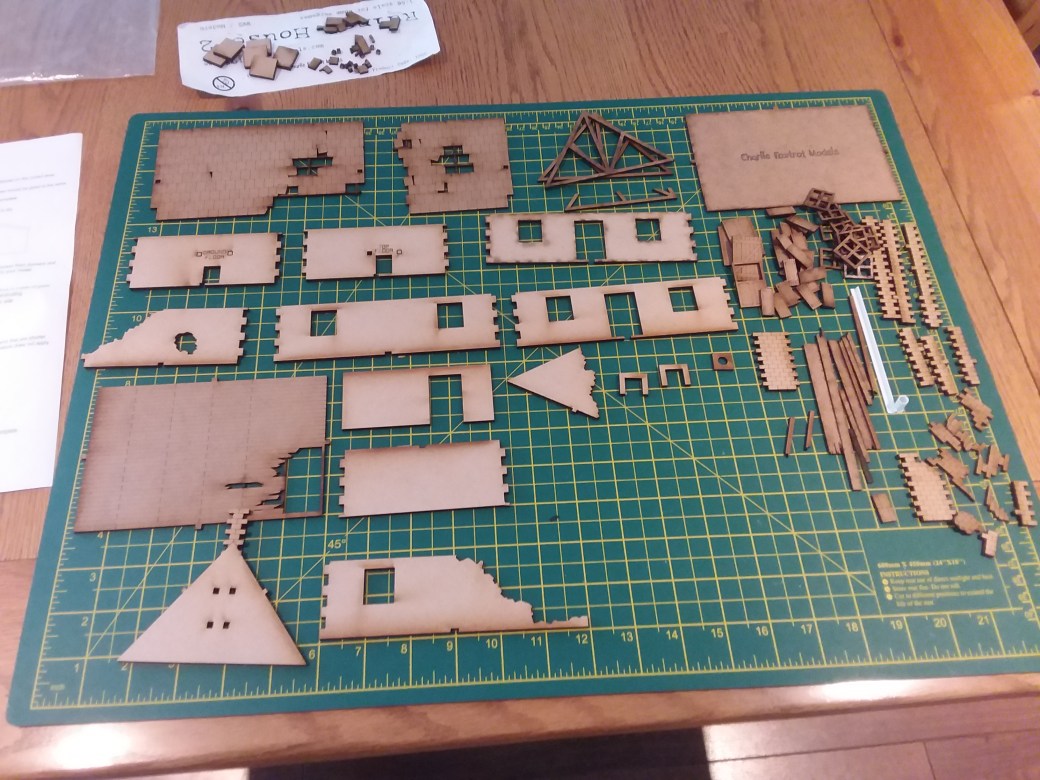
The first picture shows an image of the kit unopened in its bag.  The second and third show all the bits neatly laid out as I try to work out how the hell it all goes together.  A single A4 sheet of instructions is provided and to my surprise it did prove to be sufficient coupled with a bit of common sense and a few references to the online images on the Charlie Foxtrot website.

The model when assembled is meant to consist of three parts.  The ground floor, the first floor and the roof.  Because it is a war gaming building it is also meant to come apart rather than to be assembled as a solid single construction which is what I will be doing with it.  My first consideration therefore was to determine if it would be possible to see inside the ground floor.  If it was then I would need to make changes at this point as access to this area would not be possible once the first floor was added.

I decided it would be possible to see a little bit inside through the windows and through the hole in the ceiling as you look down from the first floor but I couldn’t be sure just how much.  I therefore concluded that some internal fitting out was necessary, just to be on the safe side at least.

The first thing I decided to do was wallpaper the internal walls.  On a “Dolls House” website I found some free wallpaper downloads.  I chose a small print for scale purposes and printed a couple of sheets on to photographic paper.  Photographic paper being thicker would glue better to the walls and would not make the inks run.  Each wall was “papered”and the floor too was covered with a wooden floor board print which I also found on the same website.  Normally I would use coffee stirrer’s for a wooden floor but didn’t think that was necessary on this occasion given how much would be seen.

20180926_16242420180929_132627

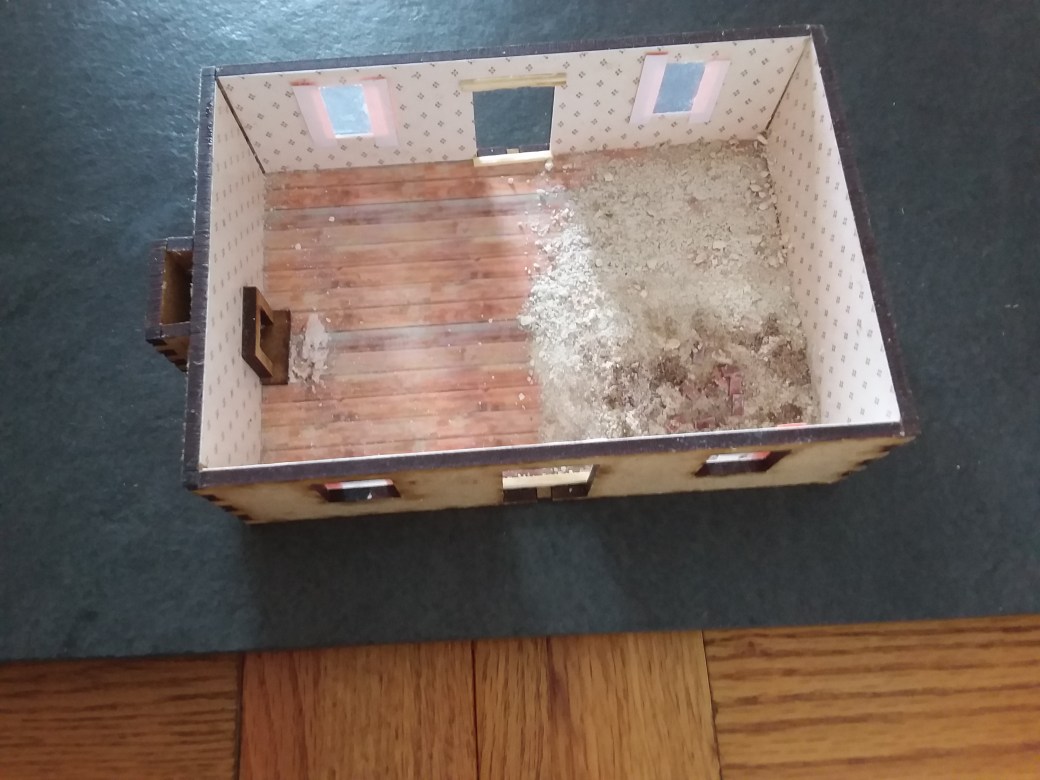
The next step was to glaze the windows using clear hard plastic.  Pieces were cut and stuck to the inside of the walls.  The windows would go in later after they were painted.  Completing the glazing at this stage would also stop the windows from falling into the building when assembled when it would be harder to get them out if that happened.  I also made one of the windows with “broken glass” by simply cutting the clear plastic accordingly.  Using some paper painted with acrylic paint I also made curtain for the windows which would be visible from the outside looking in.

20180929_132641

A similar problem to the windows existed with the front and back doors so to prevent them from falling in when it was time to fix them in place I glued matches to the top and bottom of both the door openings.  When the first floor is in place there is a hole in the floor which looks down and into the ground floor.  Now was the time to put debris in place so ground plaster board along with a few scale brick and pieces of timber were added.  At this stage the modified ground was complete and duly assembled.

The next step was to direct my attention to the first floor.

The first floor is divided into two rooms, one of which represents the damaged end of the house where the roof above the floor has been blown up.  Now the first thing I noticed with the kit design was that you could look into both these areas.  In itself this would not have been a problem except for the fact that the kit has no internal staircase.  This bugged me and so the only way I could see to get around the problem was to put a ceiling above the undamaged room (if anyone asks the staircase is on that side of the house!).

The ceiling was made using wooden coffee stirrer’s stuck to a piece of MDF which was cut to size.  The ceiling piece had to be inserted rather than simply laid on top as this would have thrown out the fit of the roof at the next stage.  For support coffee stirrer battens were positioned at the top of each of the four wall sides.  Having created a ceiling for one half of the first floor it was appropriate to make a damaged one for the other side too.  The first floor was also wall papered and glazed in the same way as the ground floor.


20180929_13272920180927_18182820180930_15061020180930_150659

The sharp eyed among you might notice that I have Peter Gabriel on in the back ground!

The next stage was to look more closely at the roof assembly.  The only thing which really needed to be addressed was the tiling.  I don’t like flat roofs and do not have the skill to produce 3D style painting so there was nothing to do but cut out several hundred cardboard tiles and glue them row after row to the MDF.  I’ve done this several times in the past and my method is tried and tested.  With suitable music or a DVD on it doesn’t take that long to achieve.  To make the tiles I used my Greenstuff World tile punch and cardboard from a cornflake box.  I find it is best to use cardboard where one side has a gloss finish.  The gloss finished side should be facing out when the tile is stuck down.  This is better for painting.  The other way around and the cardboard turns to mush if you aren’t careful.

Finally the two wall ends of the roof were rendered on the inside using ground plaster board on PVA glue.

20180930_150801

Following a little painting of areas which would prove difficult to paint if not done now the three components of the kit were ready for assembly.  The assembly itself was very straight forward, testimony of the quality of the kit.

The next job was to glue the windows, which had now been painted, into place.  This was then followed by adding some initial bits of debris to the first floor and then rendering the outside walls.  The rendering was done over several days as each side was allowed to thoroughly dry before moving on to the next external wall.  Diluted PVA was used on the outside walls before chinchilla dust (yes, chinchilla dust!) was applied to the outside.

20180930_22212320181001_16180020181001_16182220181001_161811

The damaged wall kit pieces came with small MDF brick sections which could be stuck on.  As with the roof tiles the brick looks very flat so I simply decided to go with ground plaster board to provide a rough cast finish to the top edges of the exposed MDF.

Once it was all dry I painted the render with some Dulux Emulsion paint and used Burn Umber oil paint heavily diluted with white spirit to provide some initial weathering to the walls.

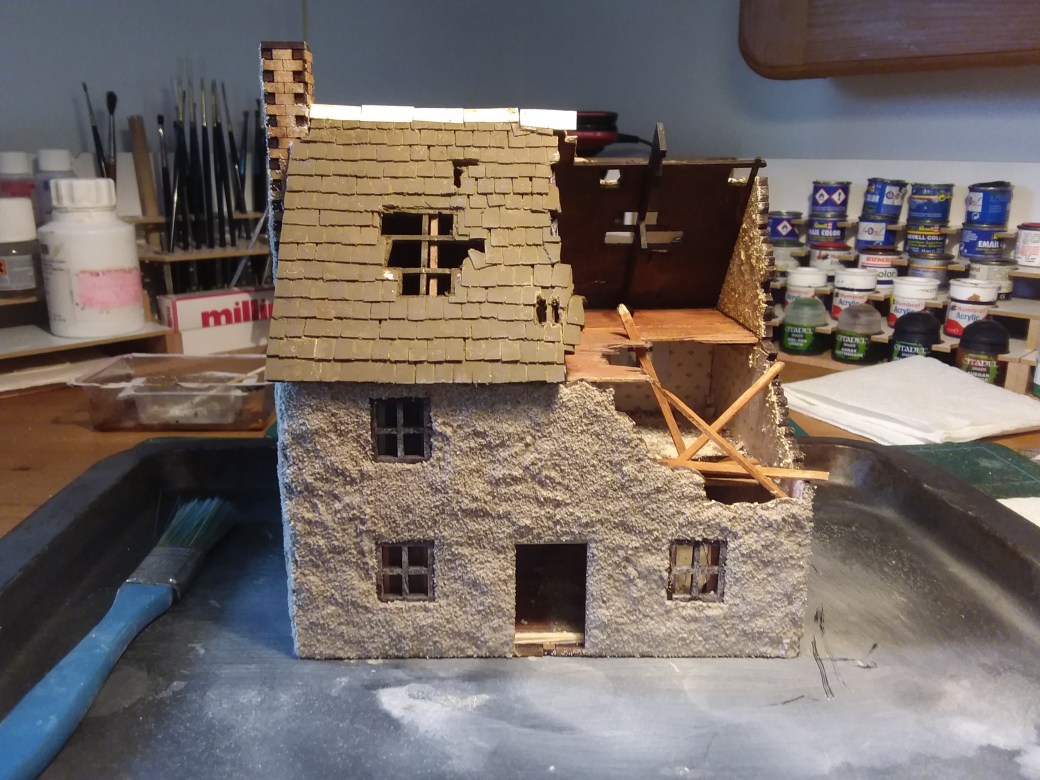
The completed model to date is shown below.  It is not finished.  The render needs to be weathered further, the window shutters need to be fixed in place and so do the doors.  At this stage I’ve yet to decide which windows will have open or closed shutters and the same goes for the doors.  These are things I will look at more closely when I make further progress on the rest of the diorama.  Scattered debris of brick, tiles, wood and broken glass will be added to the inside and outside at a future assembly stage but for now I have done as much as I can do on this one.

The next step is to order the remaining buildings for the diorama having decided I like Charlie Foxtrot’s kits.  While I’m waiting for them to come I can divert my attention to the October challenge!

Images of the current state of play below.  It doesn’t look very impressive at the moment but there is a long way to go!

TIM

20181004_16281120181004_16263420181004_16262020181004_16260420181004_162656

Fantasy Island – “The Making Of”

Firstly, thank you to those of you who commented on the original post last week, I really appreciated what you had to say.

For those of you who may not have seen the initial post and the images of the completed model a photo reminder along with a link to the article.

DSC_0812

DSC_0816

https://theimperfectmodeller.wordpress.com/2018/07/14/fantasy-island-featuring-nienna-a-28mm-reaper-elf-ranger-the-july-challenge/comment-page-1/#comment-1200

One or two of you already have thoughts on how it was constructed so I suspect this may well confirm your thinking.  Let’s get started.

The inspiration for this model came from an image I saw online, a drawing to be precise, which got me thinking about how I could bring something like it to life.  My intention at this point was to insert a copy of the image but I never downloaded it at the time and now I cannot locate it.  I’m going to therefore lie instead and say that the inspiration was entirely mine, I’m simply that creative!

For a while I mulled over how to build it.  Much of what I wanted to do was straight forward but my big concern was the potential weight issue and how to keep it from toppling over.  I’m no engineer, mathematician or physicist so this was a big problem in my head.  In the end though it didn’t turn out to be the issue I thought it would be.

The key to the “floating island” is of course the waterfall.  I had done a waterfall before in a diorama I called “Rocky Mountain Deer Hunt” (see images below) but the backdrop was a solid one which wouldn’t be the case for this model.  I couldn’t be sure if it would be possible to see through the waterfall or not so I needed something strong enough to support the island but be transparent if necessary.  This naturally ruled out a number of options and pretty much left me with needing to get hold of some clear acrylic.

20141214_13521020141214_135406

As is often the case EBay came to the rescue and for a small cost I bought an A5 sheet of 5mm thick acrylic.  Getting a wooden base was an easy purchase but now I was stumped by what to use for the island.  It needed to be light, solid and versatile enough to be able to shape it.  In the end I went for Styrofoam, not a product I’d ever used before but a few things I’d read gave it the thumbs up so I thought I would give it a go.  Once again EBay provided the solution and I managed to buy six small blocks which were an ideal size.  I only needed one so expect to see others appearing in models over time!  I now had all the things I needed so it was time to start the build.

Step 1

The first thing to do was cut off a suitable length of the acrylic sheet.  I read online that up to 5mm thick this stuff can be cut using a tile cutter and then applying a little pressure to snap it.  Like many theories it was great but turned out to be complete bollocks.  In the end I took a saw to it and some sand paper to smooth off the rough edges.  I also drilled a couple of holes which I counter sunk to ensure the screws would be flush once fixed to the Styrofoam.

20180420_134047

Step 2

Now that I had cut the acrylic I could determine the location and size of the hole I needed to drill into the wooden base.  It needed to be a reasonable fit and a tight one but any rough finish would be covered eventually by ground work.

20180420_134033

Step 3

Carving Styrofoam is pretty easy and a sharp knife is all that’s needed to cut away chunks of it.  The main thing I needed to do at this stage was get a rough outline and rebate the block in order to counter sink the acrylic.  Styrofoam can also be drilled so having lined things up I drilled two holes into the block and inserted a couple of raw plugs.

20180420_134042

Step 4

The first moment of truth, making sure it all lined up!

20180420_134225

Step 5

Before screwing and glueing I shaped the top of the block further.  I needed to make steps around the top to be able to fix rocks and stones to build it up.  Once glued I made sure it was level and left it to dry.  At this point I could still remove it from the wooden base if I needed too.

20180420_162610

Step 6

Once dried the next on the to do list was building up the rocks on top and around the Styrofoam.  For this I used slate chippings from my front garden.  Initially I was concerned about the weight but the acrylic was thick enough not to bend and the positioning on the base ensured it wouldn’t fall over.

20180420_20315020180420_17114420180420_20321820180420_203150

Step 7

The build up of the base was a slow process.  To ensure things didn’t fall a part it proved necessary to build and glue in layers allowing each layer to fully dry before moving onto the next one.  In between drying times I started building a wire based tree, a method I’ve used before.  Rather than repeat the various stages of the tree build a link appears below to the two part article I produced previously.

Part 1

https://theimperfectmodeller.wordpress.com/2017/06/04/on-the-work-bench-scratch-built-wire-tree/

Part 2

https://theimperfectmodeller.wordpress.com/2017/06/07/on-the-work-bench-scratch-built-wire-tree-part-2/

20180422_125254

20180421_170158

Step 8

Having advanced to this stage I then realised that I hadn’t fully thought through how to start the waterfall.  In some way I wanted it to be magical, coming out of thin air but using the materials I had (Woodland Scenics Water Effects) was proving difficult.  Getting it to stay upright in some way just wasn’t going to work, it needed some support.

The solution presented itself purely by chance when out walking with Buddy, my dog.  Someone had cut their hedge and lying on the ground was a piece of wood with a hole in it.  I figured I could use this in some way, the result of which can be seen in the photo’s below.

The basic tree was now fixed into place along with the first step of the waterfall.  Woodland Scenics have some great tutorials on how to use their products to I would suggest checking them out if you ever want to undertake a waterfall yourself.

20180422_12524120180424_165004

Step 9

The next step was to add the main waterfall to the model and stick it to the acrylic stand at the front and around the sides and at the back.  Adding white paint to the Woodland Scenics Water Effects gives the effect of fast flowing water.

It was also time to start constructing the base at the bottom of the waterfall and disguising the drilled area.

20180424_171533

Step 10

This step was all about painting the base, finishing the tree and adding suitable vegetation.  I like this stage on a model, the colour which gets added really starts to give things a lift and for the first time it starts to look a bit real.

I figured a decent sized waterfall would throw up a certain amount of spray and mist (well it does in my fantasy world even if it doesn’t in the real one!).  For this I used some stuffing used in soft toy making, I’m told by She Who Must Be Obeyed that this is called Kapok.  This was glued in place at the bottom and then just teased out.

20180425_14232620180425_142412

Step 11

The final step was to paint the Reaper figure I’d bought specifically for the model, position it and blend in the base.

I got lucky with the figure.  Clearly it had to be a fantasy based figure give the nature of the model but ideally I wanted a figure which looked like it was at the edge of the waterfall having come to a reasonably dramatic stop.  As soon as I saw this figure I knew it was the one for me!

20180427_15363120180427_15405620180427_15582920180427_160019

Step 12

The final model!

DSC_0812DSC_0813DSC_0815DSC_0816DSC_0819

—000—

So there you have it, how I made “Fantasy Island”.  Hopefully I’ve covered it all but if there is anything anyone would like more details on please just let me know.

TIM


Oil Paints – Hit or Myth? – A News at TIM – Mid Week Musings Special!

Welcome to a Mid Week Musings Special!

The Pros and Pros of Oil Paints

The May Day Bank Holiday provided some glorious sunshine which resulted in me sitting in the garden rather than modelling.  Instead I sat warmly in the shade (I’m fair-skinned what can I say?) watching a series of videos on YouTube aimed at painting basics.  Before I go further let me be clear on something from the start.  I am not, and never will be an expert modeller or painter.  I can however improve particularly as I am essentially self-taught.  I mention this because even watching videos on the basics I still find myself learning things or at the very least reminding myself of things I no longer do but arguably ought to.

So, why is this relevant to the title of this post? Well, two-thirds of the way through the list of tutorials the narrator started talking about “Wet Blending and Layering” techniques which it turns out I am familiar with but not by those names (in truth I didn’t even know there were names for these things).  The principles behind these techniques if I understood correctly is to achieve an end result which provides a smooth transition from one colour to another as particularly relevant to shading and highlighting.  The narrator went on to say that these techniques were in his opinion amongst the hardest to learn due to the fact that acrylic paints simply dry too quickly.  He went on to explain how to achieve Wet Blending but to be honest I had already switched off a little having decided this wasn’t for me right now.  Why?  Because I’m happy to use my oil paints to achieve these results.

There are in my opinion a lot of myths surrounding the use of oil paints for modelling and so I thought I would produce an article to expel some of them and explain a little of what I do and why.  I also thought if there are people who struggle with Wet Blending because it’s as difficult as the guy said then perhaps trying oils as an alternative might work.  So, in no particular order …

Myth No: 1 – Oil Paints are Expensive

Wrong!  A Winsor & Newton 37ml tube in the Winton Oil Colour range will set you back about £2.75.  In contrast a 17ml pot of Vallejo Game Color will cost about £2.45.  Ah I hear you say, £2.75 is more expensive than £2.45 and you would be right but for one little thing.  Except for three colours, my oil paints have over two-thirds left in every tube and are as good as the day they were bought which was over 30 years ago!  Every model which appears in my Gallery, and that’s not everything I have ever done by any means, was either fully or mostly painted using these paints.

All in all I have 16 tubes of paint.  Two of these, Paynes Grey and Sap Green I never use.  The best Grey’s and Green’s are mixed, so really it’s 14 tubes.  From these 14 colours I can pretty much mix any colour I want using my colour wheel and because they are oils they stay mixed without drying out for as long as I need.  No need for a wet pallet.

The only three colours I have ever replaced, just once in each case was Burnt Umber, Titanium White and Ivory Black.  If I only painted figures I would not have needed to replace them but these colours, particularly the Burnt Umber, I have used a lot for base work.

Myth No: 2 – Oil Paints Only Produce a Gloss Finish

Wrong!  There are mediums wich can be added to produce a matt finish but the easiest option by far is to put out a small amount of paint onto a piece of paper and let the paper absorb some of the oil.  It is the oil that provides the sheen so once reduced it becomes more matt.  Matt varnish at the end of the painting process will also dull down any sheen.  Adding a little bit of white spirit or thinners keeps the oil paint extremely pliable if you remove a lot of the oil.

Myth No: 3 – Oil Paints Take A Long Time To Dry

Wrong!  OK, they can take longer but there are things you can do to speed the process up.  The first thing is not to put too much paint on in the first place.  It is easy to be heavy-handed with oils but the paint goes a long, long way and is best applied in thin coats in much the same way as acrylics.

The other thing you can do, and this is how I tend to paint, is to use the acrylics, particularly for the larger paint areas as an undercoat.  In this way the acrylic will absorb the oil and thus speed up the drying time.  Anything I paint these days only has to be left over night at the longest and to be fair that would probably apply too if you were batch painting so what’s the big deal?

The figure in the images below (apologies, not the best of photo, figure looks darker than it appears in the flesh!) was painted using a mixture of oil paints and acrylics which has become my preferred technique for 28mm and took a couple of hours in one sitting (yeah, yeah , yeah if I’d taken my time it would have looked better!).  It hasn’t had matt varnish applied.  I chose this figure and its colour scheme deliberately to show that you can paint a very light colour (white) up against a strong colour (blue) without merging the colours.  I’ll break the figure down in terms of how it was painted later in this article.

20180512_150248

Myth No: 4 – Oil Paints Aren’t Very pliable

Wrong!  Oil paint goes where you put it.  It can be used for dry brushing, diluted to make effective washes for those very fine areas of detail but above all, and this brings me to where the idea for this article started, it can be easily blended!

The whole point of oils in modelling is that it can be blended easily.  Put two colours next to one another and they wont run into each other.  Take a brush and run it between the two colours and before you know it you will have created a smooth transition from one colour to another.  Yes I am over simplifying it, it’s a techniques like everything else of course and therefore needs practice but get it wrong and you just wipe the oil off and start again.  There is no danger of the paint drying out so you can add dark or light colours a little at a time to achieve the shade or highlight you are looking for.

The end of the Myths?  That’s something you will need to decide.

Meanwhile a closer look at the little chap above.  A 28mm Artizan Alamo figure, William Travis.

When I started to paint 28mm scale figures I soon leant that there was a need to adjust the way I painted, mainly due to some of the very fine detail.  Washes in particular became important.  I also started to try out acrylic paints which until then I had never used.  The idea of not using oil paints didn’t sit well with me as I had been using them for years so I started painting using both mediums.  The figure below is such an example.

After initially priming the figure with white primer the first task was to paint the face.  This was done entirely using acrylics.  The jacket and the trousers were initially painted using blue and white acrylics respectively.  The jacket was then painted with a blue/black oil paint mix and a dry brush was used to remove excess oil paint to ensure a thin layer of paint only remained.  Black was then blended into make the shadows and a little white to creat the highlights.

The trousers were given a very diluted wash of burnt umber oil paint and then white oil paint was added to the raised areas for highlights.

The hat was painted in acrylic and later overcoated with thin oils.  Everything else – boots, belt, sword, hands – were painted in acrylics.  A demonstration piece not a master piece!


20180512_15024820180512_14552620180512_145556


How to Make a Model Fir Tree

Why fir trees?

I think it is fair to say that modelling in all its forms is a creative subject.  The problem with creativity is it can be expensive and it can also be frustrating.  The frustration coming from having an idea of what you want to create but having no idea of how to bring it to fruition.  I’m sure I’m not the only one who has had an idea but lacked a solution and sometimes had a solution – something you’ve wanted to try – but unable to think how best to do so.  In this instance fir trees and how to make them became the solution to a couple of dioramas I wanted to do build but couldn’t get my head around how to make the relevant trees – until now!

The dioramas I had in mind both feature 28mm figures from the Last of the Mohicans.  I had a clear idea of how I wanted them composed but was struggling with the scenic side of things.  The first of these models is now complete and the second is not far behind.  I will post details of the first one over the weekend but in the meanwhile I thought I would initially share with you the making of these trees.

I’m sure for many of you this is not something new.  Little things please little minds and in this instance my little mind was impressed by the fact that this technique, as well as being a simple one, doesn’t even involve any glue!

I guess the best place to start is with an image of the end result, that way you can switch off now if you don’t like it or continue if you do.  So, immediately below a couple of finished trees.  These were my first trees.  They’re not perfect but they were simple and affective and with a bit more practice I’m sure I can achieve better results.

20180206_201935

So now onto how they are made.  To begin with you will require a few basic tools (pliers or small hand vice, a cocktail stick or similar, scissors a metal comb although you might get away with a plastic one depending the string used), some coarse string, the type that can be thinned out, some wire, hair spray and some static grass.

Step one

Cut off lengths of string about three inches in length.  The trees I made were for using with 28mm scale figures.  Depending the scale you use you may wish to cut shorter or longer lengths.  Having said that trees come in all sizes through their development so I guess you go with what you think looks best for you.  How many lengths you cut will be determined by how tall you want your tree to be.  I cut about 15 to 20 lengths in this instance.

20180126_201235

Step Two

Using the metal comb separate the fibres of the string for each cut piece (see to the left of the image above).

Step Three

Cut a length of wire, I used wire with a thickness of 0.5mm cut to a length of approximately 14 inches.  Fold the wire in half and place the two ends into the vice, I used a small hand vice but you could use pliers or something similar.

20180126_203032

Step Four

Take the combed lengths of string and spread them out between the looped wire.

20180126_203223

Step Five

Take the cocktail stick or similar and place it at the looped end of the wire (see below).

20180126_203319

Step Six

Holding the cocktail stick in one hand and the hand vice in the other start turning and rotating the hand vice and don’t stop until the wire loop where the cocktail stick is has become tight to the cocktail stick (see above).

Step Seven

Remove the cocktail stick and cut off the small looped bit of wire.

Step Eight

Using the scissors cut the string to shape the tree.  Fir trees are essentially triangular so you need to cut the string so that the top of the tree is narrow/pointed at the top and wider at the bottom.  If you want to thin out from top to bottom to get more of a Christmas tree shape between the branches you can.

20180126_204150

Step Nine (Optional)

Depending on the colour string used you may wish to paint it.  The string I used was a great colour so I didn’t bother.

Step Ten

Spray the tree with hair spray, any cheap strong hold spray will do, you could use sprayed PVA too if you wanted to I suspect.  Then sprinkle the static grass on.  You may need to do a few applications until you are happy with what you have done.  I would also suggest that you turn the tree upside down and do the underside first.  I also used a darker static grass for the underneath and a lighter one on the up side.

20180206_201935

Step Eleven (Optional)

If you want to have a lot of bark showing then strip back the string at the lower end of the tree and apply some filler or Milliput to create a tree trunk.  Alternatively you can just have the tree branches closer to the ground.

—000—

Hopefully this all made sense!

As I said earlier, these were my first trees so certainly room for improvement.

TIM

On The Work Bench – Flat Bed River

My American Civil War diorama, when complete, aims to show a six-horse Confederate limber and cannon having crossed a river via a covered bridge.  A group of infantry men are standing either side of the road making way for the limber team to ride on through.

I have completed a tree for the diorma, the bridge and most of the figures and horses.  It was time to work on the base, specifically the small section of river which needed to be created.

My base was slightly modified by adding some wooden quadrant to all four sides.  This was done to raise the edges of the base and to give depth for the river and its banks to be made.  Filler, scraps of wood and whatever else was lying around was used to bring the base, with the exception of the river, to the level of the newly added quadrant.

The area which would become the river bed was then painted black.  This was done purely as a precaution just in case anything showed through at a later stage when it would have been too late to do anything about it.  Using a variety of materials – small bits of stone and gravel, cat litter and anything else rock like – I created the banks of the river.  Some pieces of fallen tree were added too to add a little more interest.

The river bed and bank were then painted using oil paints diluted slightly with white spirit.  Black was used to depict the bottom and therefore the deepest part of the river and then I used burnt umber, burnt sienna and raw sienna as as I worked my way from the bottom of the river bed and up the sides of the bank.  The oil paints blend well and dry a little quicker when used with white spirit.

Once dried the various “rocks” on the river bed and along the river bank, together with the pieces of fallen tree, were dry brushed to bring out detail and shading.  The next step was to add the “water”.  For this I use a Woodland Scenics product called Realistic Water, a silicone product which dries clear. Pending the depth of your river it is best to build up in layers allowing each one to dry before adding more “Realistic Water”. It does take quite a while to dry and is often best left to do so over night.

Having added the “Realistic Water” to the desired depth my next step was to add movement to the river.  If you only want to create the effect of a mill pond then movement is less critical but for a flowing river it’s a must.  Woodland Scenics do have products which you can buy to help achieve this but these can be pretty expensive to buy in the UK and besides there are other ways of doing it.  My preferred method is to simply take an old paint brush (you can use other things instead) and rough up the silicone a bit before it has gone off completly hard.  This does of course mean keeping an eye on it but as it does take a long time to dry so you only need to check after several hours and not every few minutes.  The aim of this process is to create ridges in the silcone to simulate water movement.  You do not need to go deep into the silicone but you do need to go with the flow of your river and not across. Once done leave to dry completely.

When completly dry I used to white oil paint to dry brush the ridges of the silicone. It’s best to go sparingly and add more as you think you need it.  If all goes well your river now looks like it’s flowing as the highlighted ridges look like white water.

Below are a few pictures of the various stages referred to above.  Images of the completed diorama will be posted soon.

On the Work Bench – New England Style Wooden Bridge

Work continues on my American Civil War  diorama, a feature of which is a New England Style wooden Bridge.  The bridge is based on an image I found online albeit that the “real” bridge and river were wider. Nature has few space constraints but alas my diorama base does so it was necessary to construct a shorter bridge!

The bridge itself was constructed using wooden coffee stirrers to make the base and sides, match sticks to make the front and back trim and cardboard to make the wooden shingle roof.  The finished bridge was then painted using a variety of oil based washes. For further details and information on construction and painting methods please refer to my “Building Projects” section.

Below are a few images of the bridge during construction. My next step is to work on the river, more of which in my next post.


On The Work Bench – Scratch Built Wire Tree (part 2)

Having allowed the All Purpose Filler mixed with PVA to dry the next step using a sharp tool (I use my modelling knife) is to scratch some lines into the trunk of the tree in order to create a better bark effect when painted.  Once done it’s time to paint the tree starting with the underside first.

The paints I use are Winton and Newton oils – Burnt Umber, Ivory Black, Burnt Sienna and Titanium White.  The first application applied was Burnt Umber, diluted with white spirit to create a wash which nicely soakes into the filler.  This was followed by a wash of black, mostly applied to the shadow areas, then followed by a wash of Burnt Sienna with emphasis on the upper outside branches.  Titanium White was dry brushed to provide highlights.

20170606_204432_resized

Almost there with the painting

With the paining complete the next step is to add the smaller branches which will take the leaves in due course.  For these smaller branches I use small pieces of “Seafoam Trees” available from Gaugemaster.  Bit by bit these are added to complete a full canopy.

20170606_212324_resized20170606_221022_resized

Small “Seafoam” branches added to complete canopy

The final step is to add the leaves.  For this I use “Leaf Foliage” by “Noch” which comes in a variety of colours allowing for a nice mix of trees if you are aiming to have several in a display or reflect other times of the year such as Autumn.  The tree canopy is sprayed with a strong hold Hairspray and the leaves sprinkled on. Typically I find this process needs to be done several times in order for the leaves to create clumps and create a finish that I am happy with.

20170607_194526_resized

The Final Tree

Essentially the tree is finished but as I intend to use this one on a diorama the roots will need to be worked on once again along with the appropriate ground work being added too.   It will be a while until the diorama is complete but when it is I will post some images of the tree in its final state.


On The Work Bench – Scratch Built Wire Tree (part 1)

Figures for my 28mm American Civil War diorama are coming along OK but I am now starting to think about base construction.  Decided I definitely want a tree and thought I would have another go at scratch building one.  I have only ever done one tree before and much to my surprise found it easier than I thought it would be.  It might have been beginners luck though so we will have to see how this one finally turns out.

To start with I wrapped some 0.5mm wire around an A5 pad about 20 times which gave me a loop of wire approximately 9 inches (23cm) long.  Once removed from the A5 pad the loop was twisted several times starting just below the half way point.  This produced a figure 8 shape.  The bottom loop was then cut so that the wire strands all became separated.

The separated wire strands were then grouped into four individual bunches.  Each bunch was then twisted a few times and then separated once again into either two or three further bunches which were also twisted a few times and then separated again until eventually only one strand remained.  Where the remaining strand was to long it was cut off to a length I was happy with.

Once I had done this to each of the initial bunches of wire I was left with the tree’s root system.

Having completed the root system the next step was to repeat the exercise by cutting through the upper loop and creating the branches.

20170604_190341_resized

Once this was complete it was then a case of spending a few moments positioning and bending the roots and branches into a shape I was happy with.  I then mixed up some All Purpose filler together with some PVA glue to an almost liquid consistency and using an old brush applied it to the underneath of the branches first and then to their upper side, the trunk and the roots.  It was then placed to one side to dry.

It might be necessary to add more filler and to scratch away any excess dried filler but that pretty much completes the process for the basic tree.  The next step will be to paint and “dress it”, more of which in a future post.