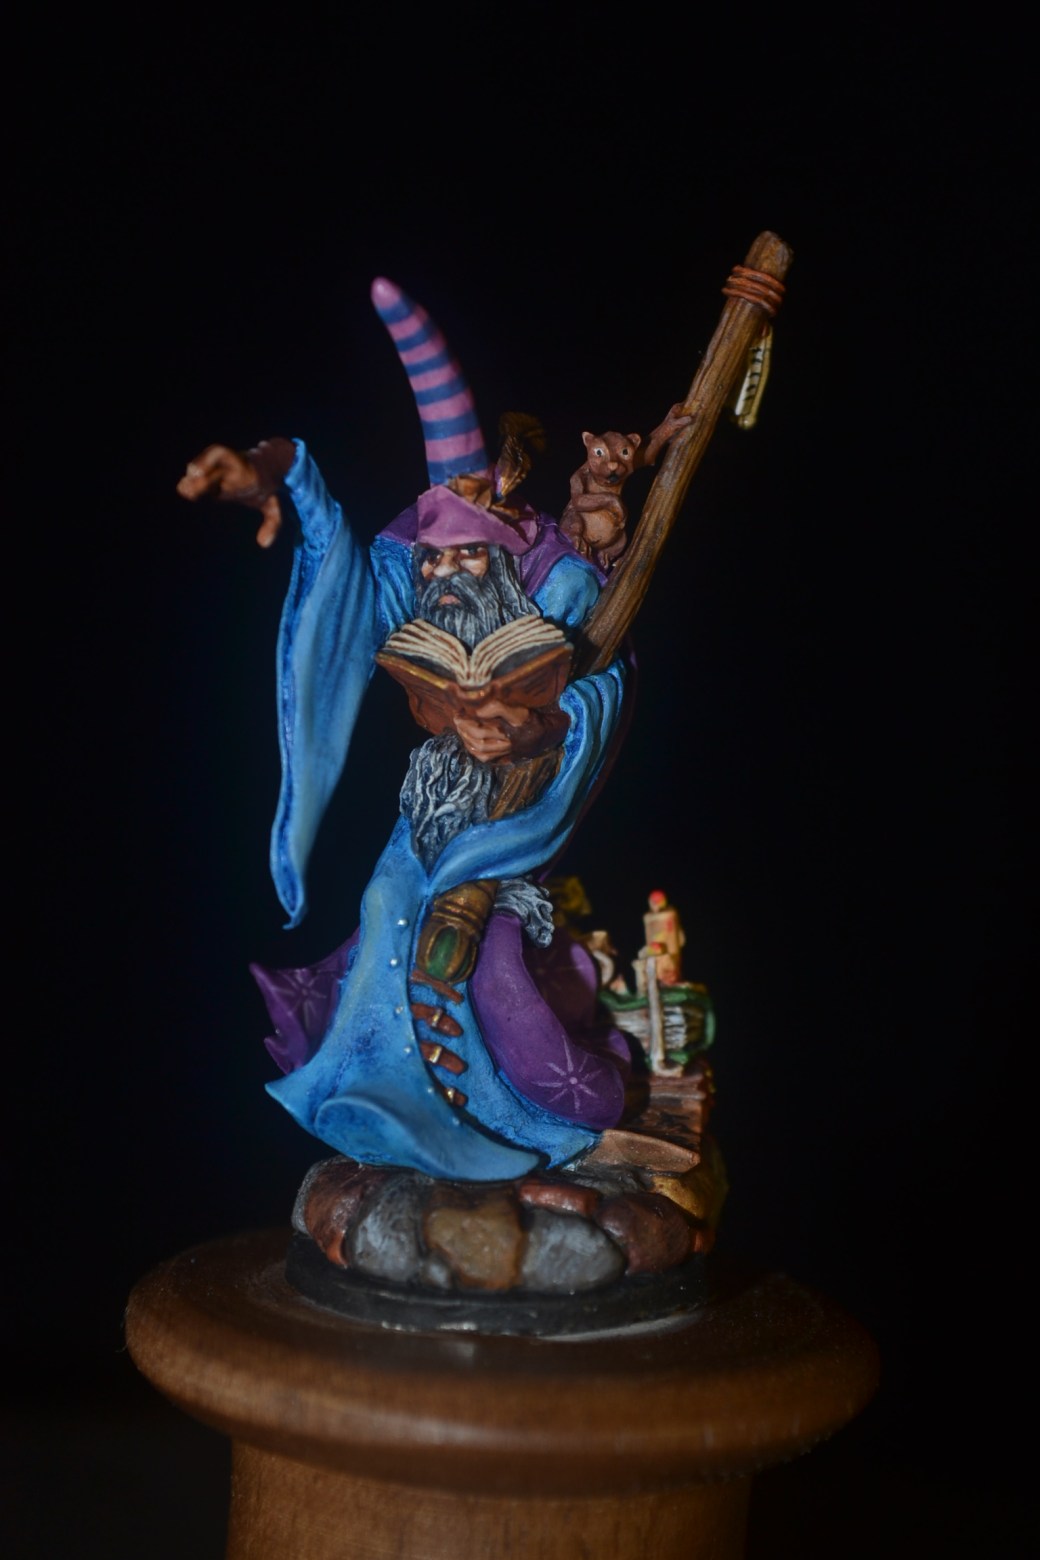
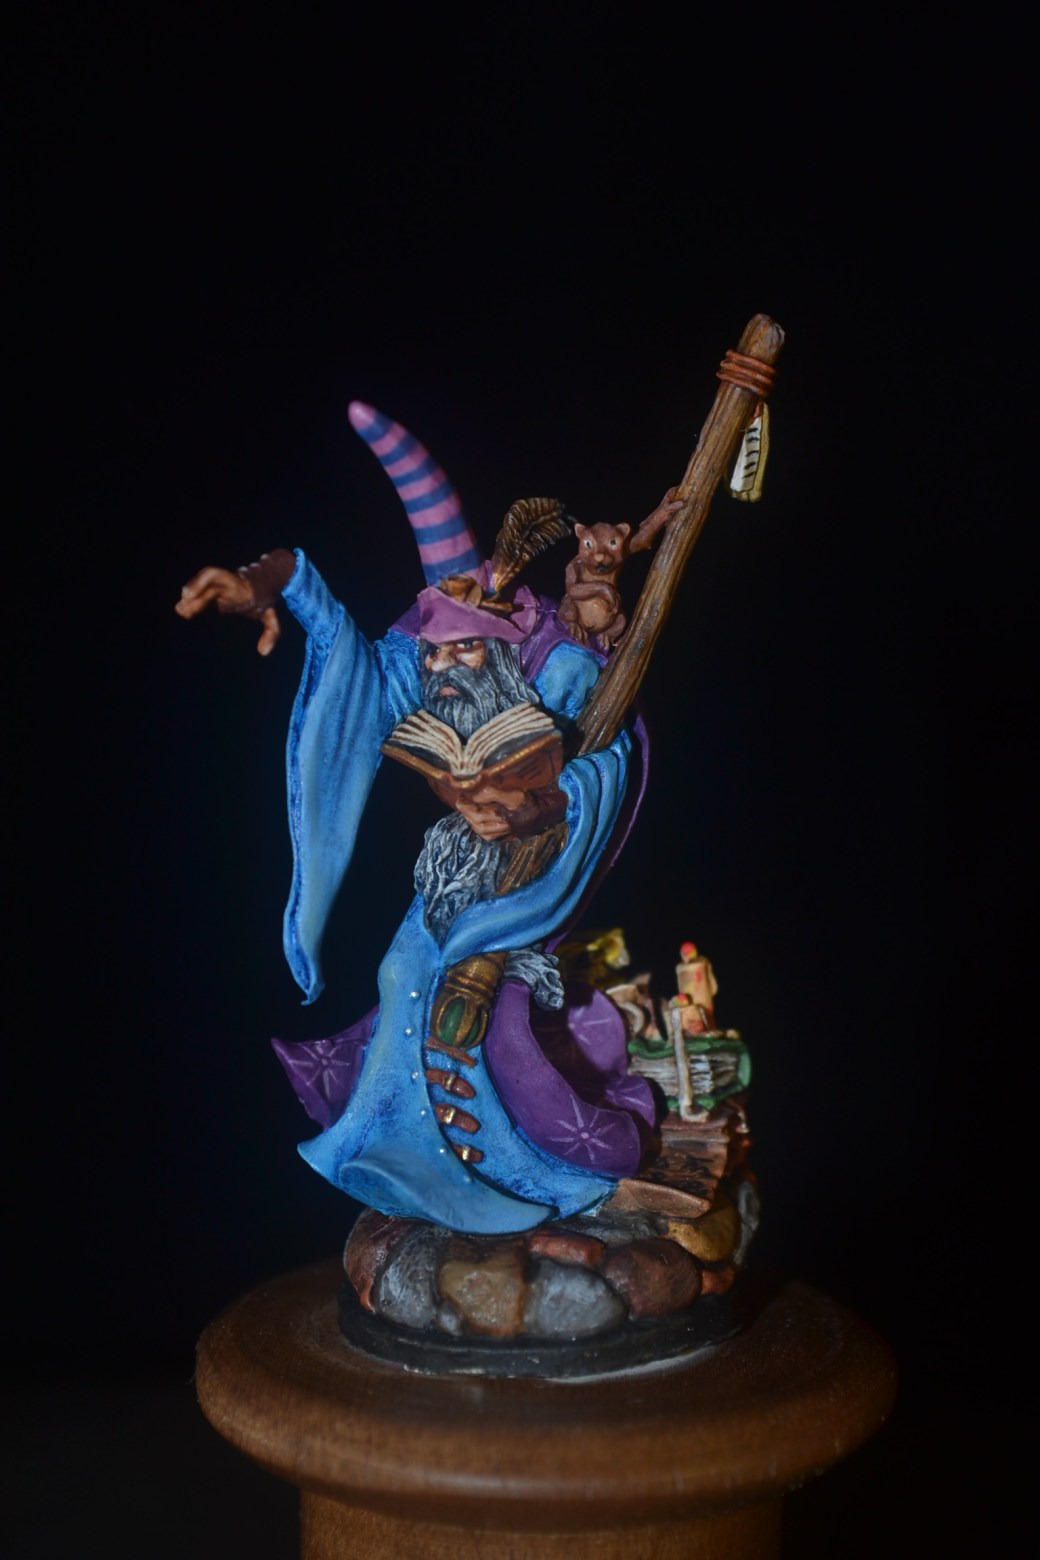
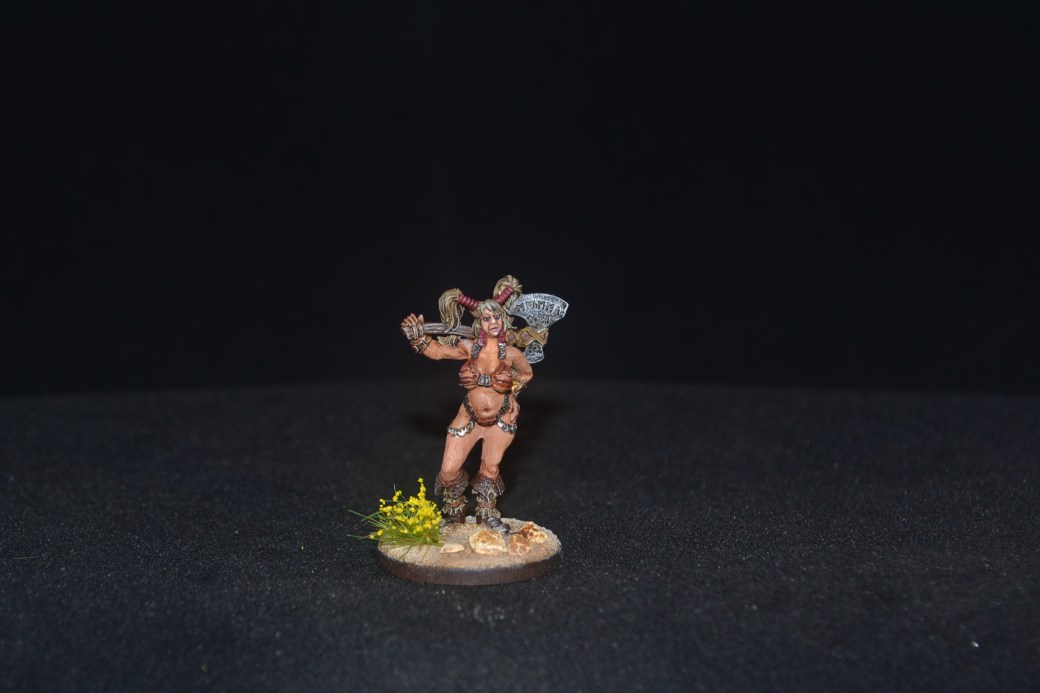
A break this week from OMG! as I promised Ann that I would take part in her challenge. I enjoy painting all sorts of figures but none more so than the occasional wizard, so I didn’t need much encouragement to enter her challenge. The brief was “March Might & Magic” and magic doesn’t come much better than a wizard. I am sure there are other manufactures out there and before too long I will have to check some of them out but for now nobody does a wizard sculpt better than Reaper in my opinion. The figures and the detail in them are to my mind simply stunning. As you can probably guess I am a fan!
What we have here is “Viharis Tenspire”. A lovely mini which I decided to simply base on one of my neighbours wood turned bases he so kindly does for me. As with most of the wizards their clothing provides plenty of opportunity for free hand painting.
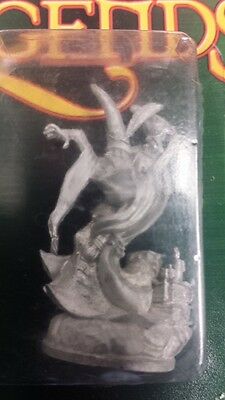
As required by the challenge a picture of the figure in the box followed by the end end result. One of my personal favourites.
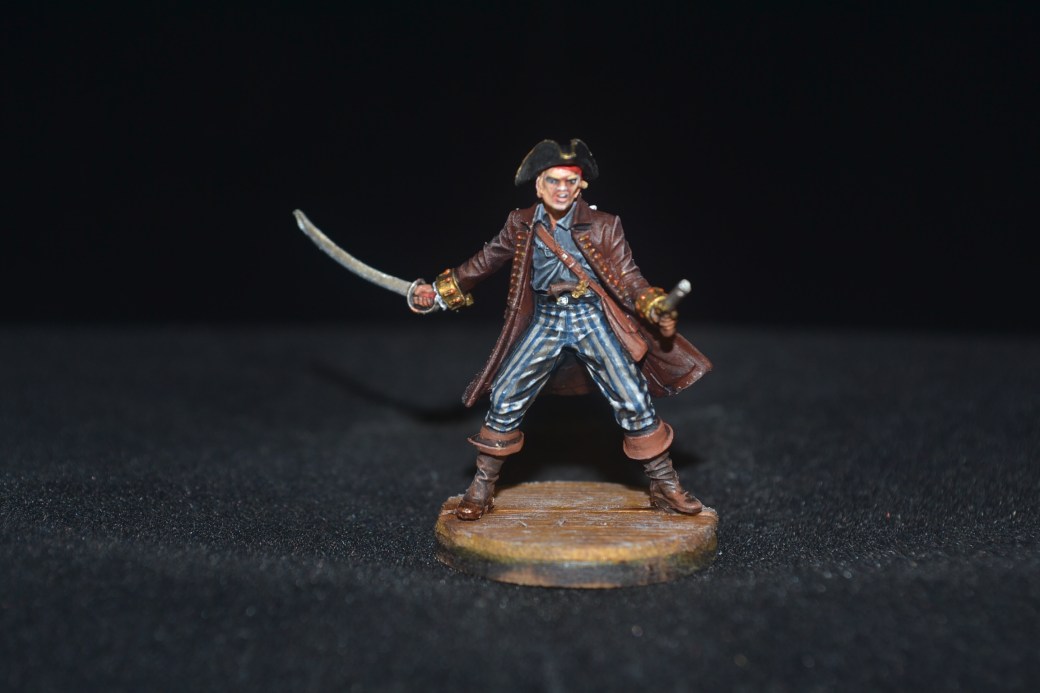
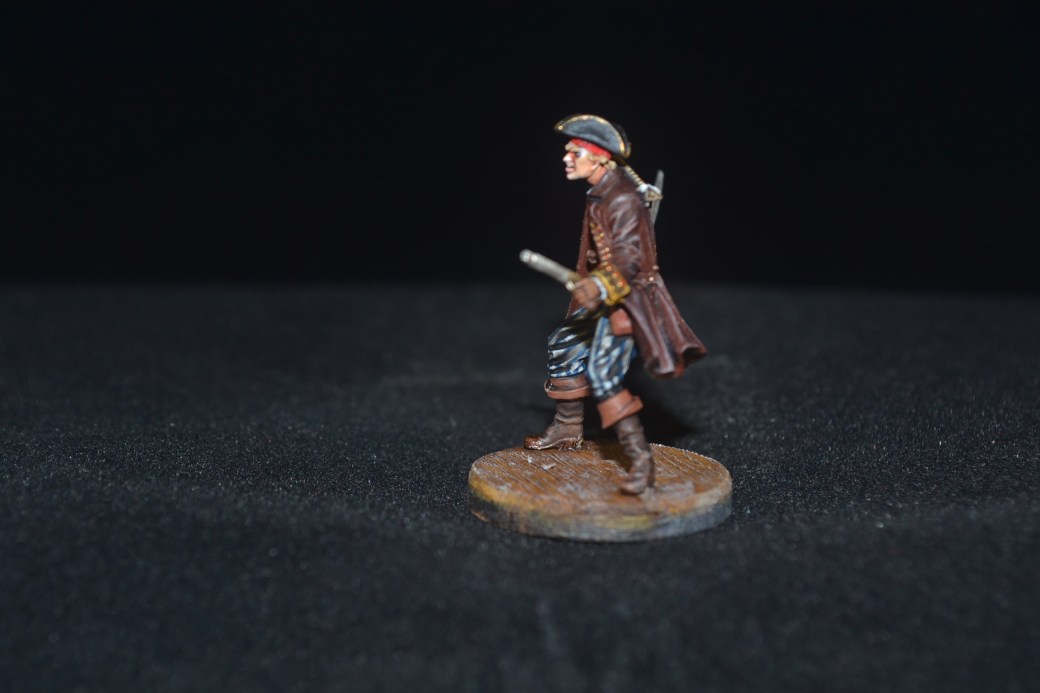
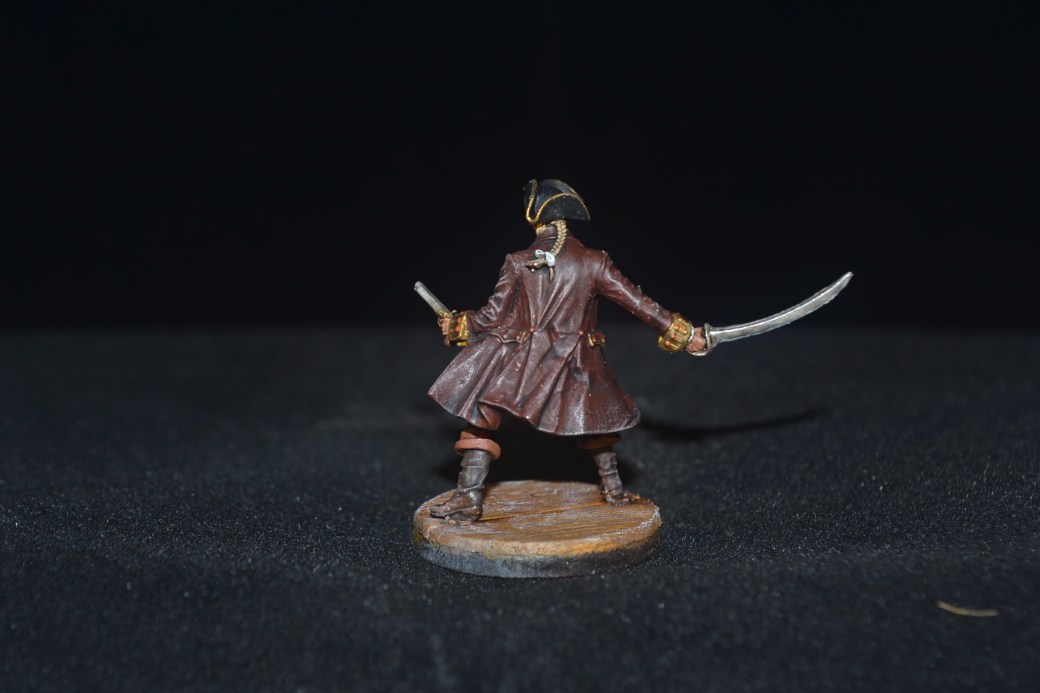
This week another miniature from Hasslefree one of my very favorite model sites if you weren’t already aware. This time a pirate from a historic period I like very much but one I have never really embraced in modelling terms. Might have to put that right at some point.
—000—
Happy Birthday To Me
A few days ago my blog enjoyed it’s third birthday. Quite where that time has gone is somewhat of a mystery but I have loved every moment so far and long may it continue.
Engaging with like minded people has been great but one of the other things which has given me a surprising pleasure is seeing where my blog has been viewed across the world. Now I appreciate that in many of the countries people have stumbled across it by pure chance and having seen it once they have not bothered to look at it again. However, the fact remains it was viewed there all the same.
Three years into my blog it isn’t very often that someone pops up in a new country to view something I have done. It was therefore quite a surprise to get three new countries all in one week. Perhaps it was one person on their travels, who knows? In any event welcome to Nepal, Qatar and Columbia.
—000—
Coronavirus – Self Isolation Week 1
Those who follow this blog will know that I take the current situation seriously. Despite my personal family circumstances there is a need to remain optimistic, maintain some perspective and above all hang on to a sense of humour. Failure to do all three of these things will lead to my certain demise. With 11 of 12 weeks of self isolation to go I thought I would share the highlights of my first week.
Day 1 – Realised I was nearly out of Vallejo Matt Black Model Color. Placed order for this and some other stuff to take order over £20.00 to get free postage. Black out of stock. Modellers stock piling too. Bugger.
Day 2 – Phoned mum and dad to see how they are getting on in their self isolation. Spoke to dad. “I didn’t let the Nazis get me so I’m fucked if I’m gonna let the fucking Chinks get the better or me either!”. Way you go dad.
Day 3 – Need a haircut. Just realised I cannot go out to get one for 12 weeks. Do I shave it all off or grow a pony tail. Placed an Amazon order for hair clippers.
Day 4 – Tesco Supermarket online order arrived. Ninety percent of the order missing. On a positive note they managed to provide toothpaste, dog food and two packs of beer.
Day 5 – Refuse to be beaten by the announcement of the local pub closure. Have placed a can of beer in every room and am going on a pub crawl.
Day 6 – She Who Must Be Obeyed insisted on family exercise to Davina McCall keep fit DVD. Still hung over from yesterday’s pub crawl. Done back in trying to bend backwards. Should have done some stretches first. Bollocks.
Day 7 – Bad back has restricted my movement. Unable to do much else spent most of the morning picking at a scab on my elbow. Red cross parcel arrived this afternoon. More figures, this lot from Reaper. Happy days!
—000—
Well It Made Me Laugh …
—000—
This week TIM has been listening to …
Bob Dylan and “The Times They Are A Changin'”.
Seemed appropriate for the circumstances we find ourselves in!
—000—
This week TIM has been watching …
“Lawless” starring Tom Hardy. The title rather than the films content could well be indicative of where we are heading. Great film with a great cast and based on a true story. If you have not seen this film then you are missing a treat.
—000—
Remember …
Trying to give up Sexual Innuendos is hard, so very, very hard.
Although most of my blog activity centered around 28mm scale figures my modelling roots were very much in 54mm figures. Even now it is nice to do a larger figure once in a while but on this occasion I was given a figure by a guy at the modelling club. He said he would never get around to doing it and wanted to see what I would come up with. This was the result. Not my finest piece of work as I look at again now. Rusty from doing smaller figures!
TIM
—000—
Off the Work Bench
I was recently given a Pegaso 54mm Comanchero by a guy who didn’t consider himself to be a figure painter. Although my American Civil War diorama is very near completion I thought I would have a break from 28mm figures and paint it. It has been a while since I have painted a 54mm figure and it surprised me how big it was!
An enjoyable project and a welcome distraction but back to finishing my diorama.
Is it just me or am I the only one who has more ideas on what to do next than I have years left to live to complete them?!
Earlier this week it was pointed out to me by “Badktothehammer” that the WordPress phone app had an image on it of the near completed gorge. How this came to be is a complete mystery to me. Whilst I was constructing this post in parrallel with build progress of the model I posted nothing so cannot understand how that came to pass. We will put it down to Gremlins and my incompetence. In any event the image if you did see it is among those you will see below in this post.
Without further ado and putting all the behind us let’s get started.
Firstly a reminder of where I ended up in Part 1.
This week saw the base and figures arrive as anticipated. First though it was time to continue with the build. With the blocks clad and everything dried out it was time to use some good old filler to fill the various gaps and to build up the upper base work.
The next few images, all very unexciting it must be said, show the base being turned up and down while filler is being added. This is a slightly tedious task but an important one and slowly the outline of the base is coming together.
As the filler dries some more carving was needed to blend with the plaster board. So far looking good and I am pleased with the way it is shaping up.
Time now to set things to one side and allow to properly cure and dry out. In the meanwhile time to start working on the tree and where I plan to put it. I wont go in to detail on how the tree is built because I have covered this before and only recently I posted a two part tutorial in TIM’S Memory Monday. The image below shows the wire armature constructed and initially positioned.
Another feature of the base is a wooden bridge across the gorge. The reason for this will become more obvious when the figures get to be placed into position. The bridge was made using twisted wire and wooden coffee stirrer pieces. It will be fixed into place later once it has been painted and more ground work has been done. I did wonder about giving it side supports but decided against it as I want to avoid it blocking out too much of the waterfall.
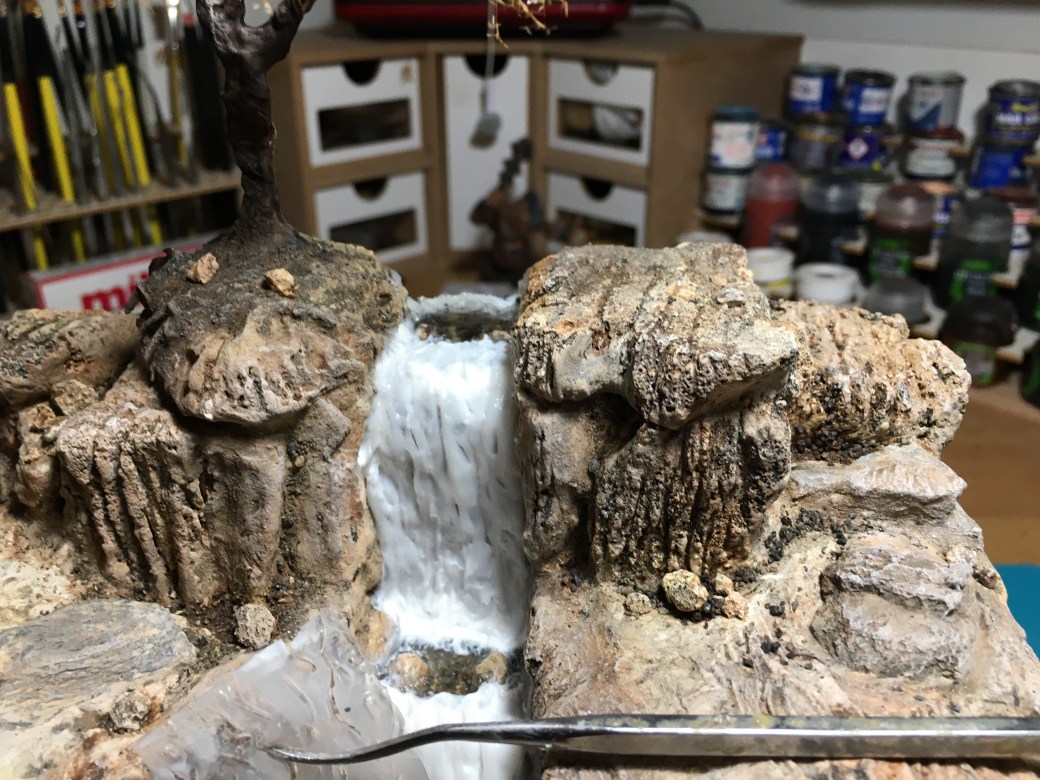
Next we have an image showing the tree put in place using some Milliput and the finer branches added.
Next work started on adding some finer ground work and doing some painting. More groundwork will be needed but will only be done once the figures have been painted and can be positioned on the base. As well as painting the base the tree was also painted along with the bridge.
The next two images below show the tree and bridge being painted and some additional ground work.
Next up it was time to paint the gorge. This was done using a variety of colours – Burnt Umber, Yellow Ochre, Burnt Sienna, Black and White. I used some Woodland Scenic paints as the base colours but then moved to oils diluted with white spirit. The nice thing about plaster board is the paint soaks in and produces natural highlights.
After some painting I began to start the waterfall. The first step was to lay down the top three edges using Woodland Scenics Water Effects. This stuff is thick and does not run. It goes on white but after time, quite a lot of time if it is applied thickly like here, it eventually dries clear. Behind these will be added Realistic Water, in this instance produced by Green Stuff World as their UV product can be dried in seconds using a UV torch.
The next step was to create the waterfalls using Woodland Scenics Water Effects once again. This is done by simply putting down the effect in strips and once dried applying it to the model. Woodland Scenics have YouTube articles on how to use their stuff so rather than me attempt to explain how to use them you would be better to watch the videos they have on offer. Link below.
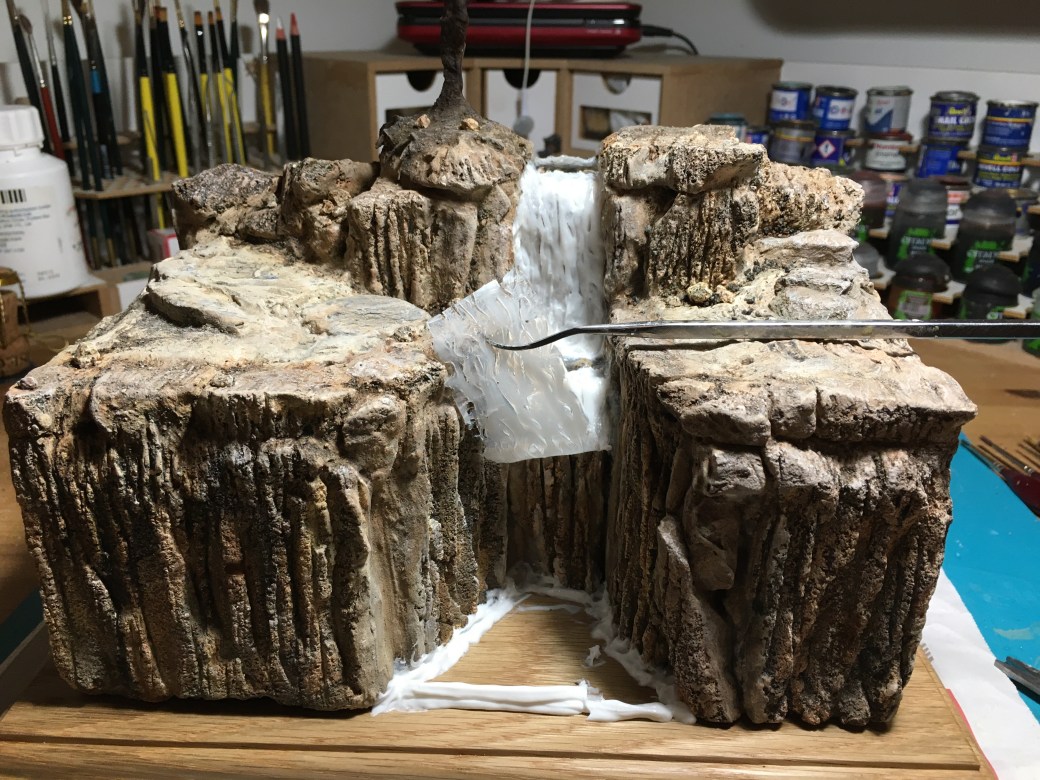
The next image shows the second waterfall being added with the first having already been done above it. Despite its white appearence it will all dry clear and then it can be highlighted. As you can also see my wooden base has arrived and the gorge has now been glued to it. The water effects has also been added to the bottom of the base to seal the connection between gorge and base. Realistic Water will be added to this and if not sealed will leak everywhere.
Next a test picture showing the bridge in situ. Not permanently fixed yet and nor will it be for a little while but I wanted to make sure I was happy with it. So far so good as far as I am concerned.
Now a couple of images of the lower pool area being worked on. Firstly with the ground work primed and then with it painted. Notice the top waterfall cascade is starting to turn from white to clear. Only taken 48 hours so far!
Happy with the progress being made but much, much more to be done. Figures not even started (there will be five of them in total), more ground work to be done, tree to be “leafed” and waterfall to be finished to name but a few. We will see how things go as I also need to do a figure for Ann’s challenge too!
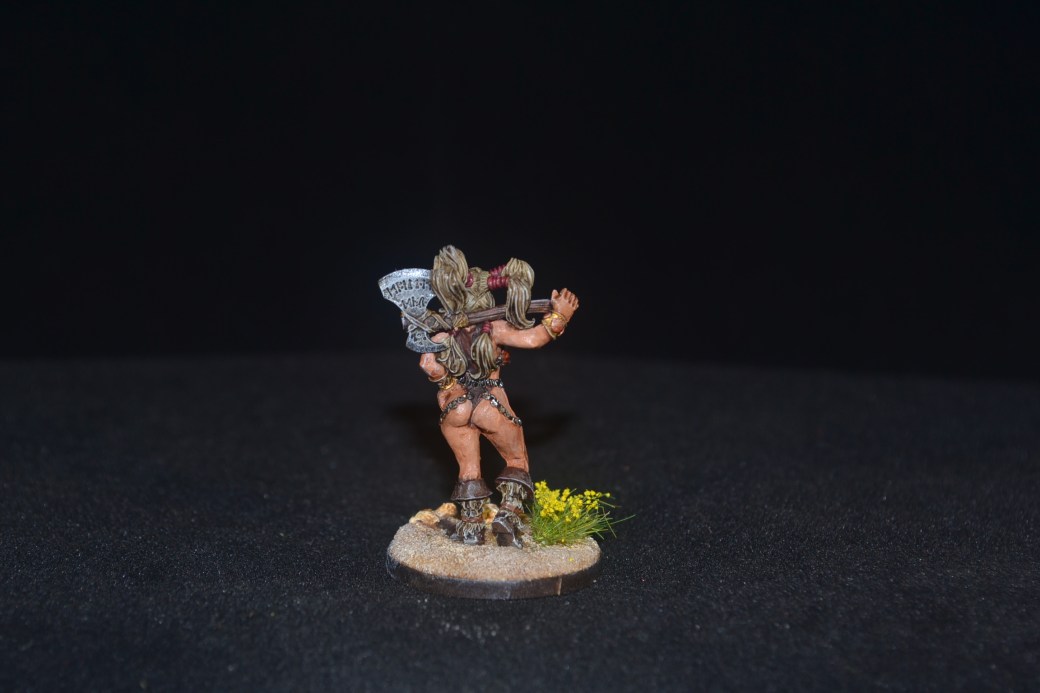
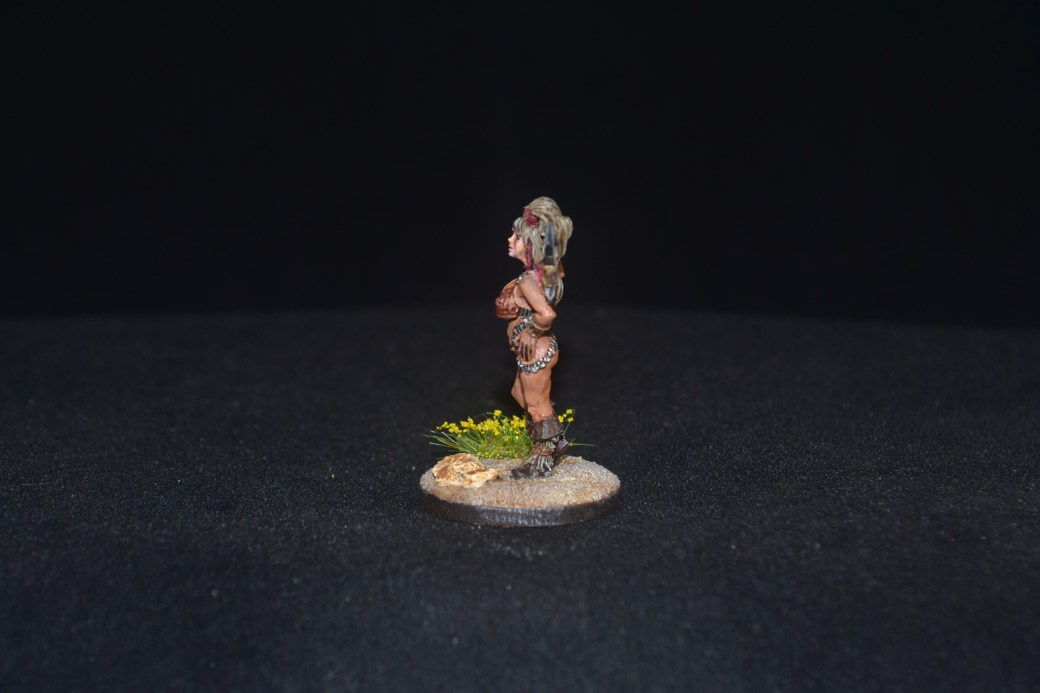
This weeks miniature is another offering from Hasslefree, a buxom young lady who goes by the name of “Yilsa The Believable” (her sister is Unbelievable and you will get to see her soon!). The figure was one of a few I didn’t manage to get done in time for the Fembruary challenge. Doubtless the others will follow in the weeks ahead. Of the figures I purchased I’m sorry to say Yilsa is my least favourite but you can’t win them all.
—000—
Coronavirus
The way I see it there are two sides to the Coronavirus situation, the serious side and the how do I exploit the situation side.
On the serious side people are dying. People of a certain age and those with underlying health conditions are it would appear among the most vulnerable. My son has Cystic Fibrosis and is very much in the high risk group. He also works in a Supermarket so there is no hiding from the general public and keeping his head down. Recent government guidelines though are such that my family and I will be going into a 12 week period of self isolation. It is a concern and as parents it worries the life out of She Who Must Be Obeyed and I a great deal.
There is also my ageing mum (88) and dad (93) to be concerned about as well as my young daughter. SWMBO and I are now in our 60’s as is my brother and his wife. We are not of course unique but like everyone else we are it seems powerless to do anything about the matter other than follow the advice we have been given. Our fate lies in the hands of God or whatever you chose to believe in.
It doesn’t have to be all doom and gloom though. Every cloud has a silver lining. Whilst some people have elected to stock pile hand gels, toilet paper, tissues and food I have placed numerous orders for vast quantities of figures. SWMBO didn’t even flinch when I told her I had just spent over £250.00 I have no intention of being bored in isolation.
—000—
Well It Made Me Laugh …
—000—
This week TIM has been listening to …
Buddy Holly.
As I have said on previous occasions my music taste is wide and varied, from Classical to Rap and everything in between. Every generations throws up its mix of great and shit music. Born in 1957 I missed out on what I think was one of the greatest periods in music, good old fashioned Rock and Roll The American High School era of the 1950’s would be a period I would like to visit if I had a time machine. Who knows, in parallel universe maybe I am there already having the time of my life!
So why Buddy Holly this week? Well a few days ago I went to the Wharf in Tavistock a wonderful small venue where tribute bands regularly play and She Who Must Be Obeyed and I went to see Buddy Holly and the Cricketers. They are an acclaimed band and were simply awesome. When they played Rave On I was in my element.
The link below is from the movie The Buddy Holly Story starring a very young Gary Busey. The clip is when the band, the first white act, went to play at the Apollo to a black audience. It is a legendary moment in rock history. Three short tracks with Rave On third up.
Sadly, as sung by Don McLean in American Pie, the music died on the 3rd February 1959.
—000—
This week TIM has been watching …
American Graffiti.
Sticking with the Rock and Roll 1950’s vibe I just felt compelled to get this one out of the cupboard. A classic movie featuring an awesome sound track (although with some poetic license used by director George Lucas ). Interestingly both this film and The Buddy Holly story star Charles Martin Smith.
—000—
Remember …
In the best interests of getting your day off to a positive start try to begin with “Good Morning” rather than “Here we Fucking Go Again!”
This post goes back to July 2017. It was a build completed before I really started with the blog so I had little in the way or progress images. If I were doing a project like this now it would probably cover several WIP posts. Nice for me to see this one again as it has been hidden away in a storage box for the last couple of years.
TIM
—000—
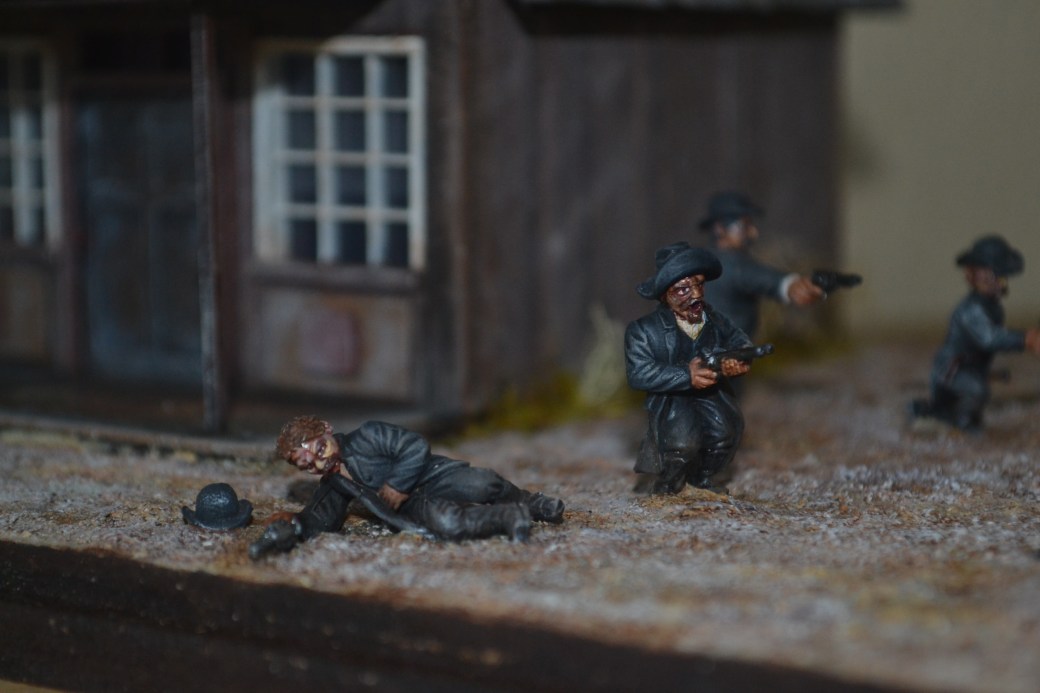
28mm Building Project No: 5 – The OK Coral
For my 5th Building Project I drew inspiration from one of the great legendary moments in Old West history, The Gunfight at the OK Coral. As much as possible I wanted to be true to the actual events and location but to create a model which worked for me and my limited base space it was necessary to invoke an element of poetic license.
Diorama in development
Without turning this into a history lesson, the fight (some might say murder) took place in a vacant lot between two buildings. Fly’s photographic Gallery was actually at the back of the lot but is usually depicted at the front, presumably because the building was of greater interest and I have done the same. The righthand building was actually an old wooden house but as I did not have the space and wanted to create the feel of a vacant lot I chose instead to make it a small barn/out building.
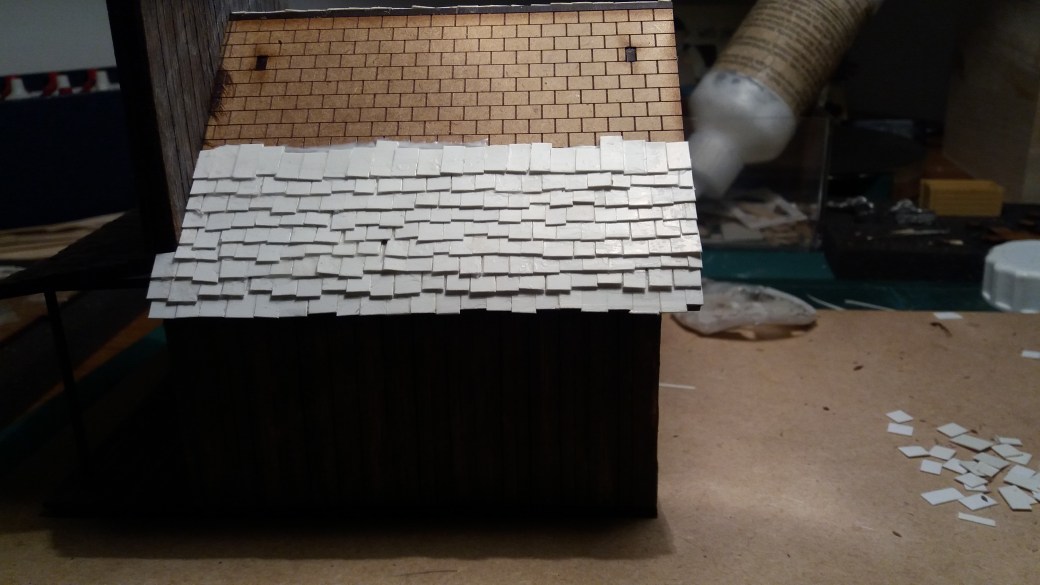
The small out building was built from scratch using the same method as Building Project No: 4 – foam board sides clad with coffee stirrers and roof made of cardboard with cardboard shingles. It was then painted using a variety of oil paint washes (for details refer earlier posts).
Fly’s Photography Gallery started life as a Sarissa Precision kit. The kit was assembled and then completely clad on the sides with coffee stirrers and on the roof with card board shingles. The doors were also remodeled. After drying it was painted with oil paint washes. Clear plastic was used to glaze the windows and blinds were added, the aim of which was to restrict the view looking into the building as on this occasion I did not plan to fit out the inside.
Signage was made using a downloaded Western font and then printed in black and white using Word. It was then given a thin wash and a bit of weathering.
The figures used were once again all from Dixon Miniatures. Virgil Earp (kneeling) was given a walking cane (a pin) and Morgan Earp (lying down shot) was given a new hand holding a gun.
In my recent Miniatures and Musings post I made reference to a new project – OMG! – a working title which may or may not change in due course. To those of you of an older generation OMG! is short for Oh My God! I’m sure most of you were well aware of that but I will hold my hand up and say most of these text abreviations have had to be explained to me by my lazy kids who cannot be arsed to type something out properly.
At this stage I cannot be certain how many posts this project will run into, best guess would be half a dozen at most. It isn’t the biggest project by any means but the nature of the build will require a fair bit of drying time which may well stretch things out. What that will allow me to do though is run a few other things in parrallel while I am having to wait. I know some of you like Work In Progress posts so the aim here is to work bottom up and end with the finished model. At this stage I don’t want to give too much away, partly because all to often there is a need to adapt things part way through due to unforseen circumstances. However, start we must and here is the first post.
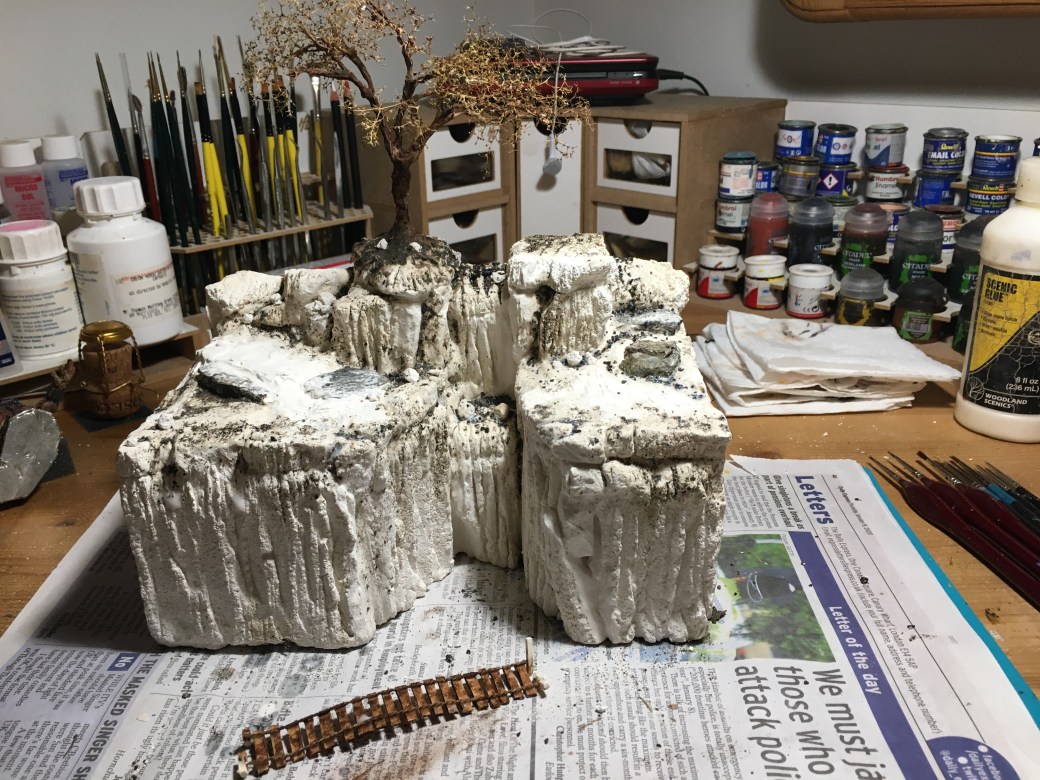
The base I am aiming to create is essentially a gorge. I want cliff edges left and right with a waterfall slightly off centre and a tree somewhere on it too. The tree and the gorge are intended for scale which will become more obvious I hope when the model is completed. Having said that it wont be really true to scale as to do so would require an enormous base but the illusion is all I am looking for and hoping to achieve.
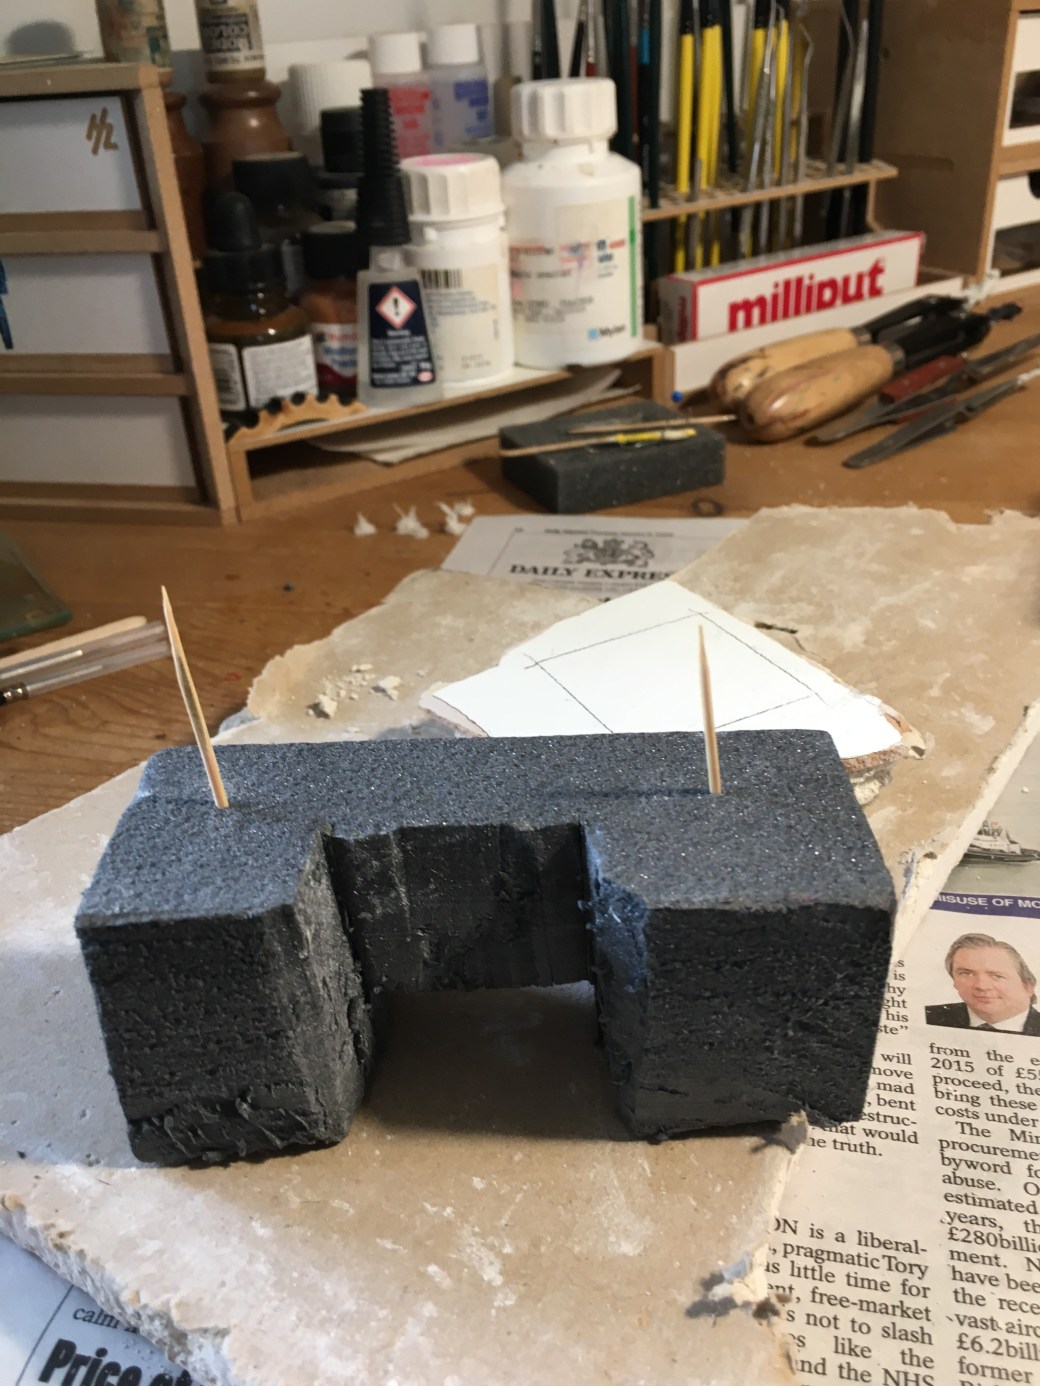
I decided that I didn’t want a big base but it did need to be dramatic. I managed to find a nice wooden base on ebay from a guy I have bought from before which had the dimensions 255mm x 155mm. It is now on order and should come within the next week or so. I didn’t need the base to get started so my first job was to dig out some styrofoam blocks from my modelling boxes stored in the garage. I also dug out some plaster board while I was there too.
As I have mentioned to a couple of people recently, plaster board is in my opinion great stuff to work with. In this instances I wanted it to clad the styrofoam blocks. The image below is of two base blocks glued together having first been shaped to outline the gorge. An elastic band was used to pull them together and cocktail sticks were used at the edges to stop the elastic bands from biting into the styrofoam.
As I wanted the build to go higher I set about working on the next level while the first was drying. Cocktail sticks would be used along with PVA glue to eventually attach the upper build to the lower build.
A rough outline of the gorge in styrofoam was completed. Time now to start on the cladding.
Sections of plaster board were bit by bit glued to the styrofoam blocks. Each was roughly carved to create the cliff like appearance that I wanted to achieve. Gaps between the pieces at this stage is not important as they will all get filled in due course
Piece followed piece followed piece until eventually the blocks were covered to the extent that they needed to be.
Now it was time to set everything to one side so it could all properly dry out. The base and figures I ordered are due to arrive next week which means I can work on them as I wait for future parts of the build to dry. For now though it is time to go off and do something else while I wait.
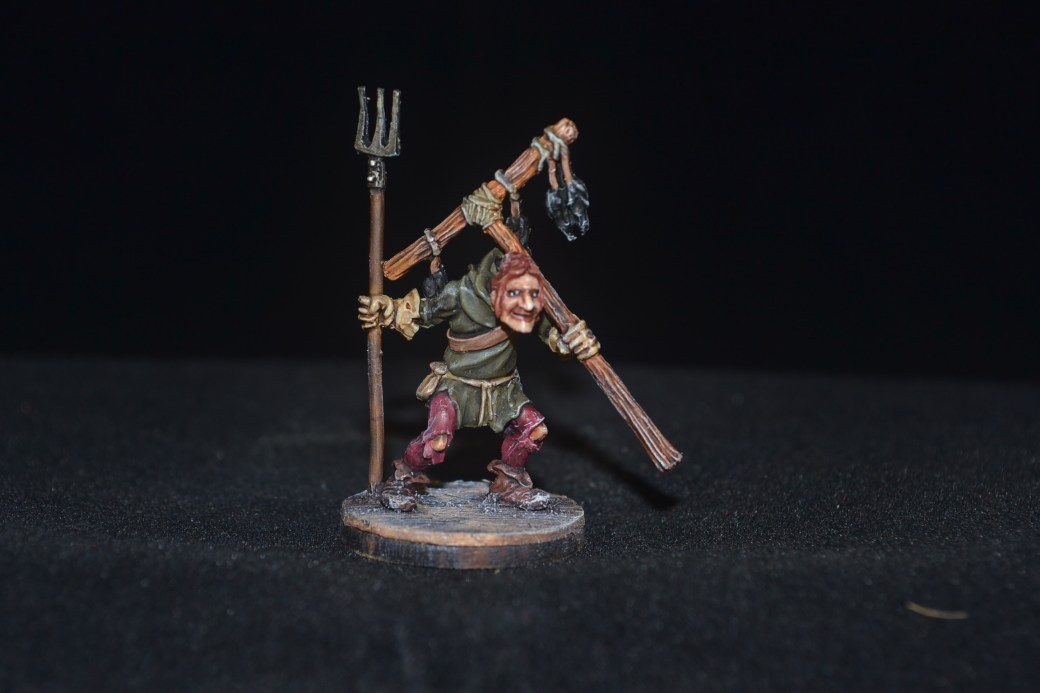
This weeks figure, a 28mm sculpt of a Rat Catcher, comes from “Other World” miniatures. Originally when I bought this figure I had other plans for it but it was so long ago that I had forgotten what that was so I just painted him and put him on a 25mm base! It’s an age thing. If I ever do remember then I guess I will have to buy the figure again.
The base, not clear from these images, was constructed using coffee stirrers to make a wooden floor.
—000—
Well It Made Me Laugh …
—000—
Time for a Project?
Just lately I have been painting stand alone figures and and a few vignettes which have required a bit more base work. It has all been fun and I have enjoyed what I have done and am looking forward to doing what I have lined up on my desk still to do. However, I recently got the urge to embark on something a little bit bigger. The driving force behind this is Telford in November.
After last years surprising success I am keen to enter a couple of things for this year, especially in the Fantasy Diorama category which I was lucky enough to win gold in. I remain convinced that part of the reason for that success was entering something which was a little different. If I am to stand a chance this year I feel I need to hit the same note again. Having been racking my brains I came up with two ideas. I favor one far than the other not least of all because it will have more detail in it.
Having had the ideas the challenge was on to find the right figures and determine how to base them. I have had a few ideas for the basing and have managed to find appropriate figures for the better of the two ideas. Work on it has now begun. It will I suspect feature several WIP posts due to drying time and the such like but I will try to spread these out with other bits and bobs as I go along.
For now I only have a working title, I am currently going with “OMG!” Maybe the title will stick, maybe it wont but for now at least I will leave it with you to consider what I might have in mind. The first installment should get posted this coming Saturday.
—000—
This week TIM has been listening to …
Cat Stevens and “Where do the Children Play?”.
Now before he went and changed his name to Yousef something or other and became a bit weird good old Cat had a few good tunes in him, several quiet deep and meaningful such as this one. Clearly not everyone’s cup of tea but as I have said on previous occasions my music taste is very, very wide and varied.
—000—
This week TIM has been watching …
“In The Heat of the Night”. A classic film from 1967 starring Sidney Poitier and Rod Steiger. A ground making film for its day and remembered by those who have seen it for the immortal line “They call me mister Tibbs”.
—000—
Remember …
If you are ever chased by a pack of taxidermists don’t play dead.
As the initial post on the “New England Bridge” was rather short I thought I would include the follow up post on the “Flat Bed River” too! Yes I know I am spoiling you, two for the price of one!
TIM
—000—
On the Work Bench – New England Style Wooden Bridge
Work continues on my American Civil War diorama, a feature of which is a New England Style wooden Bridge. The bridge is based on an image I found online albeit that the “real” bridge and river were wider. Nature has few space constraints but alas my diorama base does so it was necessary to construct a shorter bridge!
The bridge itself was constructed using wooden coffee stirrers to make the base and sides, match sticks to make the front and back trim and cardboard to make the wooden shingle roof. The finished bridge was then painted using a variety of oil based washes. For further details and information on construction and painting methods please refer to my “Building Projects” section.
Below are a few images of the bridge during construction. My next step is to work on the river, more of which in my next post.
—000—
On The Work Bench – Flat Bed River
My American Civil War diorama, when complete, aims to show a six-horse Confederate limber and cannon having crossed a river via a covered bridge. A group of infantry men are standing either side of the road making way for the limber team to ride on through.
I have completed a tree for the diorma, the bridge and most of the figures and horses. It was time to work on the base, specifically the small section of river which needed to be created.
My base was slightly modified by adding some wooden quadrant to all four sides. This was done to raise the edges of the base and to give depth for the river and its banks to be made. Filler, scraps of wood and whatever else was lying around was used to bring the base, with the exception of the river, to the level of the newly added quadrant.
The area which would become the river bed was then painted black. This was done purely as a precaution just in case anything showed through at a later stage when it would have been too late to do anything about it. Using a variety of materials – small bits of stone and gravel, cat litter and anything else rock like – I created the banks of the river. Some pieces of fallen tree were added too to add a little more interest.
The river bed and bank were then painted using oil paints diluted slightly with white spirit. Black was used to depict the bottom and therefore the deepest part of the river and then I used burnt umber, burnt sienna and raw sienna as as I worked my way from the bottom of the river bed and up the sides of the bank. The oil paints blend well and dry a little quicker when used with white spirit.
Once dried the various “rocks” on the river bed and along the river bank, together with the pieces of fallen tree, were dry brushed to bring out detail and shading. The next step was to add the “water”. For this I use a Woodland Scenics product called Realistic Water, a silicone product which dries clear. Pending the depth of your river it is best to build up in layers allowing each one to dry before adding more “Realistic Water”. It does take quite a while to dry and is often best left to do so over night.
Having added the “Realistic Water” to the desired depth my next step was to add movement to the river. If you only want to create the effect of a mill pond then movement is less critical but for a flowing river it’s a must. Woodland Scenics do have products which you can buy to help achieve this but these can be pretty expensive to buy in the UK and besides there are other ways of doing it. My preferred method is to simply take an old paint brush (you can use other things instead) and rough up the silicone a bit before it has gone off completly hard. This does of course mean keeping an eye on it but as it does take a long time to dry so you only need to check after several hours and not every few minutes. The aim of this process is to create ridges in the silcone to simulate water movement. You do not need to go deep into the silicone but you do need to go with the flow of your river and not across. Once done leave to dry completely.
When completly dry I used to white oil paint to dry brush the ridges of the silicone. It’s best to go sparingly and add more as you think you need it. If all goes well your river now looks like it’s flowing as the highlighted ridges look like white water.
Below are a few pictures of the various stages referred to above. Images of the completed diorama will be posted soon.
Suddenly I seem to have numerous things on the go. My discipline of trying to do one thing at a time has gone out of the window. I blame it on the weather and the need to work on something else while other bits are drying. That’s my excuse and I am sticking to it!
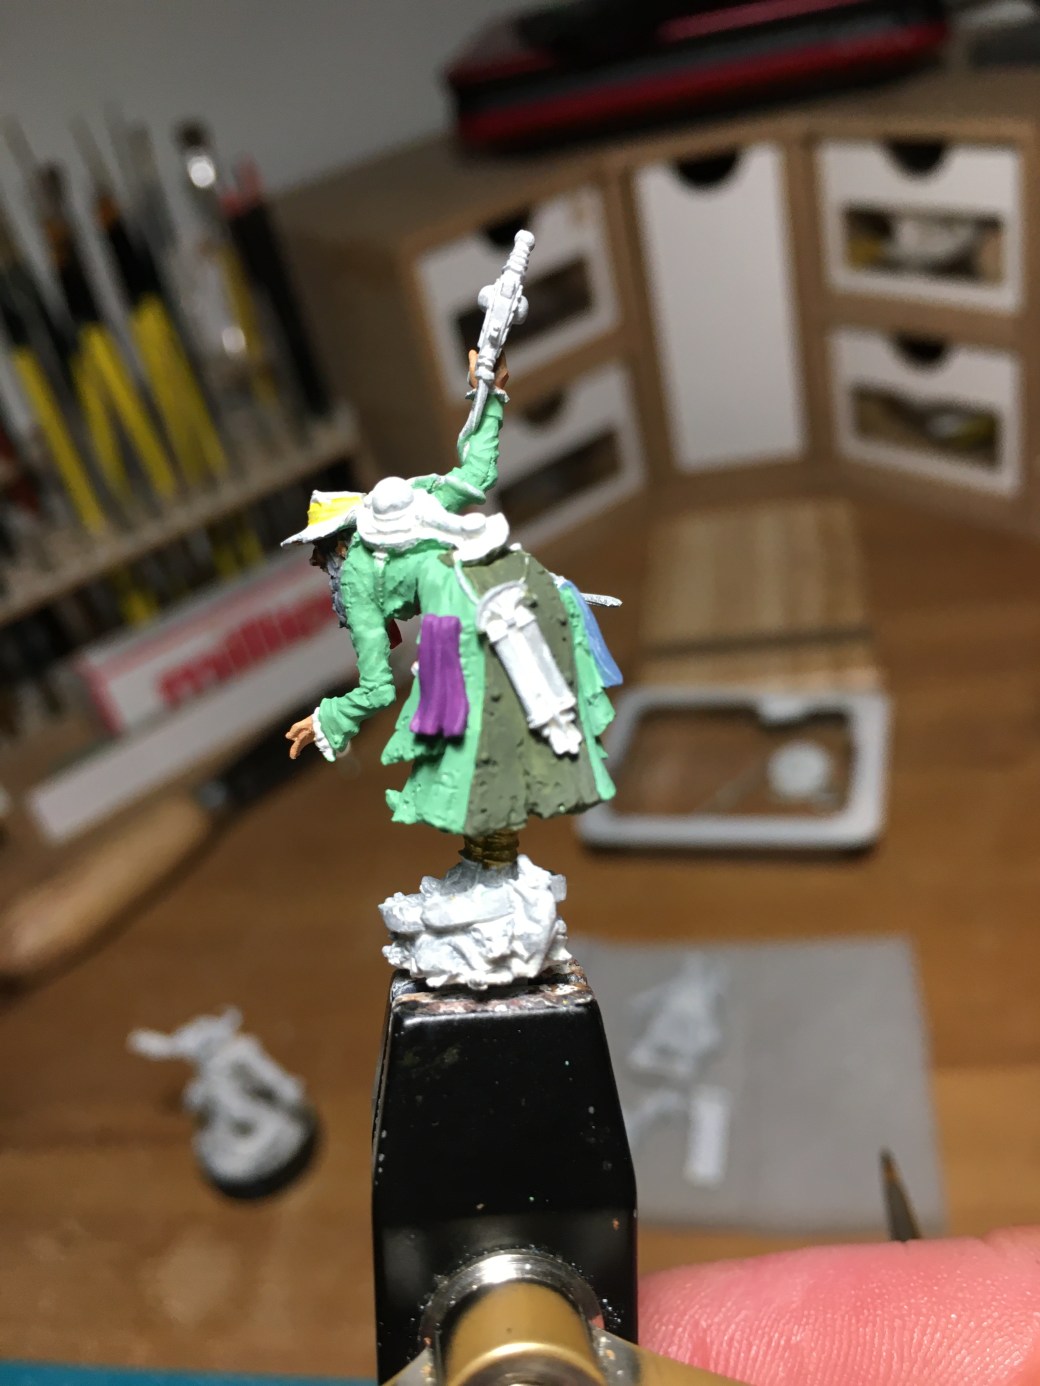
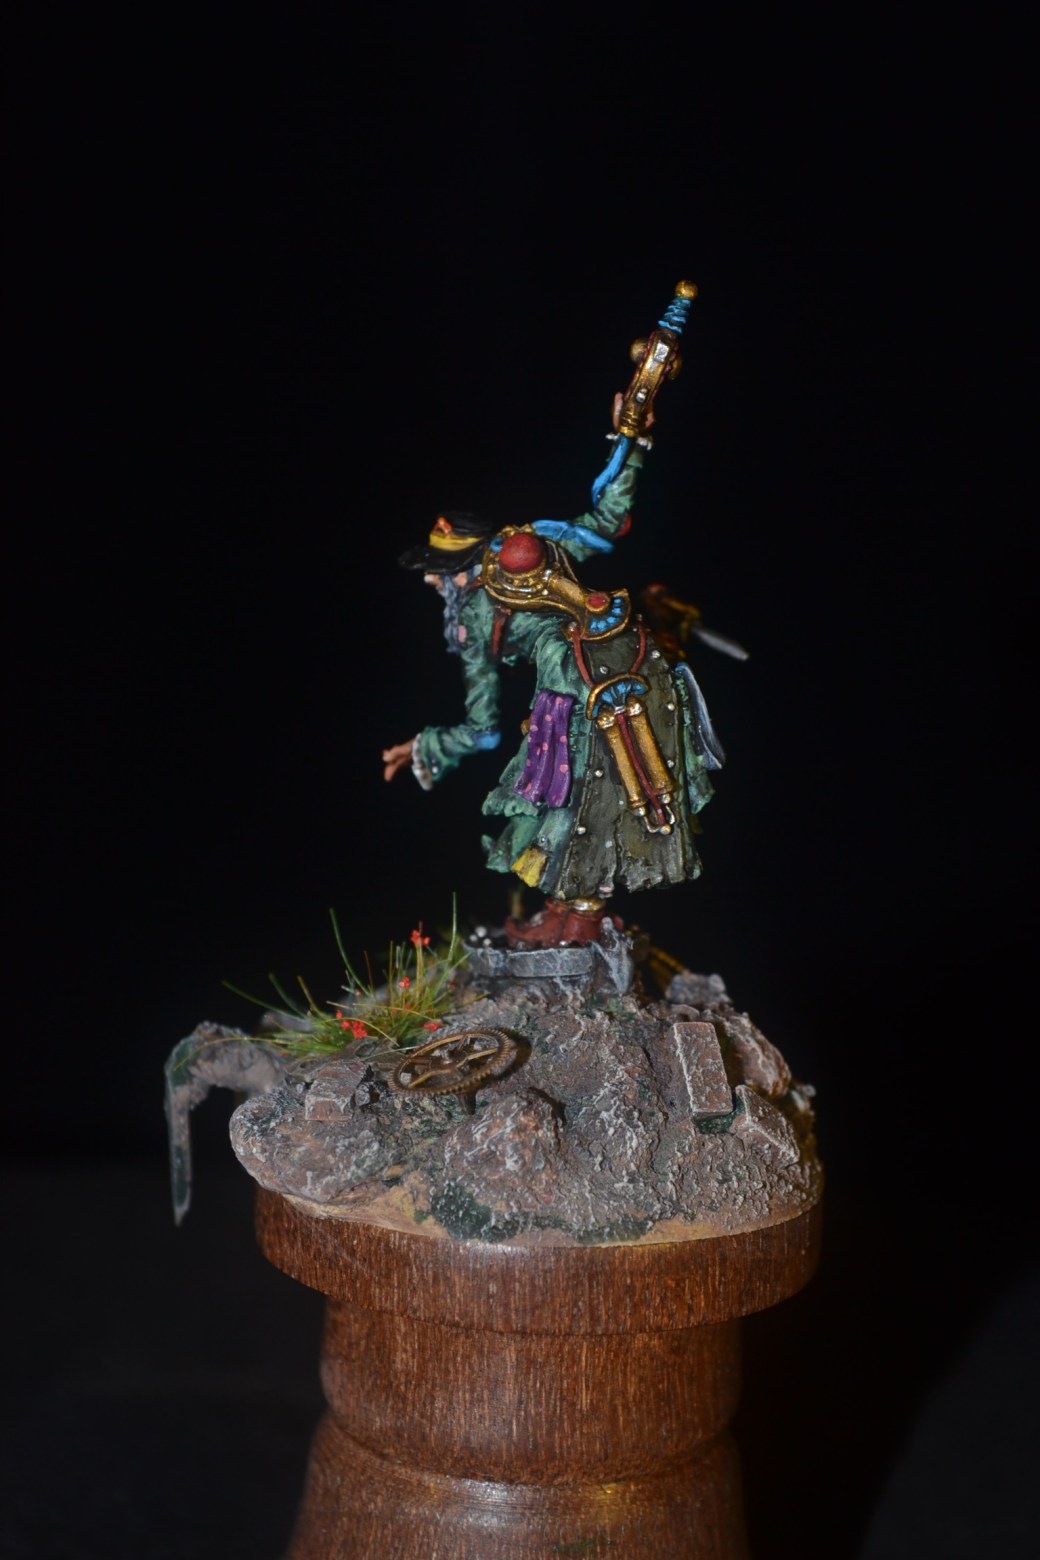
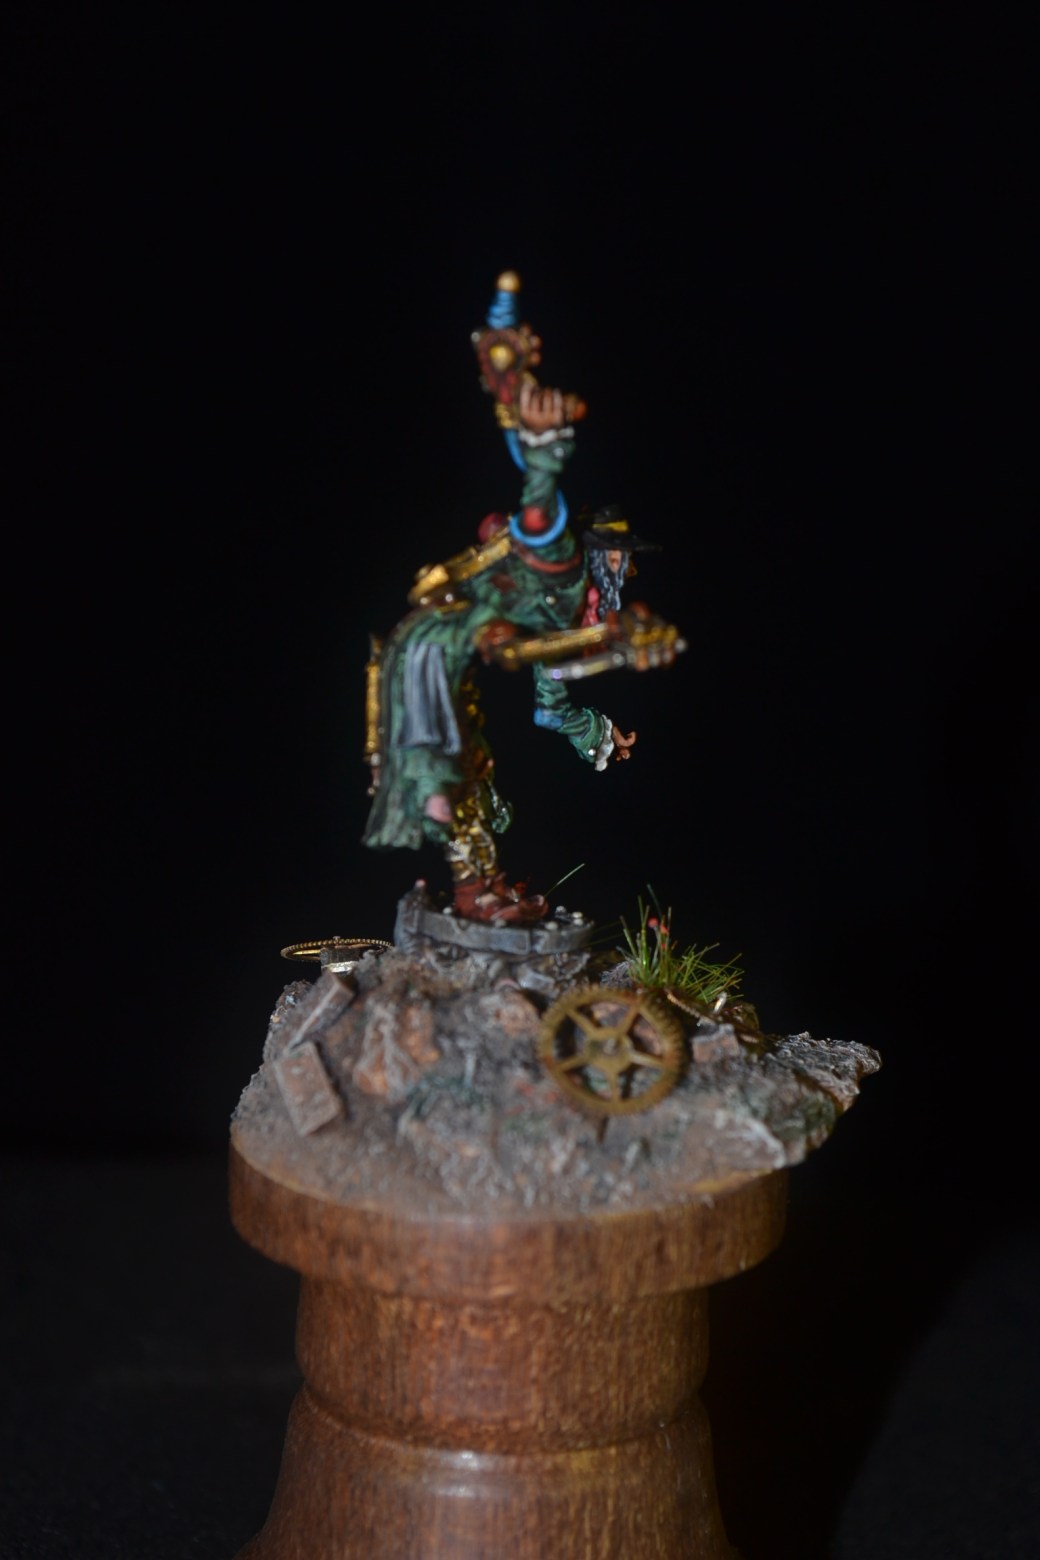
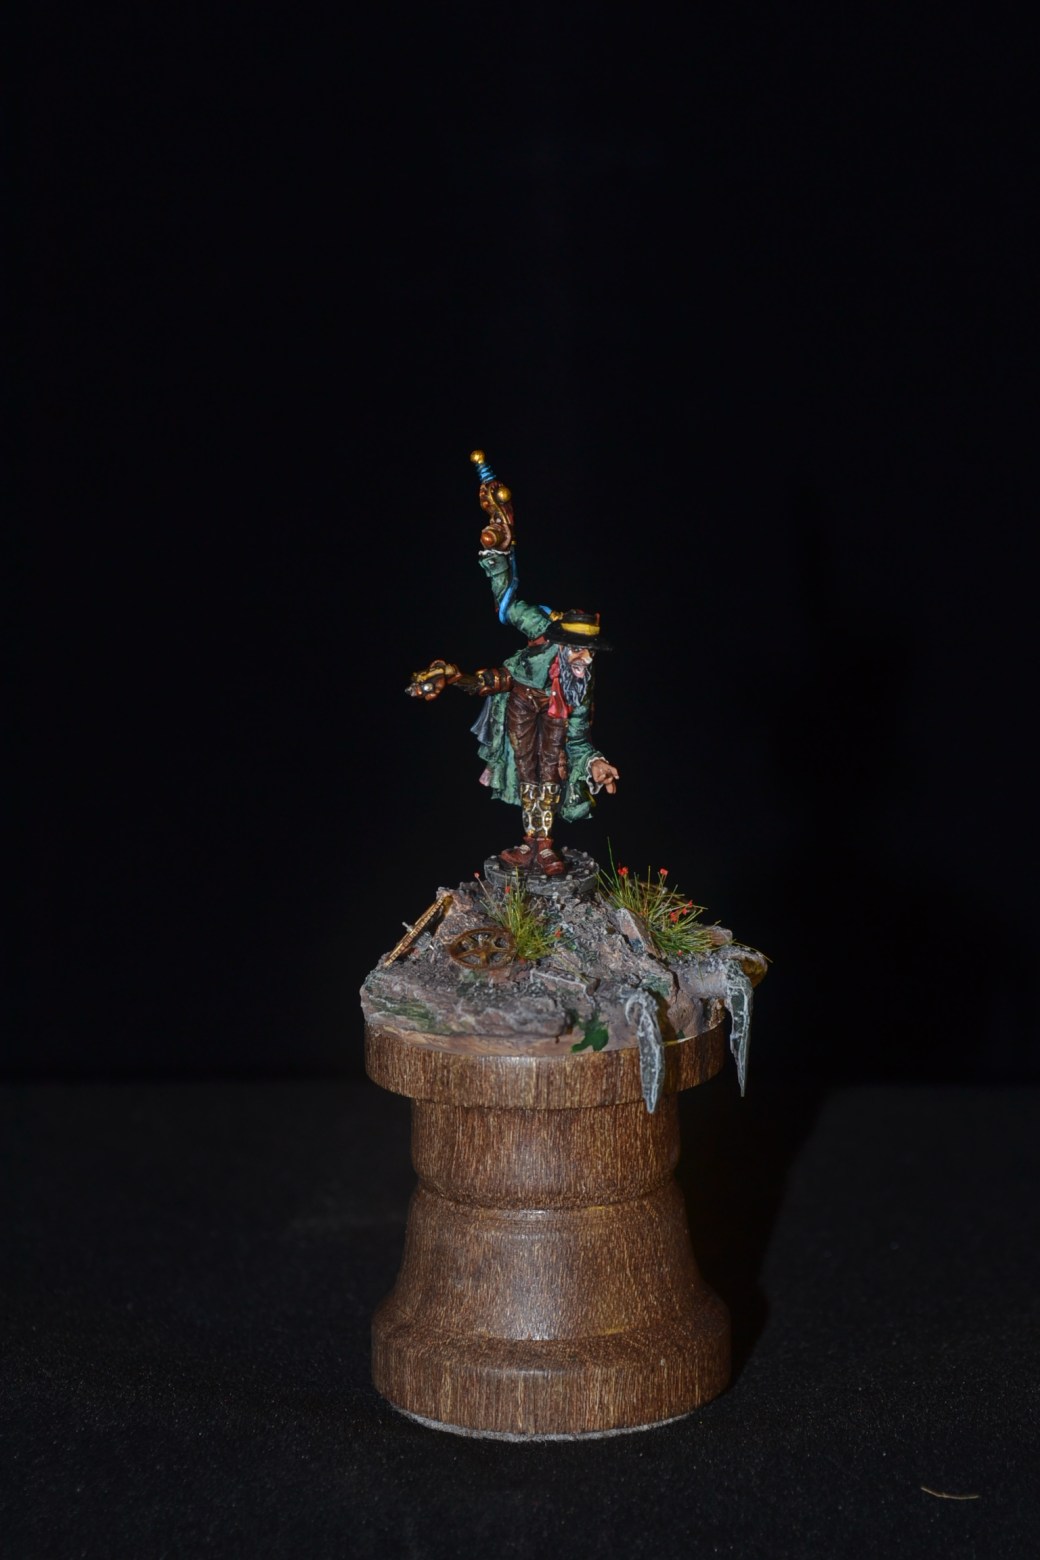
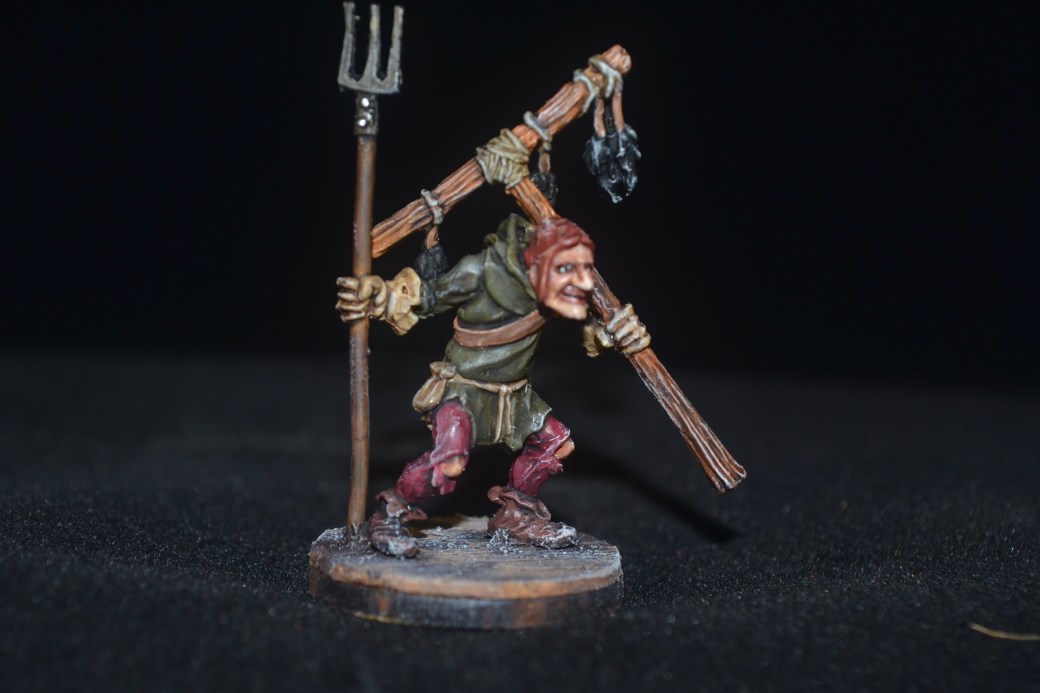
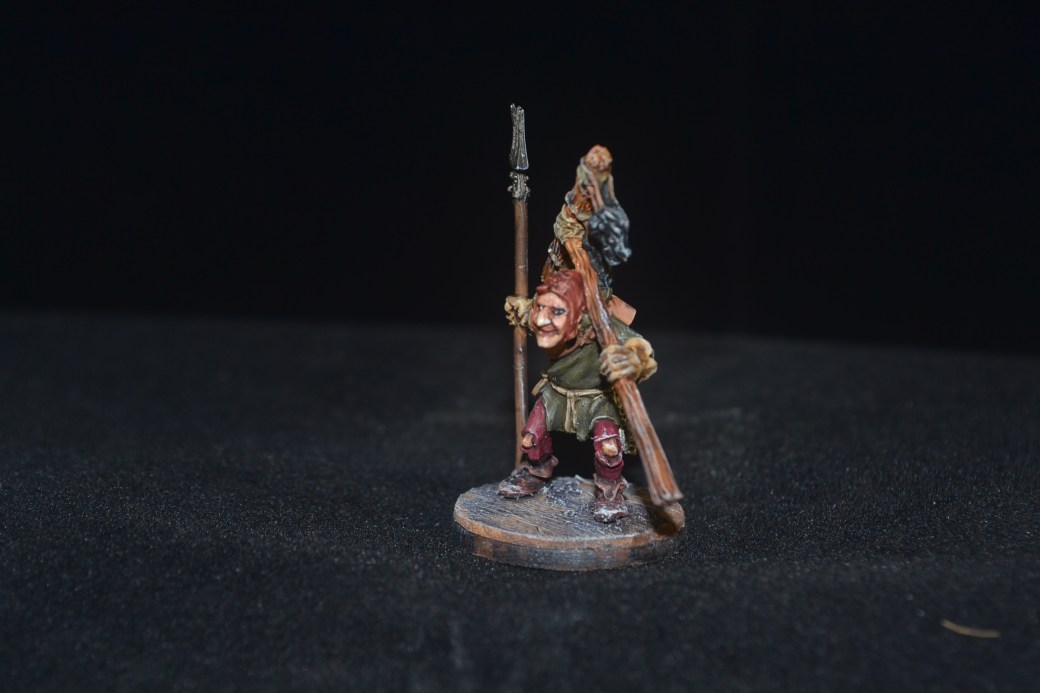
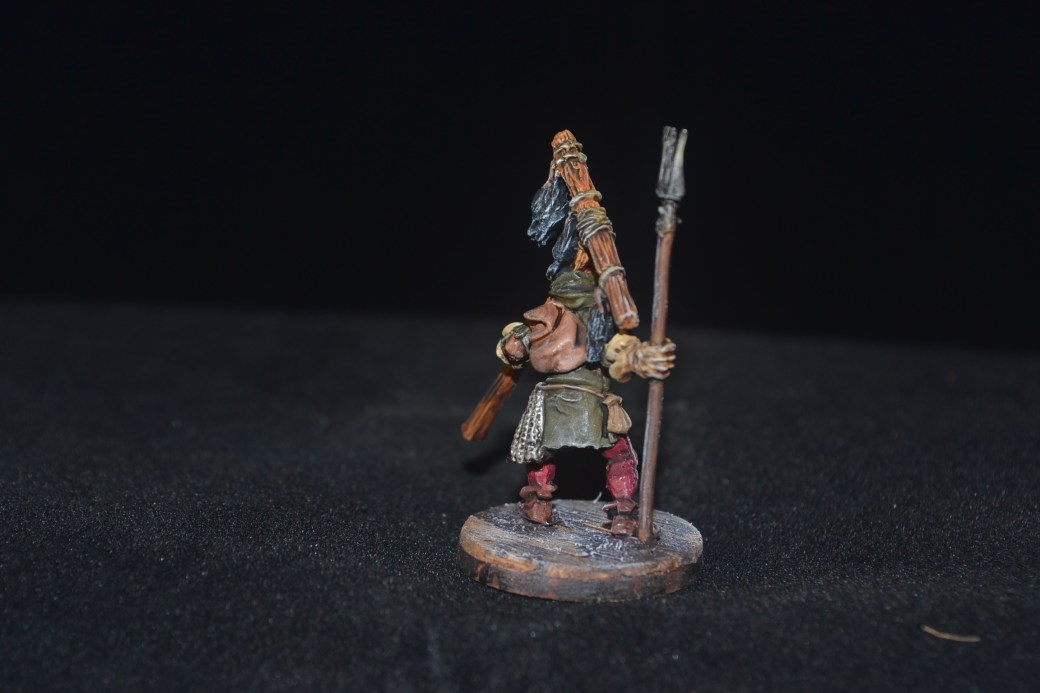
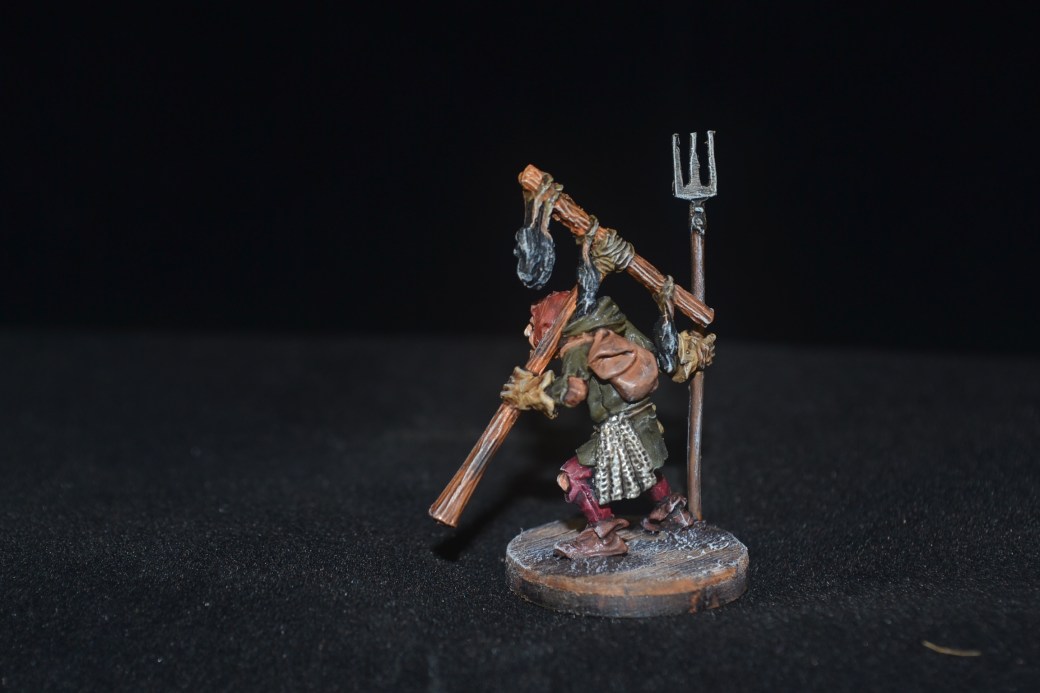
What we have this week is another Twisted Miniatures steampunk figure, their version of Fagin from the Dickens book Oliver Twist. Having done a couple of Twisted Minitaures figures now I cannot fault the quality. I have a few more in the pipe line before I either need to buy some more or move on to doing something else. I’m not short of ideas right now which is a good thing. No danger of hitting the wall on the ideas front for the foreseeable future at least anyway.
Not a great deal to say about the figure itself. It comes in a few parts and really needed to be fully assembled before painting. Sometimes I find it best to paint some bits first and then attach, all depends how easy it is to access the completed figure with a brush afterwards.
Figure painted in acrylics only. I seem to do less and less now using oils. Simple base work with a few cogs added on. Images below including a couple of WIP ones.


 —000—
—000—


 —000—
—000—