War Declared! – WW1 28mm Figure

Work on the Great War project continues and at the moment I reckon I’m about a third of the way there. The only problem is ideas for other models and dioramas keep popping into my head and the project keeps growing. In truth I really haven’t got a clue how many more are in the pipe line. This is partly fuelled by my idea to create a timeline of models, the aim being to reflect the start, the very big middle bit and the end of the war.

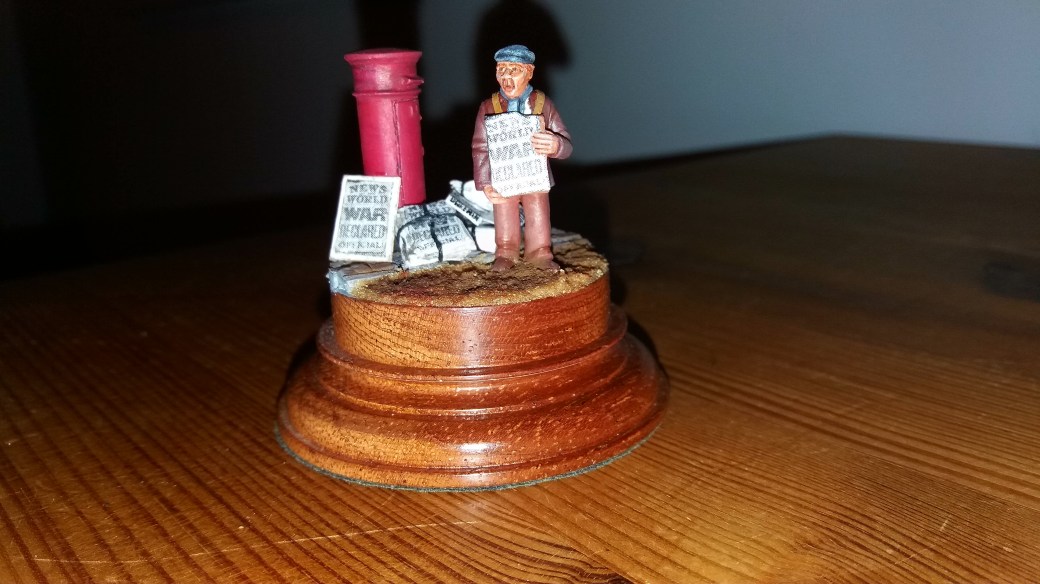
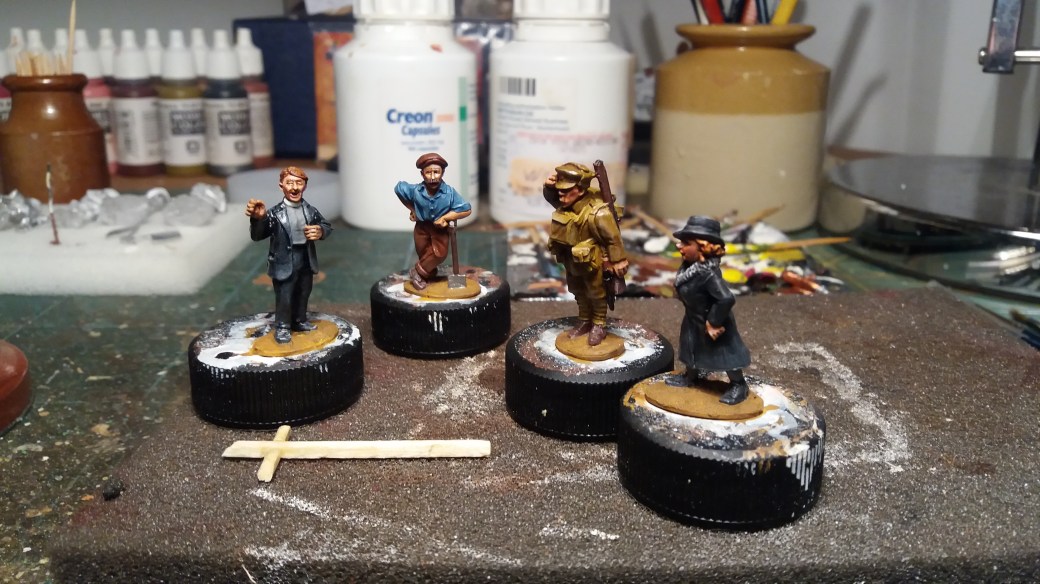
So as far as the timeline goes the first model in the sequence is this one. I needed something to kick-start the war in figure terms and although I had other ideas I couldn’t find the figures. Civilian figures are hard to find in 28mm scale (is that a niche in the market?) but then I got lucky and found this newspaper man figure from Black Pyramid Gaming. The figure is one of a four piece set which goes under the name of Jack the Ripper. It’s an excellent figure, well cast and perfect for my needs. Definitely a site I will use again.

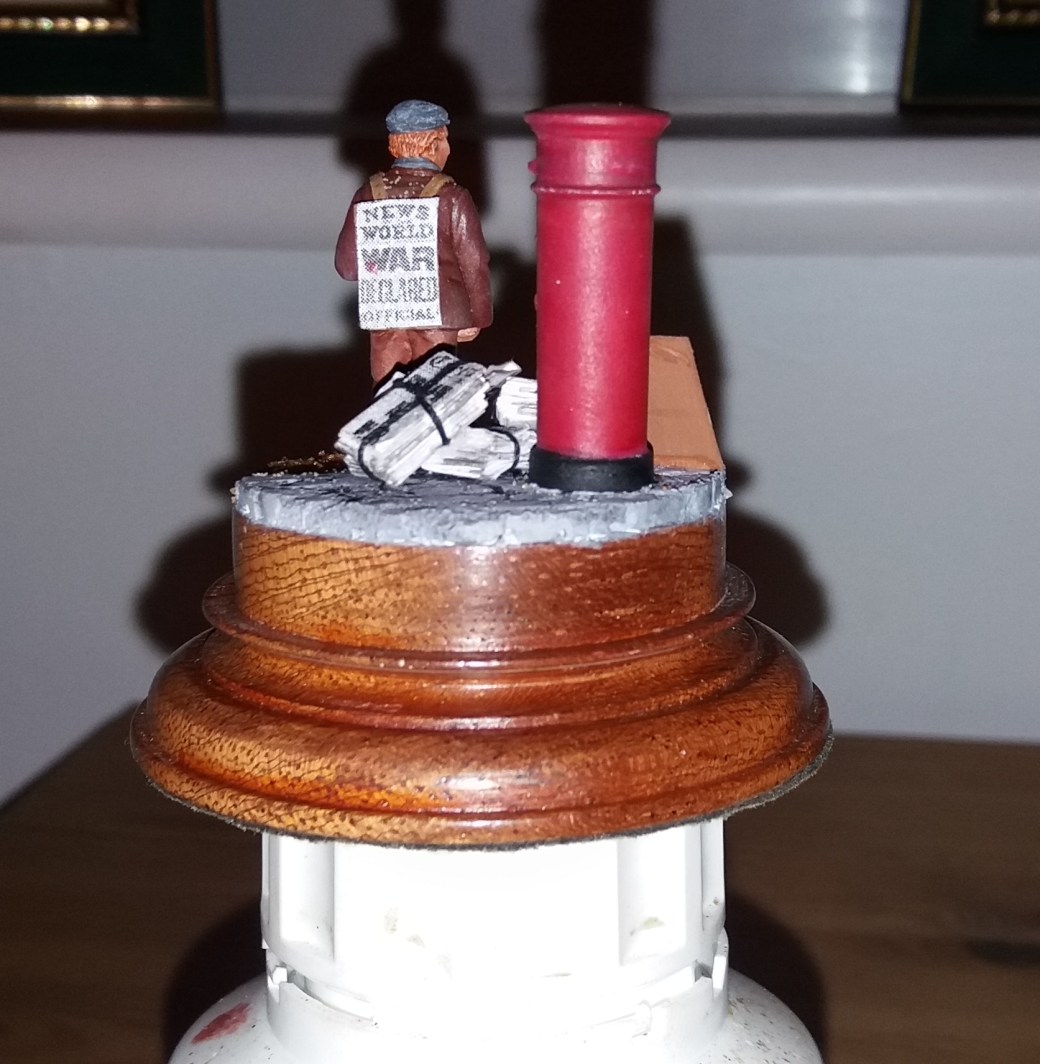
The figure itself painted up nicely and I managed to find a Post Box to provide a bit of street furniture. The newspaper images were made from downloaded images of real newspapers scaled down and made into small bundles.

A small contribution but in the sequence of the timeline a crucial one and one that overall I was pleased with. Next in the sequence will be a model reflecting the enlistment programme that was put into place immediately following the announcement of war. I’ve managed to find the figures and all being well I hope to provide a progress update on my next post.

Thanks for looking.

TIM

20171118_20210420171118_200855-120171118_20424620171118_203143


28mm WW1 Diorama – “Gone But Not Forgotten”

When I decided to do some WW1 figures and dioramas for next years centenary one thing I was keen to do was produce a few models that were relevant but (hopefully) different.  When ever I see models for this era they are almost always trench scenes with or without tanks.  Don’t get me wrong there is absolutely nothing wrong with that, in fact it’s highly relevant but too my mind there are many other images to be portrayed and I guess that’s where I come in.  That said, and before for I dig a hole for myself, I will (and have) do some models which will conform with convention (but no tanks, I don’t do tanks!).

So first up is my 28mm diorama which I have chosen to call “Gone but not Forgotten”.  Appropriate as today is Rememberance Day.  In modelling there is a side to war which can some times be forgotten – death!  I don’t know how many dead soldiers were brought home but as far as I can establish most, for a variety of reasons (body identification being but one), were buried where they fell.  Having said that a great many soldiers who enlisted early were repatriated having been seriously wounded and unable to fight on.  Sadly a return home did not guarantee survival and many soldiers died of their injuries before and after the 1918 armistice.  It’s this scenario on which the diorama is based.

The figures are all stock figures and were purchased from a couple of suppliers, Footsore Miniatures and North Star Military Figures, all excellent castings.  I’m not sure how accurate the clothing for the civilian figures actually is for the era but on balance I’m not sure it really matters, not to me at any rate.  The scene is a simple one.  In addition to the grave we have the gravedigger in the background, the vicar/priest, the dead soldiers mother/wife and his soldier brother.

Ground work was straight forward but looked a little flat so I built another tree to provide some height and a little more interest.  The finishing touch was a small wreath made of twisted wire with Noch leaves added.

WE WILL REMEMBER THEM.

TIM

20171112_10584920171112_10592720171112_10592720171112_10591520171112_10590820171112_10590820171112_10594520171014_11412420171008_220641


Battle of Britain RAF Pilot No: 1

Work continues on figures and small dioramas for next year’s Plymouth show and will continue to do so for sometime. The Old West remains my genre of choice but I really am enjoying WW1 and, all be it to a lesser extent, the RAF.  The Great War is proving to be a great outlet for my imagination and ideas for small scale dioramas have been fuelled by finding excellent figures in 28mm scale.

The RAF on the other hand has proven to be more difficult. There are less figures out tbere, or so it would seem, and ideas for dioramas which don’t involve planes has had me stumped. I don’t mind the idea of doing a plane but 28mm is not a true scale so such things rarely, if at all, exist in the right dimensions. Scratch Building is an option but I’m not inspired to do so and going up in scale would result in a huge plane.

Confronted by my RAF dilemma I decided the only way forward was to return to my modelling roots and simply go for finding and painting a figure or two and leave the dioramas for WW1.

A trawl of some of my preferred suppliers threw up a couple of options but even a general search didn’t exactly leave me spoilt for choice. Still, I managed to find a couple of suitable figures which will allow me to meet my obligation to the club so I guess all is well.

First of the work bench is a 54mm vignette produced by Andrea Miniatures which goes by the title “Afternoon Tea”. Andrea produce some fantastic figures and I’ve done a good few over the years and thoroughly enjoyed doing them. This one was no exception.

TIM

DSC_0730DSC_0734DSC_0732DSC_0731


28mm WW1 Mounted Figure – James Newton Langley 1876 to 1935

So who is James Newton Langley?

James was born in Brixton, London in 1876, enlisted in the Middlesex Regiment on the 7th June 1915 and died in 1935. He went through the war until he was demobbed in 1918. With his regiment he saw action at Ypres and the Somme as well as numerous other encounters.  James was my Great Grandfather and below is one of a few pictures which were handed down to me.

James Newton Langley 1

When I was searching for WW1 figures I came across a 28mm mounted soldier by North Star Military Figures which got me quite excited. The figure itself was of an officer (James was a humble Private) but with a couple of minor alterations I felt I could produce something a little closer to the photo above.

The first change was to remove the upper part of the figures boots and turn them into gaiters.  Next up was to add white braiding to the horse harness and to the figures left shoulder.  Minor alterations which made a considerable difference but about as much as I could realistically achieve given the casting of the figure and my own ability.

The next thing I did was to take the photo and flip it so that the horse and rider were facing the other way.

20171009_102232

Finally all that remained was to paint the figure and add it to a plain base. As a model this falls a long way short of being my best work. As a meaningful figure it sits top of the pile.

TIM

20171014_17122320171008_22070220171008_22101220171008_22071020171008_22065220171008_220652


28mm WW1 Diorama (No: 2)

This week saw my second mini WW1 Diorama completed and off the work bench.  The good news is I now have two items for next years Plymouth show, the bad news (or I guess good news too as I enjoy my modelling) is that I’ve got about another 10 exhibits to do!

Not a great deal to say about this model.  The figures were all purchased from Empress Miniatures (Mutton Chop WW1 range) and are some of the best figures in 28mm scale that I have seen.  I’d recommend these figures to anyone else out there who is interested in WW1 they really are excellent.  No adjustments were made to the figures, just the simple case of painting, composing and a bit of base work.  The enamel badge, actually a remembrance lapel badge, was bought on Ebay for a couple of pounds to complete the base.

I did paint these figures slightly different from my other WW1 diorama.  In both instances I put down base coats in Vallejo acrylics but on the first diorama I added a top coat in oils.  On this model I applied a second coat of acrylic followed by an oil paint wash, the oil paint diluted using White Spirit.  I’ve tried using water based washes but personally I’m not a big fan.  It might be the way I use them but the water based washes run off too much for my liking whereas an oil paint wash is absorbed into the acrylic and in my opinion gives a better looking finish.  Each to their own I guess.  In any event I’ll leave those that look at this post to judge for themselves.

Pictures of the final diorama appear below.

TIM

20170929_13474520170929_13460620170929_13452720170929_13423420170929_13415520170929_13404920170929_13450320170929_13461920170929_134131


On The Work Bench

Well at long last the various models I had ordered have all arrived and I have been able to commence work on the first of what will be a few 28mm WW1 dioramas.  If all goes to plan then I should have half a dozen or so models complete over the coming weeks.  However, we all know that nothing goes to plan so in reality it will probably take longer and involve obligatory swearing and cursing.

I decided to start with some of the figures I bought from Empress Models, their Muttonchop WW1 range.  The detail in these 28mm figures is simply outstanding.  Painting the figures is underway with some finished and others almost there.  Base work has also started and all things being well then by the end of next week I will be able to post images of the end result.

TIM

20170923_11535220170925_21302220170925_21332420170928_11194320170928_111928

28mm Old West Saloon – Boxed Diorama

This week has been a planning week with little being done in the way of actual modelling.  The simple reason for this is that I’m waiting on a number of things to arrive in the post.  When they do arrive my time will be dedicated to WW1 and RAF figures.

In the meanwhile I’ve started to look at how to go about constructing my Old West Town diorama.  I wont be starting it for a while but there is a lot to think about and a lot of figures to identify and purchase.  It’s also intended as a project which will last a long time.  One of the things I would like to do is install lighting to some of the buildings and with this in mind I revisited a boxed diorama that I put together a while ago.

The idea of a boxed diorama appealed to me when I saw one at a show I went to.  Keeping with my Old West theme I knew I wanted to do a western saloon scene but the first stumbling block was finding a suitable box.  Eventually I managed to find one on Ebay (see below).  An inexpensive purchase with windows at the top and front of the box.

20171006_152209

Having acquired  a suitable box it soon occurred to me that I had a few obstacles to overcome.  Firstly, I didn’t need a window in the top of the box.  Secondly, although finding figures proved straight forward (Dixon Miniatures once again came up trumps) many of them came on bases which needed to be removed without damaging the figures feet otherwise they wouldn’t look right standing on a wooden floor.  Thirdly, I needed to get my head around how to make the lighting work and finally an issue I had originally completely overlooked, composition.  It’s not that I don’t normally give composition a lot of consideration because I do, it’s just that I soon realised with a box diorama you only have one view.  The figures therefore needed to be placed in such a way that they can all been seen.  Essentially it’s like looking at a stage theatre.

A very fine saw enabled me to remove the figures quite easily in the end and the lid of the box proved more than sufficient to conceal the lighting and associated battery and wires.  Composition was a matter or trial and error and the window on the box lid was filled with a stiff piece of card of an appropriate thickness to which was added a poem.  Yes, a poem.  In a moment of inspiration I came up with a few choice words which essentially tell the story of the people in the saloon.  If you cannot read it from the images below then it reads as follows:

When The Sun Goes Down

When the sun goes down and the day is over

Enter the town folk, sheriff and drover

A pianist playing and a barman pouring

A lady singing and saloon girls whoring

Whiskey and poker late into the night

A winner, a loser, a probable fight

Another day in another town

More of the same when the sun goes down

No prizes for finding all the characters in the box!

What follows are a few pictures of the making of the box diorama with the lights on and off.  Apologies for the quality of some of the photo’s but try as I might I seem unable to eliminate some of the reflective light .  Overall it presented quite a challenge but it should stand me in good stead as I look ahead to my Old West Town diorama.

TIM


20151105_11402120151105_12330620151106_10515820160203_16362920160203_16362020171008_11072420171008_11073520171008_11080620171008_11080220171008_11112320171008_11113920171008_111211

A Second 28mm Knight in Shining Armour

I mentioned in my last post that I had a second knight to paint and put together and over the last week I’ve managed to get it completed.  The figure came from 1st Corps and I have to say that the quality of their castings are fantastic.  Their figures are mostly for historical periods which have little or no interest to me but they do have some WW1 figures which I will look at more closely.

Overall I’m pleased with the way this one worked out too but I have a number of model ideas going around in my head so I think it may be a while before I do something with knights again.  If I do then I think I’ll most likely check out the Norman period.  My view on decals hasn’t changed, they feel too much like a cheat, but I enjoyed dabbling all the same.  I was a kid back in the 60’s (anybody else remember seeing Ivanhoe with Robert Taylor?) and I can recall using decals on Airfix planes but until now hadn’t used them since.  Applying them to flat surfaces was easy as best I can recall but these knights proved more of a challenge due to the various folds on the castings.  It was made easier when I discovered Micro Set and Micro Sol decal softeners.

Images of the completed figure appear below.

So what next?

Figures for a second 28mm WW1 diorama have arrived and I expect to start on that shortly.  A 54mm RAF Pilot has also arrived in the post so I’ll get underway on that one too although at a first it looks like I’m going to have a lot of trouble with that one.  It’s not cast in the way I had anticipated so assembling and painting it will be awkward I think.  Both these models are needed for next years Plymouth show which is remembering 100 years of both WW1 and the RAF.  Hopefully they will come together OK.   I’ll need to do a few others as well so plenty or research needed as well.

I’m also pining for the Old West and have decided to build a town scene consisting of about a dozen buildings or so.  I was pleased with my last foray (Wells Fargo Way Station – Building Project No: 6) as it was entirely scratch built and my aim is to self build all of the buildings this time around.  I’m also keen to construct the insides for several of the buildings too and add lighting to some as well.  It all needs a great deal of thinking and planning at this stage and I need to find figures as well and avoid using them more than once unless I can adapt them of course.  Should keep me going through the English winter which started early this year, stopped for one day in May, another day in June and continued every day until now.  Crap weather for outside chores but great for modelling!

TIM

20171001_11453520171001_11445820171001_11355920171001_11390420171001_11462220170924_204445


A 28mm Knight in Shining Armour

I mentioned in a post a few weeks ago that having returned from holiday I wanted to diversify a little from modelling Old West figures and dioramas, my genre of choice.  To this end I identified the medieval period as an area in which to have a brief dabble.  I was partly inspired by a fellow blogger Souls In Miniature.  Ironically SIM is based in the good old US of A modelling knights of the realm while I am based in the UK modelling the Old West. Clearly we were both born on the wrong continent.

I digress.

Painting figures of knights has long had an appeal for me but my modelling skills are simply not up to painting coats of arms.  However  I recently discovered some fantastic 28mm figures by 1st Corps which come with decals and transfers so thought I’d give it a go. I bought two mounted knights and below are the images of The first one duly completed.  The second is under construction.

I have mixed feelings regarding the end result. On the one hand I think the model looks ok but on the other hand I can’t help but feel that using decals is a cheat on the painting.  Having said that, hand painting the lance proved a challenge and finally came good.  I will  complete the second model and post details in due course but the jury is out as to whether or not I will do some more.

My experiment on diversifying is not proving too successful. I need to do a few more WW1 figures and a couple of RAF figures for my model club which I am looking forward to doing but I’m missing the Old West. A new building diorama is being planned.  I don’t normally have projects running side by side but I think that will have to change.  In the meanwhile images of The First Knight!

TIM

20170923_181429_resized20170923_181218_resized20170923_181210_resized20170923_181158_resized

Messing About With Realistic Water … Again! (Part 3 -Completed Model)

Well, after what seemed to take for ever the Realistic Water started to set which then enabled me to manipulate it before it was left to completely go off. Together with Woodland Scenics Water Effects I managed to eventually build up the “running water” into something like a fast flowing white water river.  When completely dry certain areas were dry brushed with Winsor and Newton Titanium White oil colour.

Where appropriate, the front of the canoe and by the paddles, I tried to create the image of cutting through the water.  All in all I’m reasonably pleased with this one but I’ll leave that for others to judge rather than me.  To give it some perspective the model stands 6 inches (15cm) tall and is about 3 1/2 inches (9cm) wide.

There is definitely an art to creating water that looks realistic and this is an area I may look to explore more in the future as I have more to learn for sure. For me though the jury is out with Woodland Scenics. Ideally it would be good to find something less liquid that can be molded but still dries clear (bathroom sealent?). It may well be that Woodland Scenics offer the best products for this sort of thing but I can’t help but think there must be others available and possibly cheaper too.  Something to investigate ahead of any future diorama I do with water.

If anyone knows of other products I would love to hear from you!  In the meanwhile some images of the end result.

TIM

DSC_0735DSC_0742DSC_074020170911_22145420170911_221515-120170911_221515-220170911_22151520170911_221248DSC_0734DSC_0736DSC_0742DSC_0737