The Search for Jack – 28mm Vignette (The May Challenge)

On the 7th August 1888 the first of 11 murders potentially committed by a murderer later to be known as Jack the Ripper took place.  The victim was Martha Tabram and the location for the ghastly crime was George Yard (now Gunthorpe Street), Whitechaple, London.

A few year ago now I started to investigate my family history.  I was aware of a lot of things but unaware of far more. Part of my research revealed that my great-grandfather and his family had lived in George Yard at around the time of the Ripper murders. At the time I was unaware of the association of George Yard and the Ripper but when I googled the address out of initial curiosity it went ballistic! Since then I have been more than a little intrigued by Jack the Ripper and have read and acquired a number of books on the subject.

It was when I was looking for a suitable figure for the first model in my WW1 project that I discovered a set of four figures which included the newspaper seller.  The other figures were a women, since used in another WW1 model, a policeman and Jack The Ripper.  The latter two figures were primed but remained in my bit box neglected until the May Challenge got me sifting through my old stuff, which is the aim of course.  Using various bits and bobs I decided to put together a little vignette.  Another neglected figure was used to provide the corpse.

The macabre is not something I would describe as my usual modelling fair but it was fun to do.  Not sure where I’d go with this genre if I chose to do something else but my mind is open to the possibility.

Getting everything onto a small base (4.5cm x 4.5cm) proved to be the toughest challenge but I got there in the end.  Scratch built roof, brick and wooden walls together with some rolling pin cobblestones set the scene.  Painted mostly in oils over acryllic undercoats. A wet wipe was used to create the tarpaulin covering the victim.

Images below.

TIM

DSC_0819 (1)DSC_0837)DSC_0817 (1)DSC_0836DSC_0818 (1)DSC_0838DSC_0821 (1)DSC_0839DSC_0840DSC_0822 (1)

The News at TIM – Mid Week Musings (No: 12)

Welcome to this weeks Musings!

The Ageing Process

Last week I attended a family funeral.  It has been a while since I attended one but, unsurprisingly, they always result in periods of personal reflection.  I’m sure I will share more of my inner most thoughts with you in future posts but for now I find myself considering the ageing process.

When I was a young man I fantasized about being seduced by an older women (those of you familiar with Mrs Robinson in the film The Graduate will be able to relate to this), considered the idea of sleeping with a women in her 60’s repulsive (that would be like having sex with your granny, err!), thought a super model was Raquel Welch and, if I ever got lucky, would panic if I couldn’t find a condom in the drawer of my bedside table!

Then the ageing process kicked in.

Now if I look at a much younger woman I’m considered a dirty old man, I am now sleeping with (a soon to be) 60 year old woman, think a super model is something one of you guys has posted on your blog and panic if I can’t find my reading glasses in the drawer of my bedside table!

It’s a funny old world.

The Devil is in the Detail

I enjoy modelling and making vignettes and dioramas but I’m a long way short of being any sort of expert so I was flattered to be asked recently what I considered made a good diorama.  An interesting question and one where the answer varies I suspect depending upon who you ask.

Somethings are in my opinion a given.  Ideally the paint work and the setting will look good and everything is in scale.  Hopefully it will also tell a story or more likely appear to capture a moment in time, the equivalent of a still photograph if you like.  The nature of the piece, be it historical, present day or futuristic is largely a matter for the modeller and what they were inspired to create.  However, despite the importance of all of these things it is the detail, or lack of, which makes or breaks a diorama in my opinion.  Allow me to provide an example.

The other day I saw a diorama which had been put together of a tank centred on a nice base the landscape of which was mainly mud.  The tank was excellent, far better than anything I could do and the mud looked very realistic.  The only problem was how had the tank got to the centre of the base, driving across a muddy terrain having left no tracks?

The devil is in the detail.

Is it good to have a routine?

Last week, not for the first time, I received an email from WordPress offering some tips on how to grow my blog.  I didn’t take too much notice of it but one tip did catch my eye, mainly because unintentionally I was actually doing it already.  The tip was to post regularly.

Now the only reason I post regularly is because I have the time to do so and because I enjoy it, it’s not by design and intent to establish a blog empire.  Some people will argue that it’s good to have a routine, others prefer to be more impulsive.  Personally I confess to being a creature of habit and liking an element of routine and order but am not governed by it.  If the opportunity arises to do something in the heat of the moment or off the cuff then that works for me.  However, some routines are far from desirable.

I once heard of a chap whose bodily functions ran like clockwork.  Every morning at six thirty he would have a wee.  He was so geared to this routine apparently that you could set your watch by it.  The only problem was he never woke until seven!

Like I say, not all routines are good.  You’ve been warned.

—000—

Until next time.

TIM

28mm Carolingian Warlord

This 28mm figure is the second of four that I purchased a little while ago from Gripping Beasts, the first  being the “Legendary Viking Warlord – Ragnar Lothbrok, King of Sweden & Norway” which featured in a post a few weeks ago.

I’ve got a few things on the go in respect of vignettes and dioramas at present, including the May Challenge.  Nothing too grand but they do require drying and “next step inspiration time” and while I’m waiting for the next light bulb moment I thought I would fill the gap with some quick win figure painting rather than sit idle.  As consequence you now get to look at a Carolingian Warlord.

I like the quality of these figures from Gripping Beast as well as the historical era and it’s an interesting diversion from things I have done of late.  I still have a couple more figures from this period to do and will doubtless post details of these in due course.  I shall also take a closer look are what else this era has to offer.

Pictures below.

TIM

DSC_0792DSC_0796 (1)DSC_0795 (1)DSC_0794 (1)DSC_0793 (1)


Oil Paints – Hit or Myth? – A News at TIM – Mid Week Musings Special!

Welcome to a Mid Week Musings Special!

The Pros and Pros of Oil Paints

The May Day Bank Holiday provided some glorious sunshine which resulted in me sitting in the garden rather than modelling.  Instead I sat warmly in the shade (I’m fair-skinned what can I say?) watching a series of videos on YouTube aimed at painting basics.  Before I go further let me be clear on something from the start.  I am not, and never will be an expert modeller or painter.  I can however improve particularly as I am essentially self-taught.  I mention this because even watching videos on the basics I still find myself learning things or at the very least reminding myself of things I no longer do but arguably ought to.

So, why is this relevant to the title of this post? Well, two-thirds of the way through the list of tutorials the narrator started talking about “Wet Blending and Layering” techniques which it turns out I am familiar with but not by those names (in truth I didn’t even know there were names for these things).  The principles behind these techniques if I understood correctly is to achieve an end result which provides a smooth transition from one colour to another as particularly relevant to shading and highlighting.  The narrator went on to say that these techniques were in his opinion amongst the hardest to learn due to the fact that acrylic paints simply dry too quickly.  He went on to explain how to achieve Wet Blending but to be honest I had already switched off a little having decided this wasn’t for me right now.  Why?  Because I’m happy to use my oil paints to achieve these results.

There are in my opinion a lot of myths surrounding the use of oil paints for modelling and so I thought I would produce an article to expel some of them and explain a little of what I do and why.  I also thought if there are people who struggle with Wet Blending because it’s as difficult as the guy said then perhaps trying oils as an alternative might work.  So, in no particular order …

Myth No: 1 – Oil Paints are Expensive

Wrong!  A Winsor & Newton 37ml tube in the Winton Oil Colour range will set you back about £2.75.  In contrast a 17ml pot of Vallejo Game Color will cost about £2.45.  Ah I hear you say, £2.75 is more expensive than £2.45 and you would be right but for one little thing.  Except for three colours, my oil paints have over two-thirds left in every tube and are as good as the day they were bought which was over 30 years ago!  Every model which appears in my Gallery, and that’s not everything I have ever done by any means, was either fully or mostly painted using these paints.

All in all I have 16 tubes of paint.  Two of these, Paynes Grey and Sap Green I never use.  The best Grey’s and Green’s are mixed, so really it’s 14 tubes.  From these 14 colours I can pretty much mix any colour I want using my colour wheel and because they are oils they stay mixed without drying out for as long as I need.  No need for a wet pallet.

The only three colours I have ever replaced, just once in each case was Burnt Umber, Titanium White and Ivory Black.  If I only painted figures I would not have needed to replace them but these colours, particularly the Burnt Umber, I have used a lot for base work.

Myth No: 2 – Oil Paints Only Produce a Gloss Finish

Wrong!  There are mediums wich can be added to produce a matt finish but the easiest option by far is to put out a small amount of paint onto a piece of paper and let the paper absorb some of the oil.  It is the oil that provides the sheen so once reduced it becomes more matt.  Matt varnish at the end of the painting process will also dull down any sheen.  Adding a little bit of white spirit or thinners keeps the oil paint extremely pliable if you remove a lot of the oil.

Myth No: 3 – Oil Paints Take A Long Time To Dry

Wrong!  OK, they can take longer but there are things you can do to speed the process up.  The first thing is not to put too much paint on in the first place.  It is easy to be heavy-handed with oils but the paint goes a long, long way and is best applied in thin coats in much the same way as acrylics.

The other thing you can do, and this is how I tend to paint, is to use the acrylics, particularly for the larger paint areas as an undercoat.  In this way the acrylic will absorb the oil and thus speed up the drying time.  Anything I paint these days only has to be left over night at the longest and to be fair that would probably apply too if you were batch painting so what’s the big deal?

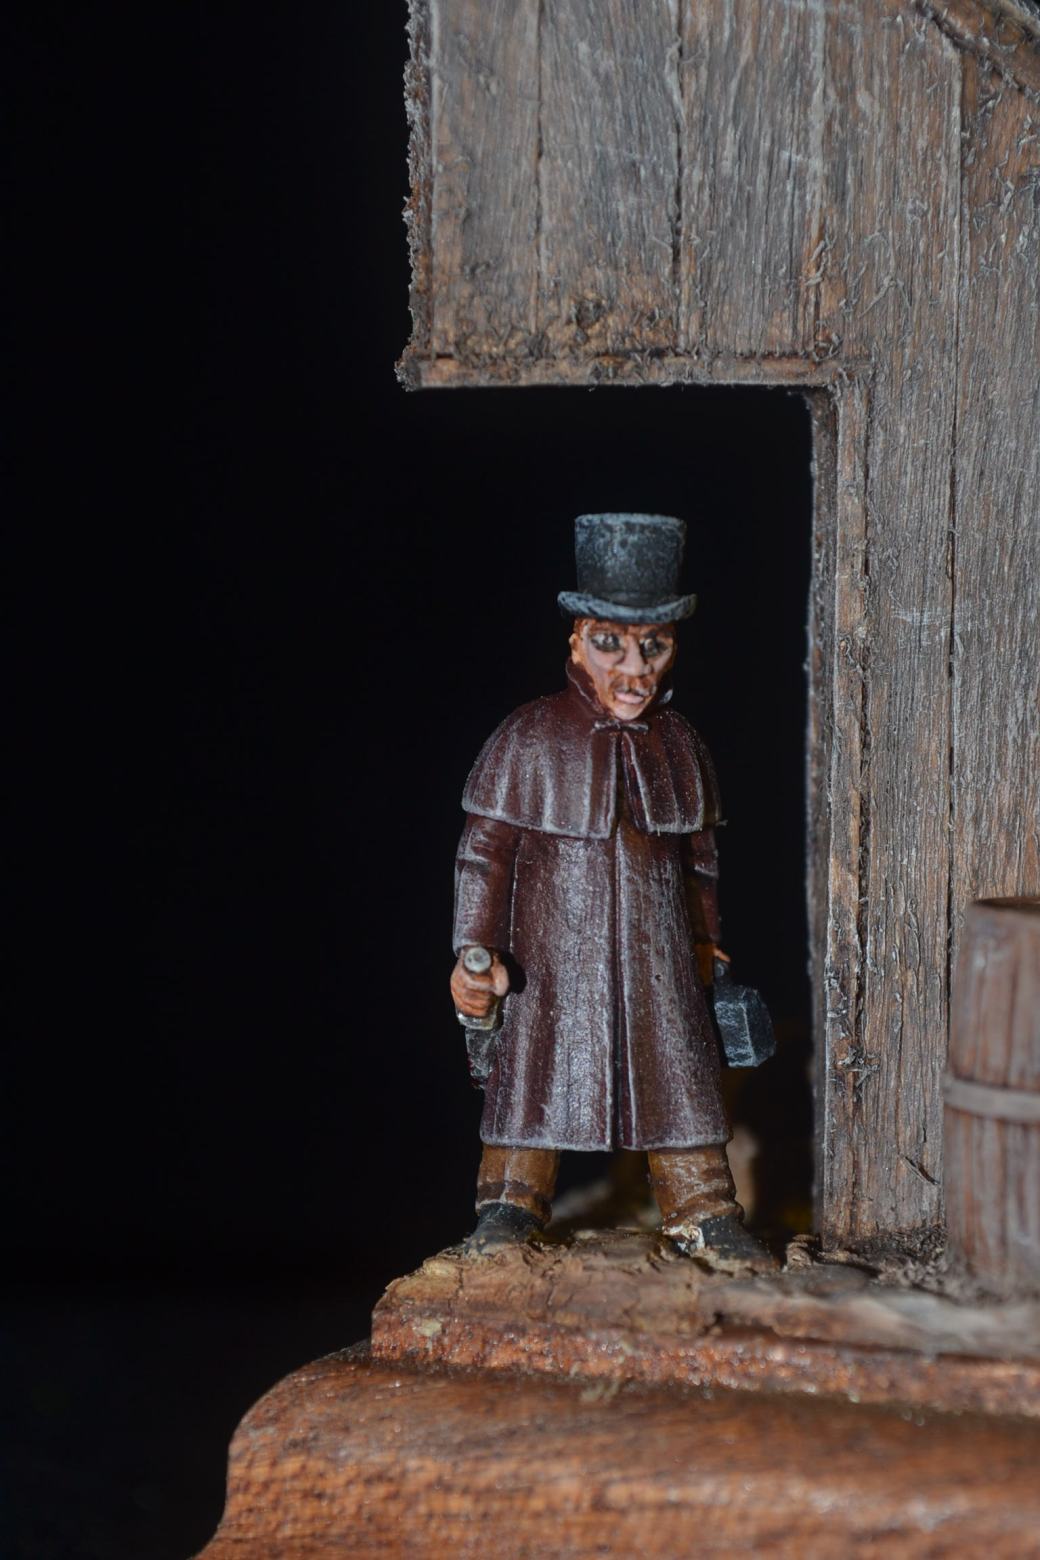
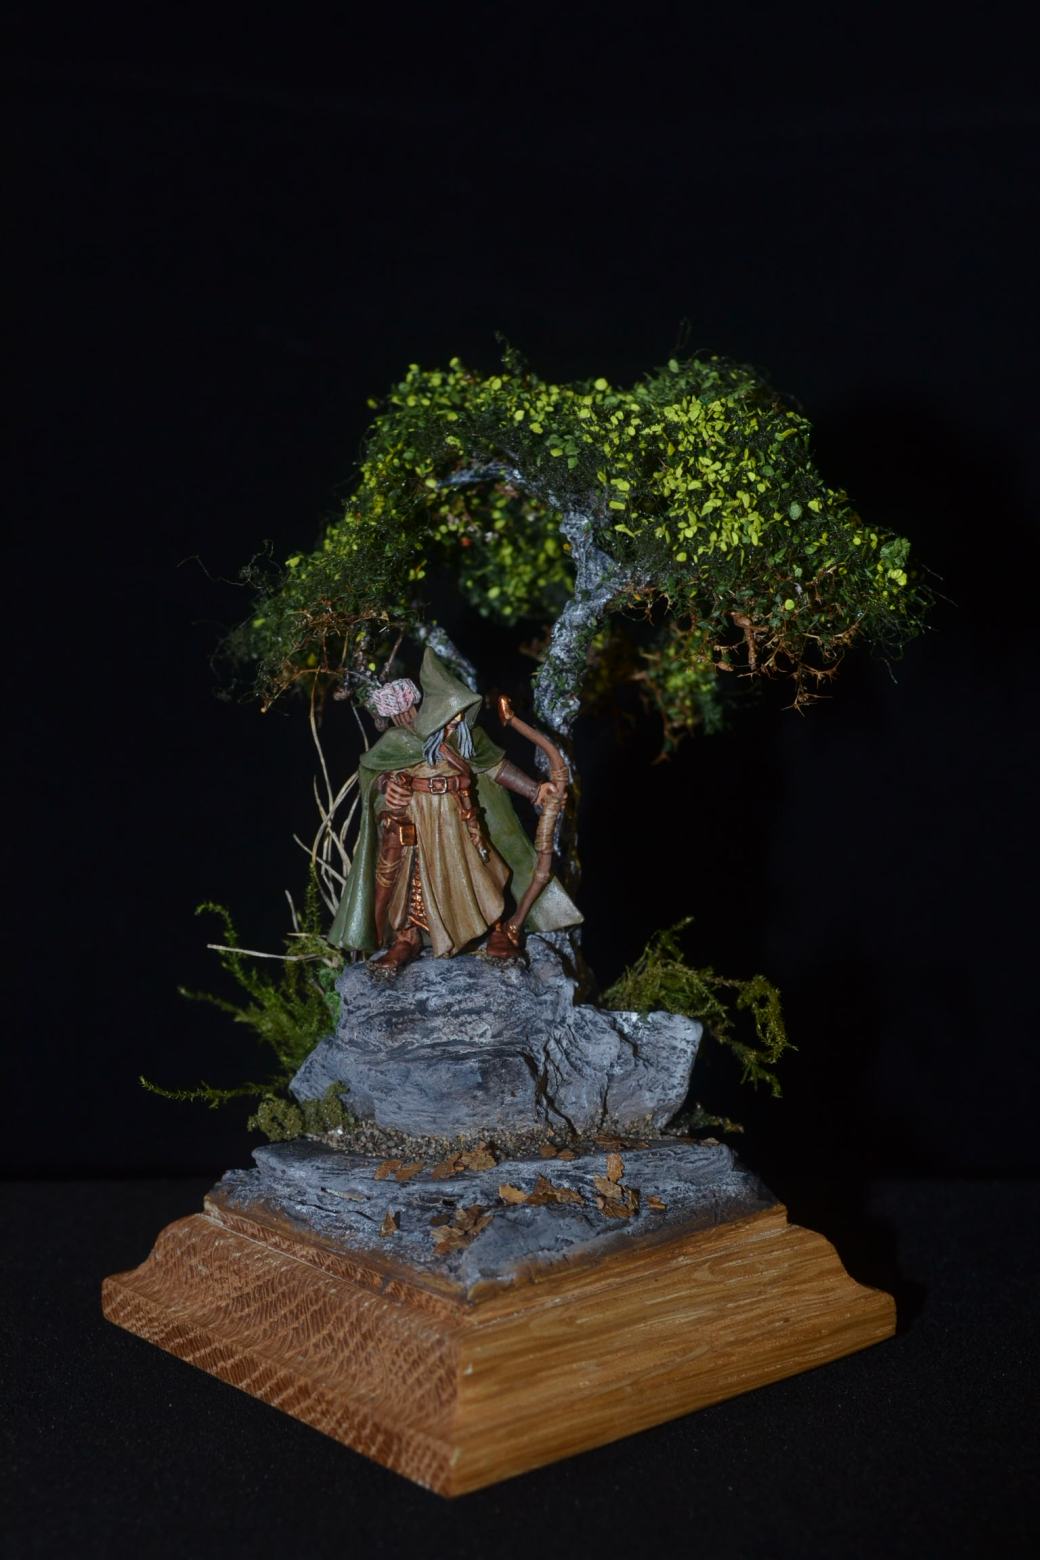
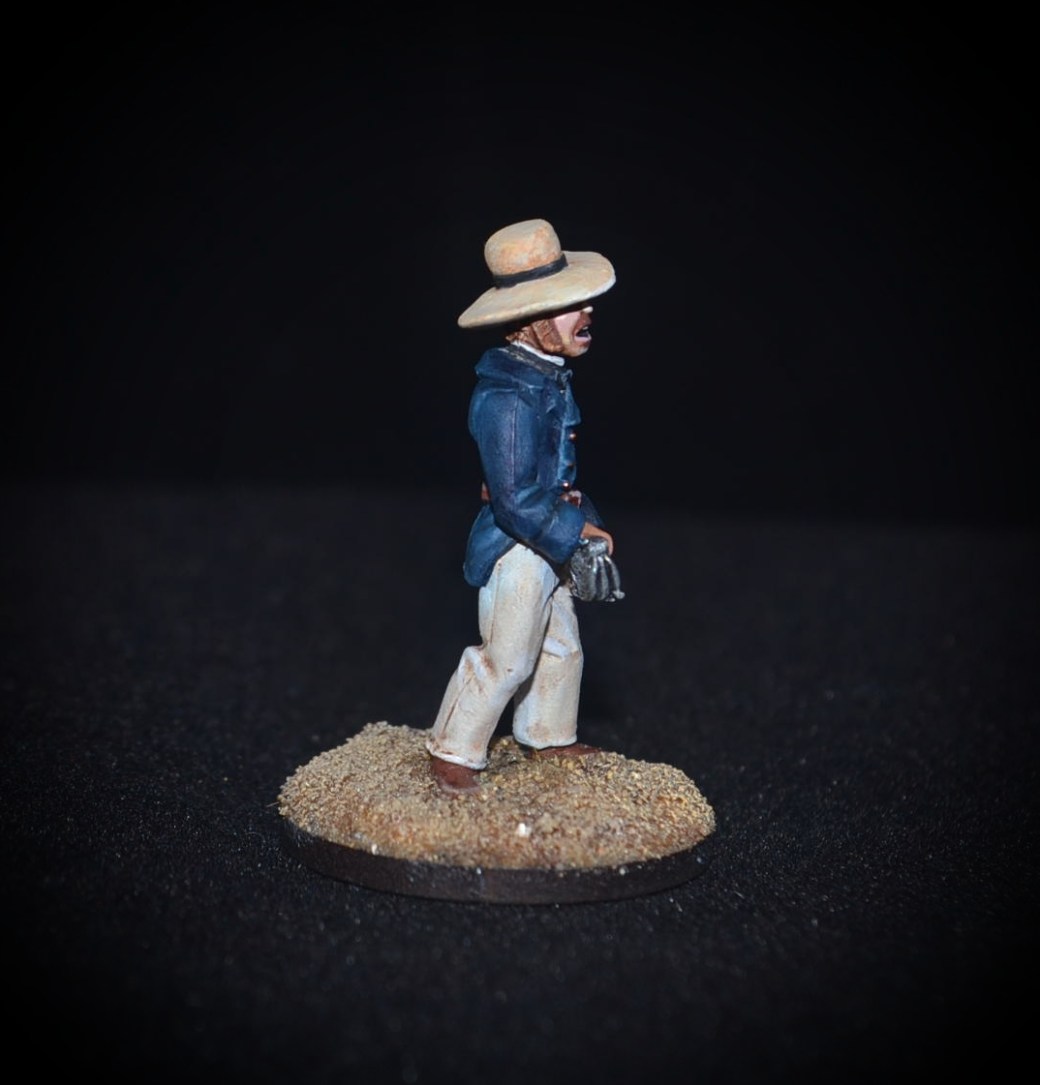
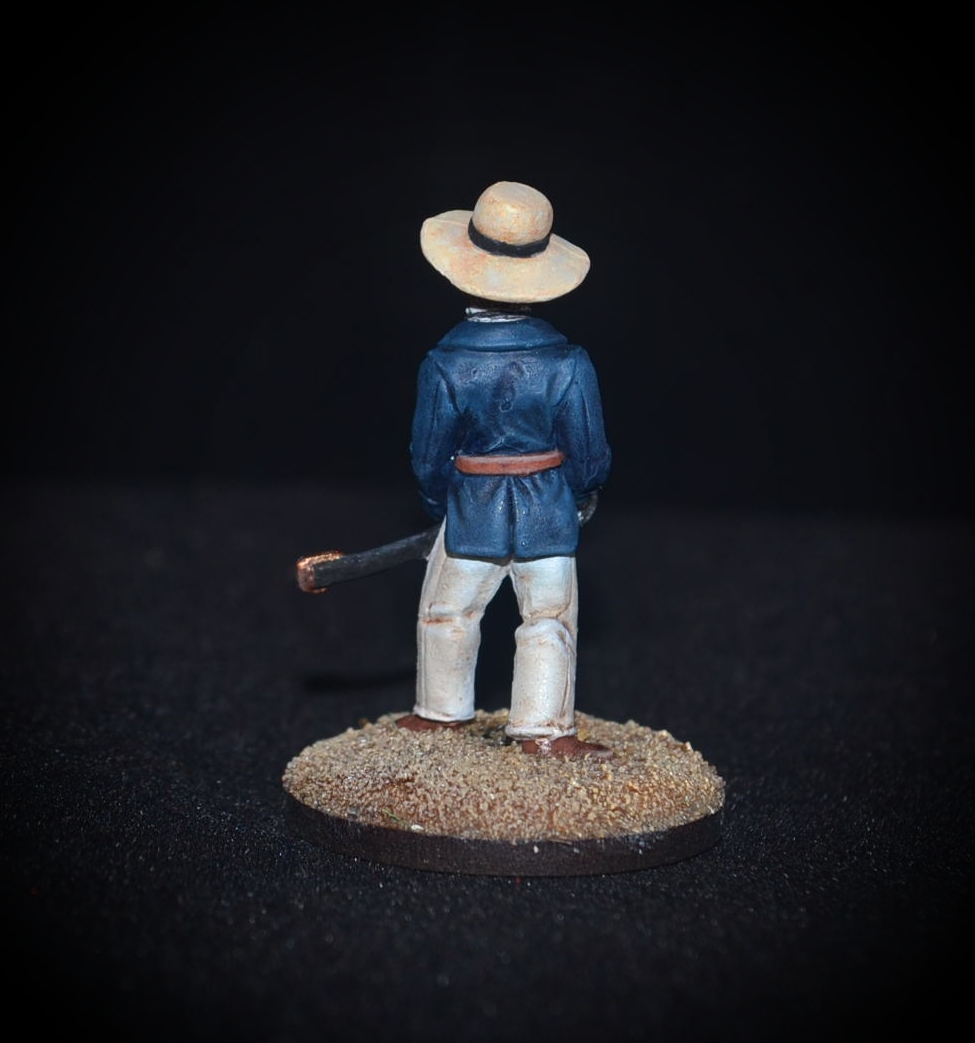
The figure in the images below (apologies, not the best of photo, figure looks darker than it appears in the flesh!) was painted using a mixture of oil paints and acrylics which has become my preferred technique for 28mm and took a couple of hours in one sitting (yeah, yeah , yeah if I’d taken my time it would have looked better!).  It hasn’t had matt varnish applied.  I chose this figure and its colour scheme deliberately to show that you can paint a very light colour (white) up against a strong colour (blue) without merging the colours.  I’ll break the figure down in terms of how it was painted later in this article.

20180512_150248

Myth No: 4 – Oil Paints Aren’t Very pliable

Wrong!  Oil paint goes where you put it.  It can be used for dry brushing, diluted to make effective washes for those very fine areas of detail but above all, and this brings me to where the idea for this article started, it can be easily blended!

The whole point of oils in modelling is that it can be blended easily.  Put two colours next to one another and they wont run into each other.  Take a brush and run it between the two colours and before you know it you will have created a smooth transition from one colour to another.  Yes I am over simplifying it, it’s a techniques like everything else of course and therefore needs practice but get it wrong and you just wipe the oil off and start again.  There is no danger of the paint drying out so you can add dark or light colours a little at a time to achieve the shade or highlight you are looking for.

The end of the Myths?  That’s something you will need to decide.

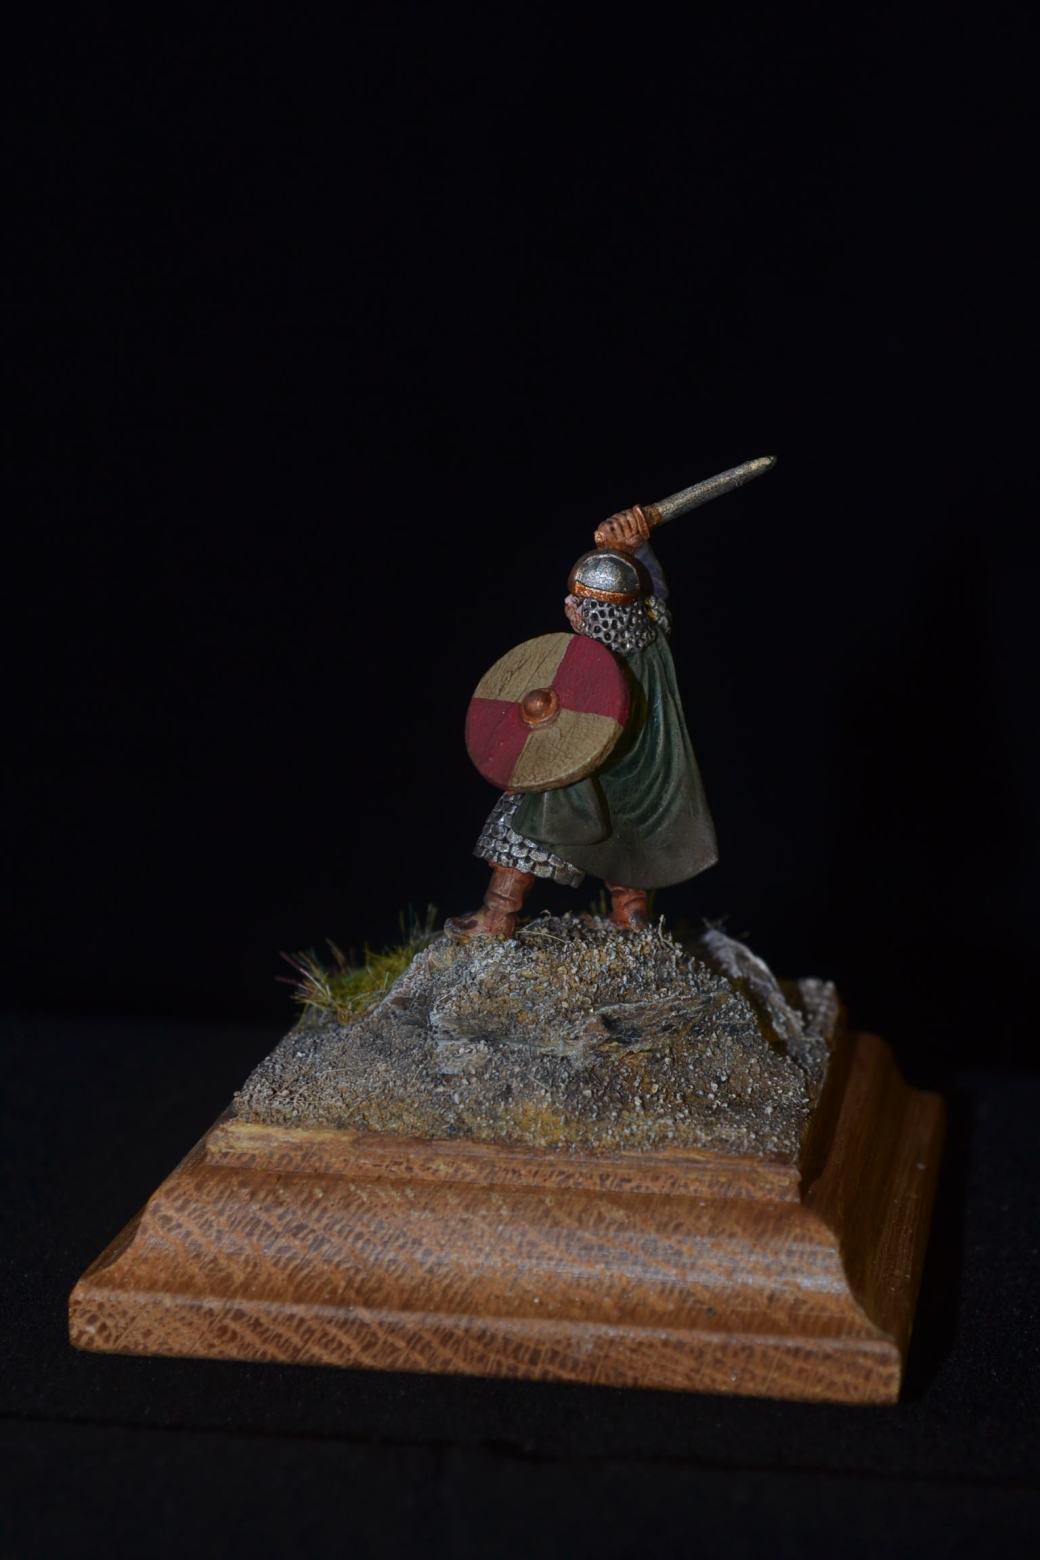
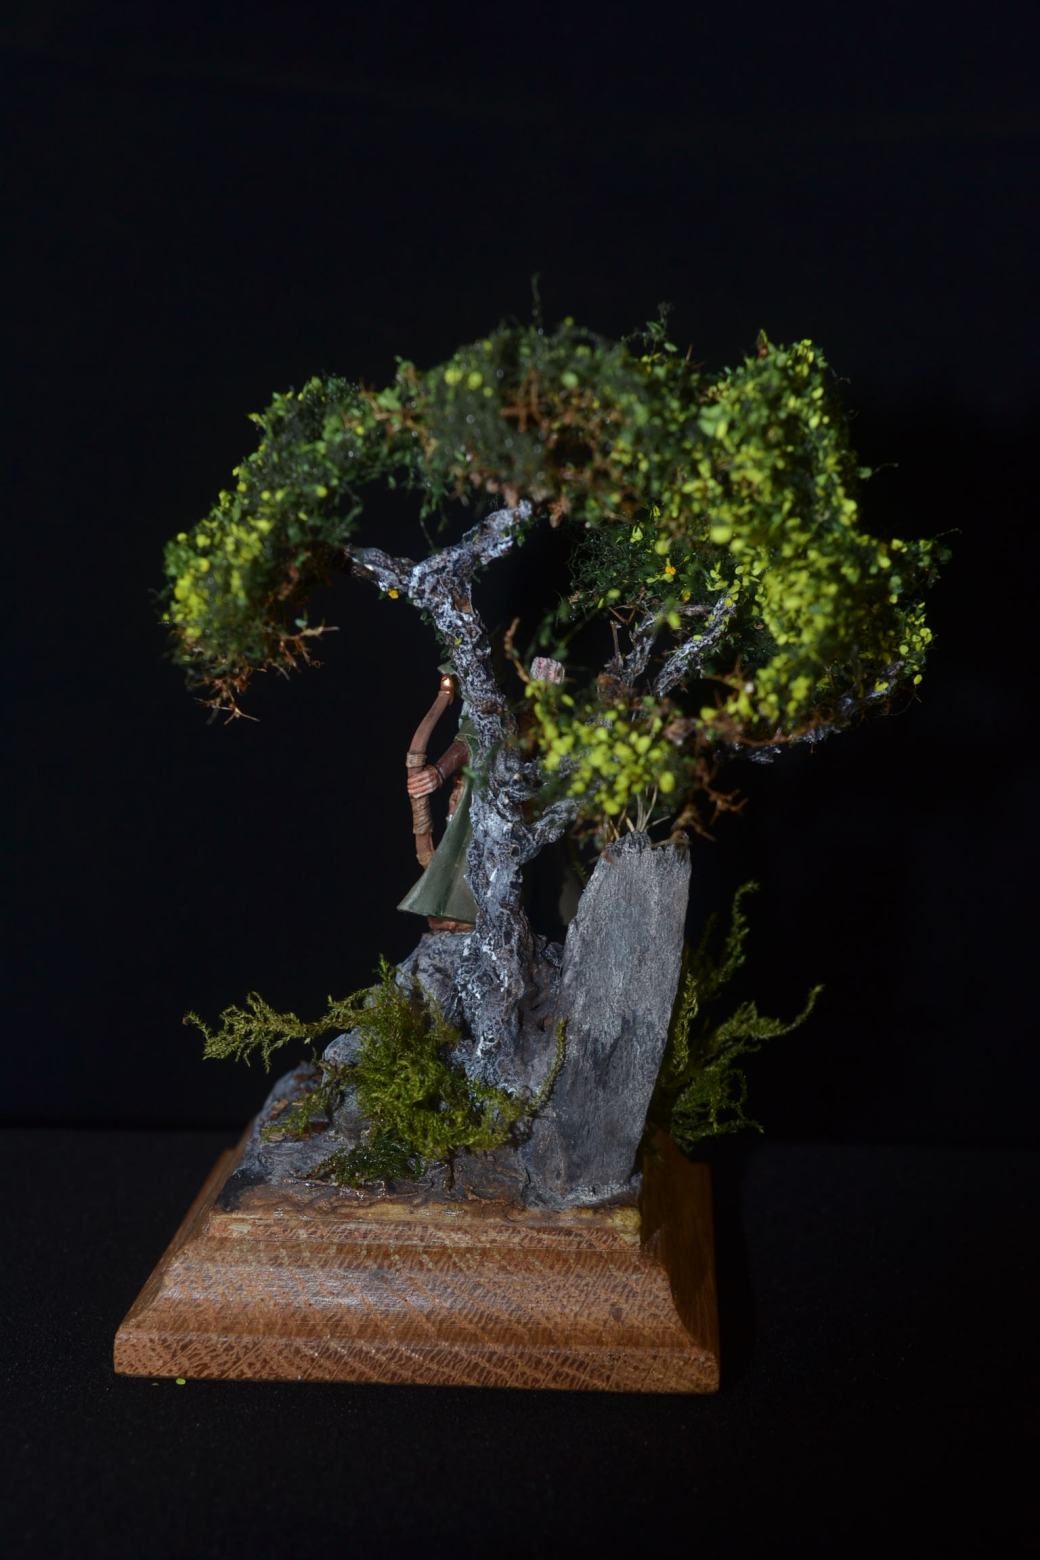
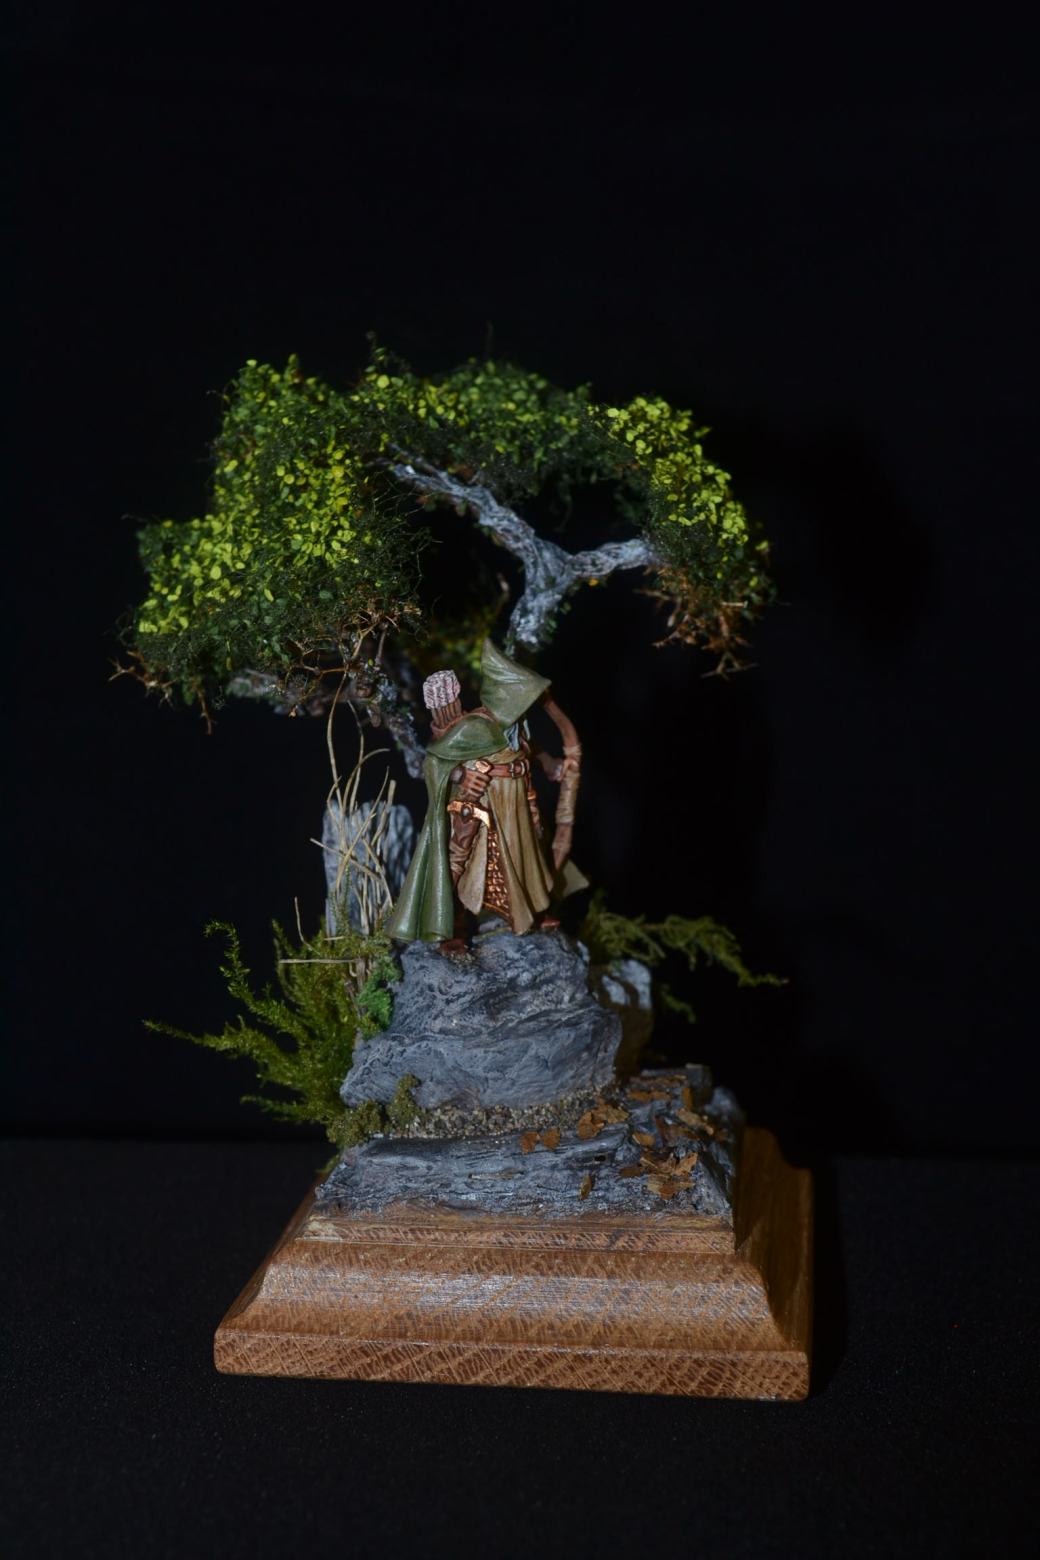
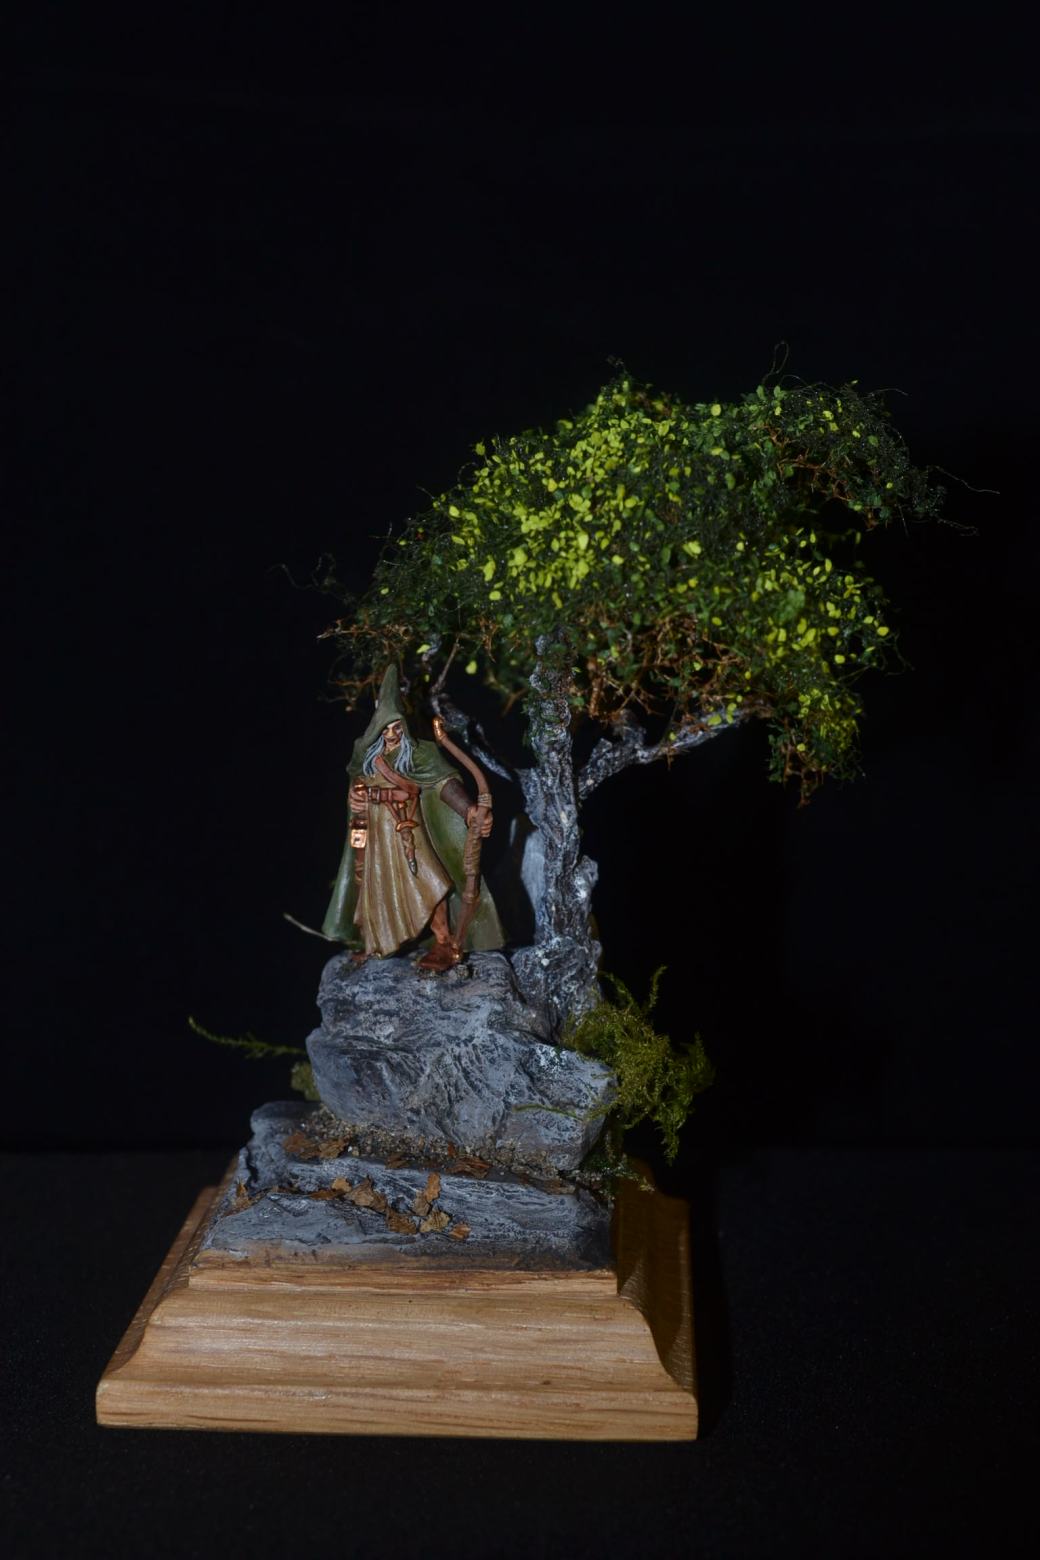
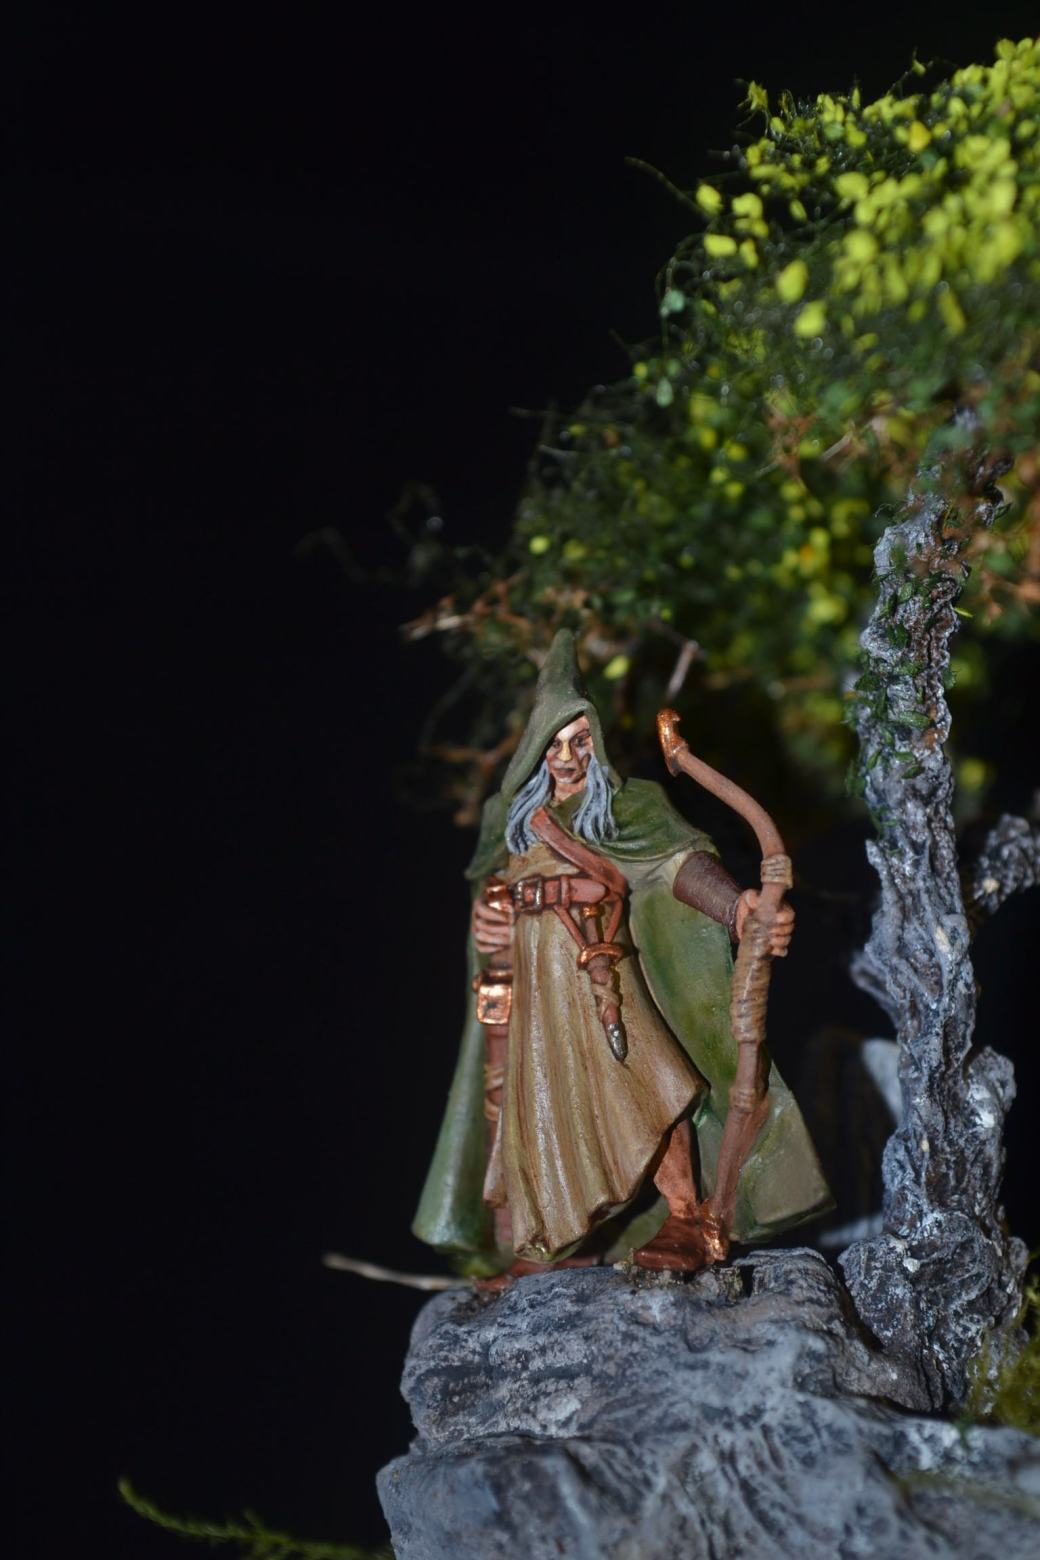
Meanwhile a closer look at the little chap above.  A 28mm Artizan Alamo figure, William Travis.

When I started to paint 28mm scale figures I soon leant that there was a need to adjust the way I painted, mainly due to some of the very fine detail.  Washes in particular became important.  I also started to try out acrylic paints which until then I had never used.  The idea of not using oil paints didn’t sit well with me as I had been using them for years so I started painting using both mediums.  The figure below is such an example.

After initially priming the figure with white primer the first task was to paint the face.  This was done entirely using acrylics.  The jacket and the trousers were initially painted using blue and white acrylics respectively.  The jacket was then painted with a blue/black oil paint mix and a dry brush was used to remove excess oil paint to ensure a thin layer of paint only remained.  Black was then blended into make the shadows and a little white to creat the highlights.

The trousers were given a very diluted wash of burnt umber oil paint and then white oil paint was added to the raised areas for highlights.

The hat was painted in acrylic and later overcoated with thin oils.  Everything else – boots, belt, sword, hands – were painted in acrylics.  A demonstration piece not a master piece!


20180512_15024820180512_14552620180512_145556


Lawrence of Arabia – “The Road to Damascus” – 28mm Diorama

A couple of months ago Martin, an email follower of my blog, asked me if I’d ever considered doing a model of Lawrence of Arabia. I replied saying that I had thought about it some years ago but hadn’t been able to find a suitable figure.

My original inspiration came many years ago after seeing the film Lawrence of Arabia by David Lean. If you have never seen it then I would strongly recommend that you do.  A big budget film where the people you see are all real people not half a dozen replicated by computer imagery.  The sweeping landscapes filmed in Jordan are stunning and on top of that it’s a true story, how accurate though I cannot comment.  Peter O’Toole’s acting debut if I recall correctly as well. Sadly nothing came of it in modelling terms.

However, Martin’s email prompted me to look again and was I rewarded by finding figures by Artizan Miniatures. It’s quite possible the figures have been around for sometime and simply passed me by because I would have been looking at 54mm scale in those days and not the 28mm scale that I am much more into now.  Needless to say I purchased the figures.

The actual Lawrence figure comes as part of a pair and was nicely cast which is something I have come to expect from Artizan’s models and originally the figure held a pistol.  For the little diorama I had in mind I thought this was inappropriate so I removed it and added a stick/crop instead.  That’s about the extent of my figure conversion ability!

It’s been a while since I painted a figure that was essentially all one colour and I’d forgotten the challenge that comes with highlighting and shading.  As for painting camels these are my first! Overall they didn’t come out too badly.  Oddly the second figure didn’t come with anything to hold so I chose to resolve that by making a flag.

The base work was a simple affair but if I’m being honest it’s also my biggest disappointment with this little diorama.  In an ideal world I would have put the two completed figures on a base 20 feet wide to provide a sense of scale.  Alternatively I could have taken it to a beach in Cornwall and photographed it there!  If you are familiar with the film then you’ll probably understand where I’m coming from with this, it’s all about the shear scale of the landscape.  Still things are what they are and I’m pleased to have completed a model of an iconic figure.

TIM

DSC_0811 (3)DSC_0814 (3)DSC_0816 (1)DSC_0811 (2)DSC_0821 (2)DSC_0815 (1)DSC_0813 (2)DSC_0814 (2)


The News at TIM – Mid Week Musings (No: 11)

Welcome to this weeks Musings!

The Power Of The Internet

A few people recently, myself included, have made mention to how much they enjoy being part of our blogging community.  This got me wondering how far my own little blog had reached around the world since I started it just over a year ago.  So without further ado I checked out my statistics, however, before going any further I feel I should point out a couple of things, particularly to those of you who fall within a younger age group.

I did not grow up with computers, such things, if they featured at all, only appeared in the SiFi movies of the day, they certainly were not in the work place.  To give you a further perspective on this, in 1974 when I was but a mere 17 year old office boy in a department of 250 people working in the City of London, I used to have to queue up to use the departmental calculator!  The arrival of computers was simply extraordinary back then and the advancements to where we are today is therefore breathtaking to someone like me.  The nearest I got to a hand held device way back then was holding my willy while having a pee!

So why mention this?  Simply because I am in awe of the power of the internet and how it has made the world a smaller place.  To think that here I am sitting at my desk in a house in a small Devon village in England, typing away on my laptop and at the touch of a button I can publish something which has the potential to be seen all over the world is, to me at least, incredible.  As my mum or dad would say “What will they think of next!”.

As things stand my blog has currently been viewed in 32 countries and across 6 continents.  If someone had said to me a year ago that this would be the case I would never have believed them.  Very minor in the big scheme of things I know but in the world of TIM simply extraordinary.

The May Challenge

I have several things on the go on the moment but also need to allocate time for May’s Neglected Model Challenge.  Having been through my bits box I have a couple of ideas of what I might do.  What did surprise me though was how many figures I had which I would not personally describe as neglected.

I’m not sure it matters a great deal in the scheme of things but I would describe neglected as something I wanted to do but for whatever reason haven’t.   In truth many of the figures I have in my bits box are figures that I never wanted to do in the first place and have no real appetite for doing now either.  So why do I have them?

Unfortunately, and I suspect we are all victims of this, some figures can only be purchased in sets and we don’t always want all of the figures.  A bit like buying pants or socks in sets of four or five, at least one pair is crap.  And so it is with figures.  Not neglected, simply never wanted in the first place.

Other than using them for spare parts the question of course is what to do with them?  Painting practice?  Both are rather sad outcomes for someone who went to the trouble of sculpting them.  Perhaps I’ll try to love them and think of them as neglected after all.

Modelling Memoirs

I had a thought the other day, not an exciting one as you will have gathered from the titlle above.  The truth is I have been feeling more than a little nostalgic of late, an age thing I’m sure, which in turn got me thinking about all sorts of things including my early modelling days.  Not entirely sure what I have to say on the subject but nevertheless I think I will put pen to paper (make that fingers to key board) and see what transpires.  I don’t envisage what I have to say being more than a few posts but we will see.

Clearly this news will have gotten you all excited but you are just going to have to be patient and wait!

—000—

Until next time.

TIM

28mm WW1 Timeline

Those of you kind enough to follow my blog will be aware of my WW1 Timeline project. After a good few months of work and several periods where I hit the wall in terms of inspiration the project is now complete.  I say complete, to be fair this historical period has been one which I have really enjoyed and as such I cannot see myself not adding to it in the future.  For now though, and in particular for the Armed Forces Day event to celebrate 100 years of the ending of the Great War which inspired this work, the job is done.

I thought I would share with you the sequence of these 28mm figures, vignettes and dioramas as they accord with the timeline.  Full details and better photos on each model can be found under the menu header “WW1” if your interest extends beyond this post.  For now I’ve just been lazy with regard to the photos I’ve pulled together. I didn’t have my Light Box when I started the project but when I get a moment I’ll retake all the photos and update this post.

Looking ahead I’m very much open to suggestions for expanding this project with further figures/vignettes/dioramas and any ideas you might have will be gratefully received.

TIM

—000—

Model 1 – “Read All About It” – Britain declares war on Germany – 4th August 1914

Believe it or not this little guy was key to my project.  I wanted to kick the thing off with the announcement of war but couldn’t work out how to do it until I found this little chap.

20171118_200855-1

Model 2 – “It’ll Be Over By Christmas” – Enlisting 1914

Enlistment was a major event and took place all over the country with lengthy queues of young men signing up.  Little did they know what was in store for them.

20171023_155300

Model 3 – “Passchendale” – July 1917

One of the major conflicts.  Nothing like a slow walk towards machine guns!

20170929_134155

Model 4 – “James Newton Langley” – Middlesex Regiment, June 1915 to November 1918

This is my Great Grandfather.  He went through the war unscathed.  When I found this figure which had an uncanny resemblance to his photograph I just had to do it and include it in the project.

20171014_171223

Model 5 – “Scottish Highlander” – 1914 – 1918

This started life as a spare figure. I didn’t want to do a big thing on the Scots but neither did I want to leave them out.  I then had the idea of turning the figure into a bust.

20171209_195255-1

Model 6 – “Field Marshall Douglas Haig” – Commander British Expeditionary Force, Western Front 1915 – 1918

Love him or hate him a key figure who divided opinion. Impossible to leave out.

20171209_194106-1

Model 7 – “Ypes” – April 1915

This was the first model I completed before it grew into a project.  Painted entirely with oils.  There were several battles at Ypes, all bloody conflicts.

20170729_144826-1_resized

Model 8 – “The Somme” – July 1916

Possibly the most famous incident of the war with an incredible loss of life on day one.  Hard to associate it with anything other than death.

20180127_082649

Model 9 – “Vickers Gun Crew” – Amiens August 1918

The machine gun of its day and a must for inclusion.

20180307_155950

Model 10 – “British Command” – 1914 – 1918

Lions led by Lambs.  Not all the officers were incompetent!

DSC_0791

Model 11 – “British Casualties” – The Somme, July to November 1916

A sad reality of war.  Not everyone survives or gets killed. Some get to live with devastating injuries for the rest of their lives.

20171217_093600

Model 12 – “British Signallers” – 1914 – 1918

Communication in all walks of life are key but not very Hollywood!  Underrated heroes.

DSC_0809

Model 13 – “British 18 Pounder Gun Crew” – 1914 – 1918

The volume of shells fired during the war was incredible.  No wonder the landscape was so devastated.  An artillery piece was another must.

DSC_0794

Model 14 – “British Troops French/Belgium Border” – 1915

I felt I needed a centre piece and fancied another building project.  I settled for a scene depicting troops making their way through a French/Belgium farm

20180206_101313

Model 15 – “Gone But Not Forgotten” – British Cemetary 1917

Not everyone died on the battle field, some died from their injuries after they returned home.

20171112_105927

Model 16 – “Daddy’s Home” – November 1918

The last piece (for now).  I needed an ending and decided a soldier returning to his family would no nicely.

DSC_0836


The News at TIM – Mid Week Musings (No: 10)

Welcome to this week’s Musings!

Big Project Versus Boredom

For a little while now I’ve been toying with the idea of undertaking a bigger project.  I’m not talking about something on the scale of a large gaming board.  Although the idea appeals to me it’s the space issue even if I did something modular.  I’m thinking more along the lines of a larger version of the Old West buildings that I’ve done in the past.  Instead of a single building something which has four or five instead and gives the impression or being a section of a town.

On the up side it would keep me going for a long time, enable me to embrace the improvements I made with the latter builds I did and of course I like the genre.  On the downside my chief concern is getting bored.  I love the creative side of the hobby and I feel certain other ideas will flow through my mind which will lead to frustration and impatience  with what I am doing.

Of course I could strike a compromise.  Construct a building at a time, paint a couple of figures, do something different and then start the cycle again.  I’m warming more and more to this idea.  Some further thought and some planning is need.  I also need to write a list, lots of lists in fact.

I also need to complete a few more of the dozen or so things that I currently have on the go.  Which leads me nicely into my next topic for this week …

Multi Tasking

It’s often said that men cannot multi task.  Women apparently do it all the time and never more so than when they have a baby in tow. They just get on with everything because they have to.  As a father of two I  can testify to this.  In fact I’ve never been allowed to forget it!  Having a child is a badge of office which seems to have entitled my wife to ridiculing my inability to multi task at every opportunity.  Like giving birth it’s a women thing which us blokes just can’t do.

I choose not to argue with she who must be obeyed but of course she is talking – how can I put it – total bollocks! Of course men can multi task.  For example, while the kettle is boiling to make a morning cup of tea I empty the dish washer and get the breakfast things out (her job really bit what can I say I’m a modern man).  More than that I have at least half a dozen models on the go at any one time! Hell, I can even paint a model while listening to music or watching a film!

Men can multi task.  I can multi task!  I think I have proved my point.  In fact I will go one step further.  If women are so good at multi tasking, and yes dearest I’m including you in this (God help me if she reads this!) then why can’t they make love when they have a headache?

… “and that my Lord concludes the case for the defence”.

Memory Loss

I have mentioned in past Musings that I am a lists person.  Nothing has changed, I still am.  However, due to age, I’m now starting to forget things.  I am remembering to put things on the list but not how to do them.  In modelling terms this translates into “paint the wooden doors” being on the to do list but forgetting what colours and the sequence I painted them in.

Something needs to be done so I’m contemplating the idea of documenting some of this and maybe just maybe making a mini series of future posts.  This of course only stands any chance of working if I can remember what I did!  I’ll think on it.

—000—

Until next time.

TIM


28mm Reaper Wood Elf – Arthrand Nightblade, Wood Elf Sergeant – (The April Challenge – Project No: 2)

This was my original idea for the April challenge and fell under Azazel’s example “be inspired by another hobbyists work and create your own version of something you have seen online”.

Many of the figures produced by those who I follow and by those who follow me generally fall into the Si-Fi/Fantasy genre. Nothing wrong with that at all, in fact the figures created and painted are simply superb and appeal to me.  My problem, as someone who likes to do vignettes and dioramas rather than gaming, has been how to create the right setting for any figures I might undertake to do. As a consequence it has been something which has continued to sit on the back burner … until now!

The turning point came following a post by “Caseyrog, Wyrd Stones and Tackle Zones” entitled “Tinkering with Elves” (an arrestable offence surely!).  A great article featuring some excellently painted miniatures.  This inspired me to do a little bit of Google Image and Pinterest searching which resulted in the discovery of this lovely little figure by Reaper Miniatures It’s difficult to explain precisely why I fell in love with this figure but fall in love I did. You may not agree but to me the figures pose is very cool.

I deduced that Wood Elves live and operate in woods (there’s not much that escapes me!) and therefore a woodland setting would be a highly appropriate setting for a vignette or diorama. An idea which had been sitting on the back burner had now become a reality.

I’m not sure what future models I will do within this genre but I have no doubt that I will do others. In fact a couple of figures are on order already!

Photos of the completed model below.

TIM

DSC_0816DSC_0819DSC_0817DSC_0815DSC_0820

The Good, The Bad and The Ugly – 28mm “The Man With No Name”

Prompted by IRO’s recent post I realised I had yet to publish my second contribution to his The Good, The Bad and The Ugly challenge.  So here it is.

For my part I figured it wouldn’t be right to not at least have one figure of the main character from the spaghetti western series which starred Clint Eastwood as “The Man With No Name”.  Andrea Miniatures do a very nice 54mm figure but this one is a 28mm (more like 25mm I’d say) from Ebob Miniatures.  A really cool pose in my opinion.

Painted using mostly oils but with some acrylics too.  The blue shirt isn’t quite so shiny in the flesh but I think it’s been exaggerated by the flash bouncing back from the oil paint but I’m guessing.  The close-ups highlight a few things that need some touching up so will make amends and get the brush out later!

TIM

DSC_0828DSC_0815DSC_0814DSC_0816